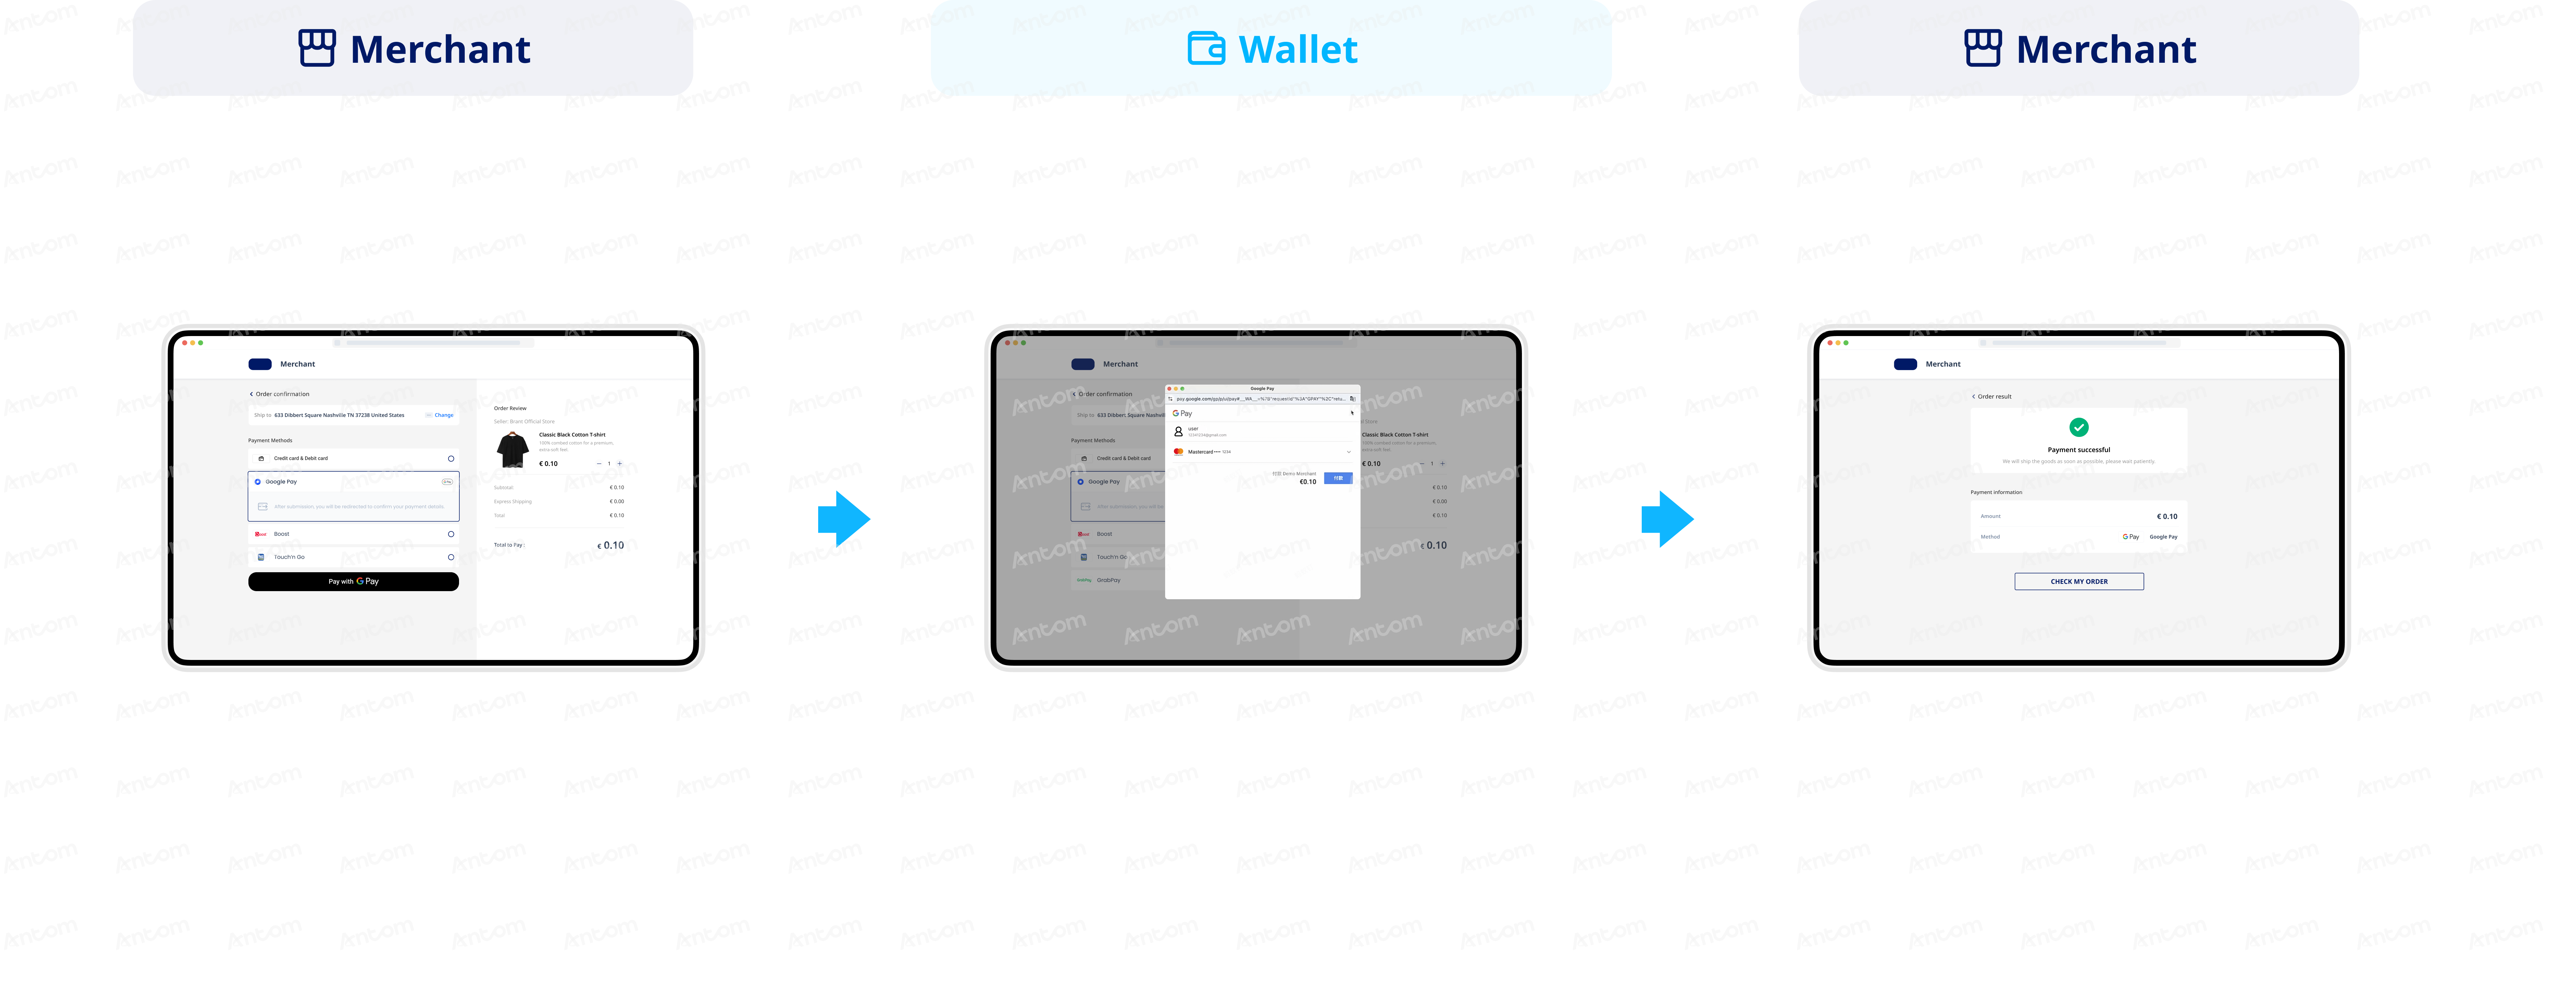
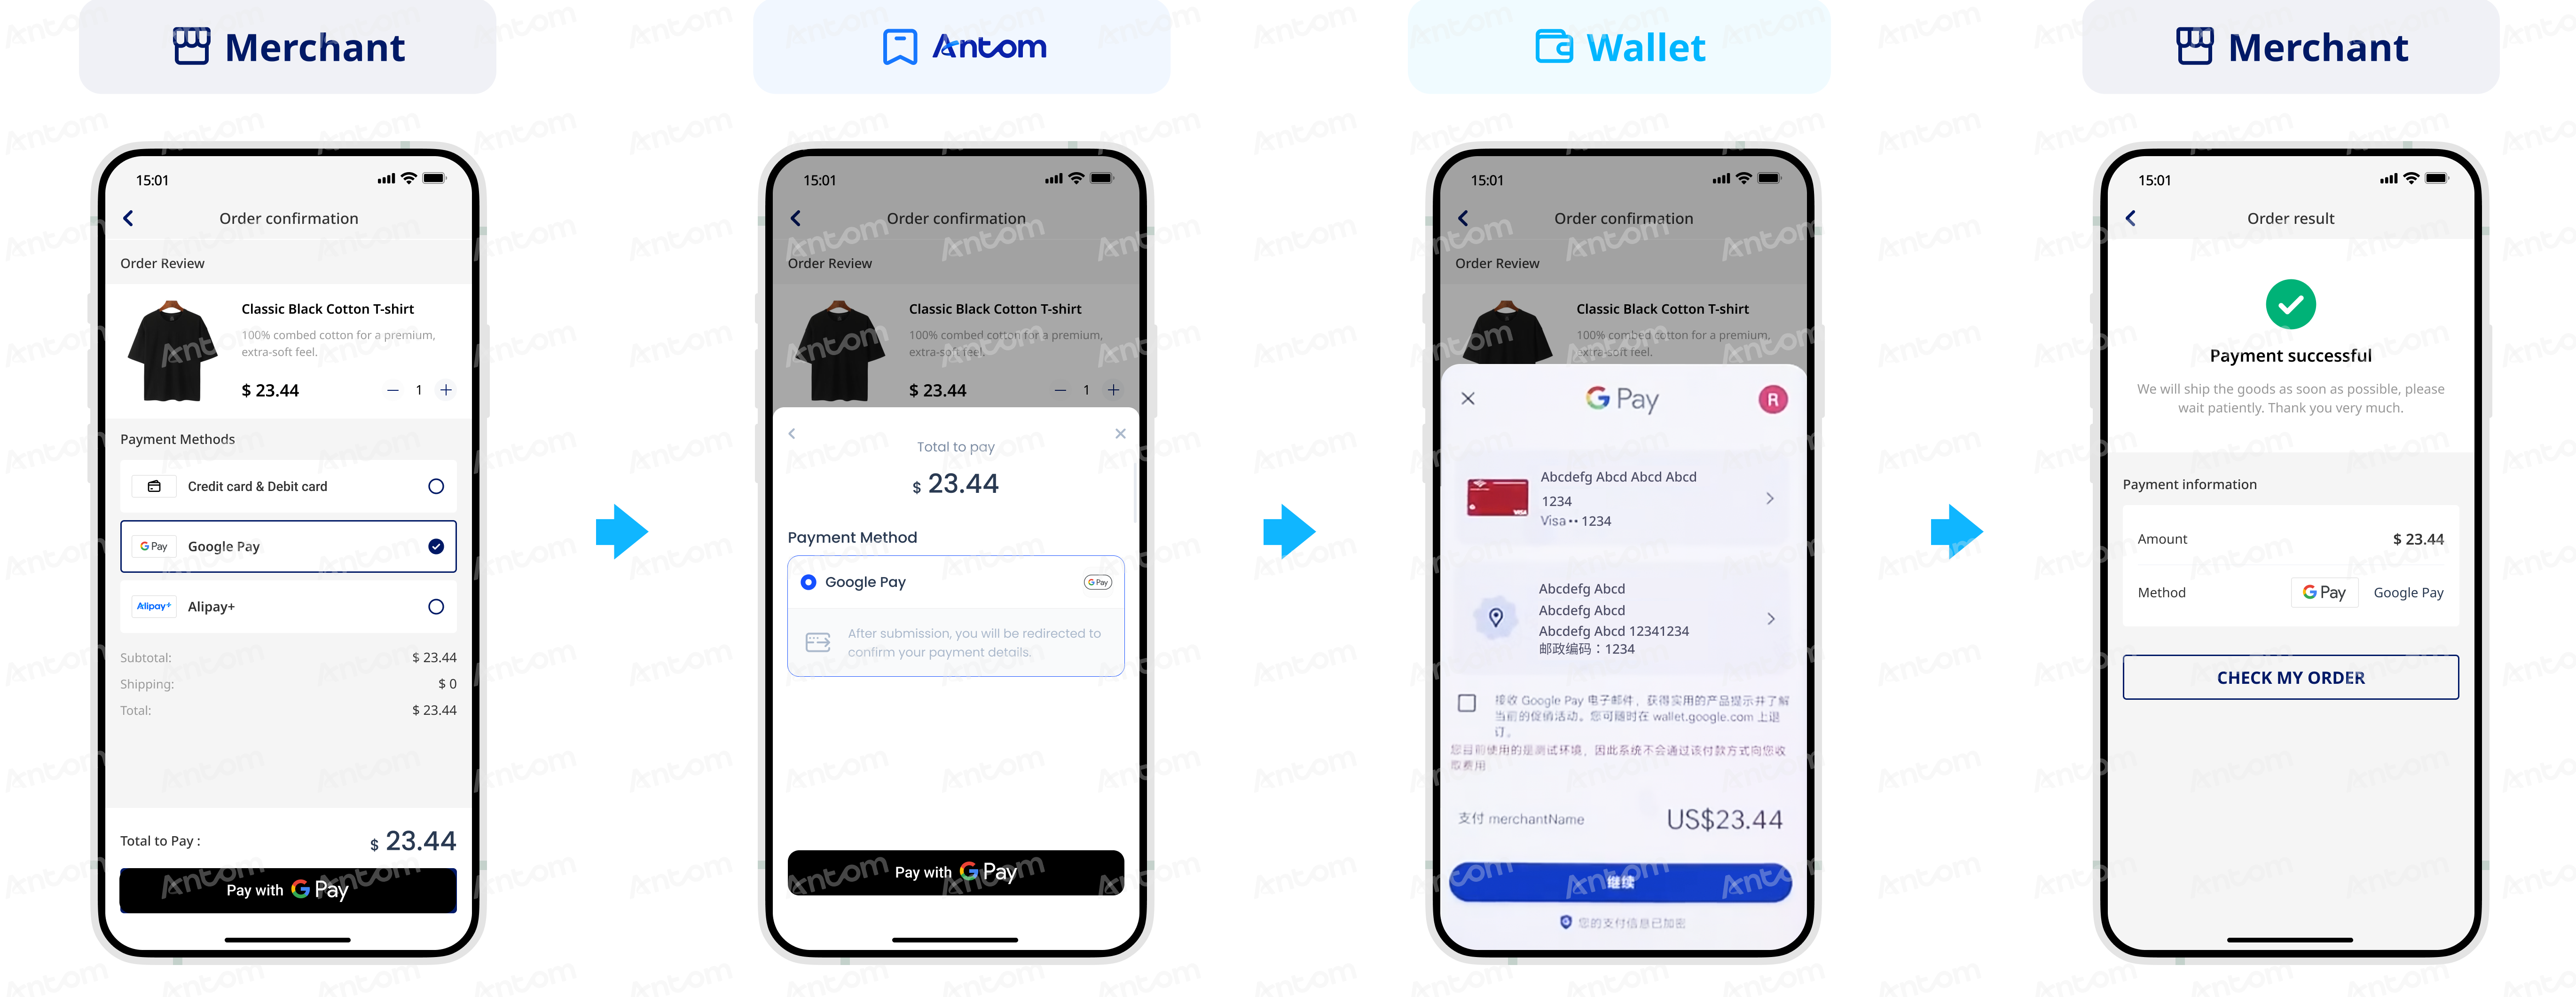
Through the Google Pay service, buyers can make payments using credit or debit cards stored in their Google accounts. With Antom Payment Element, you do not need to integrate the Google Pay SDK separately. Payment Element will automatically load Google Pay for you and can be configured to support Google Pay as an express payment method. The following figures demonstrate the user experience of paying with Google Pay: - Before using Payment Element, you must complete the onboarding and publishing process in the Google Pay Merchant Console:
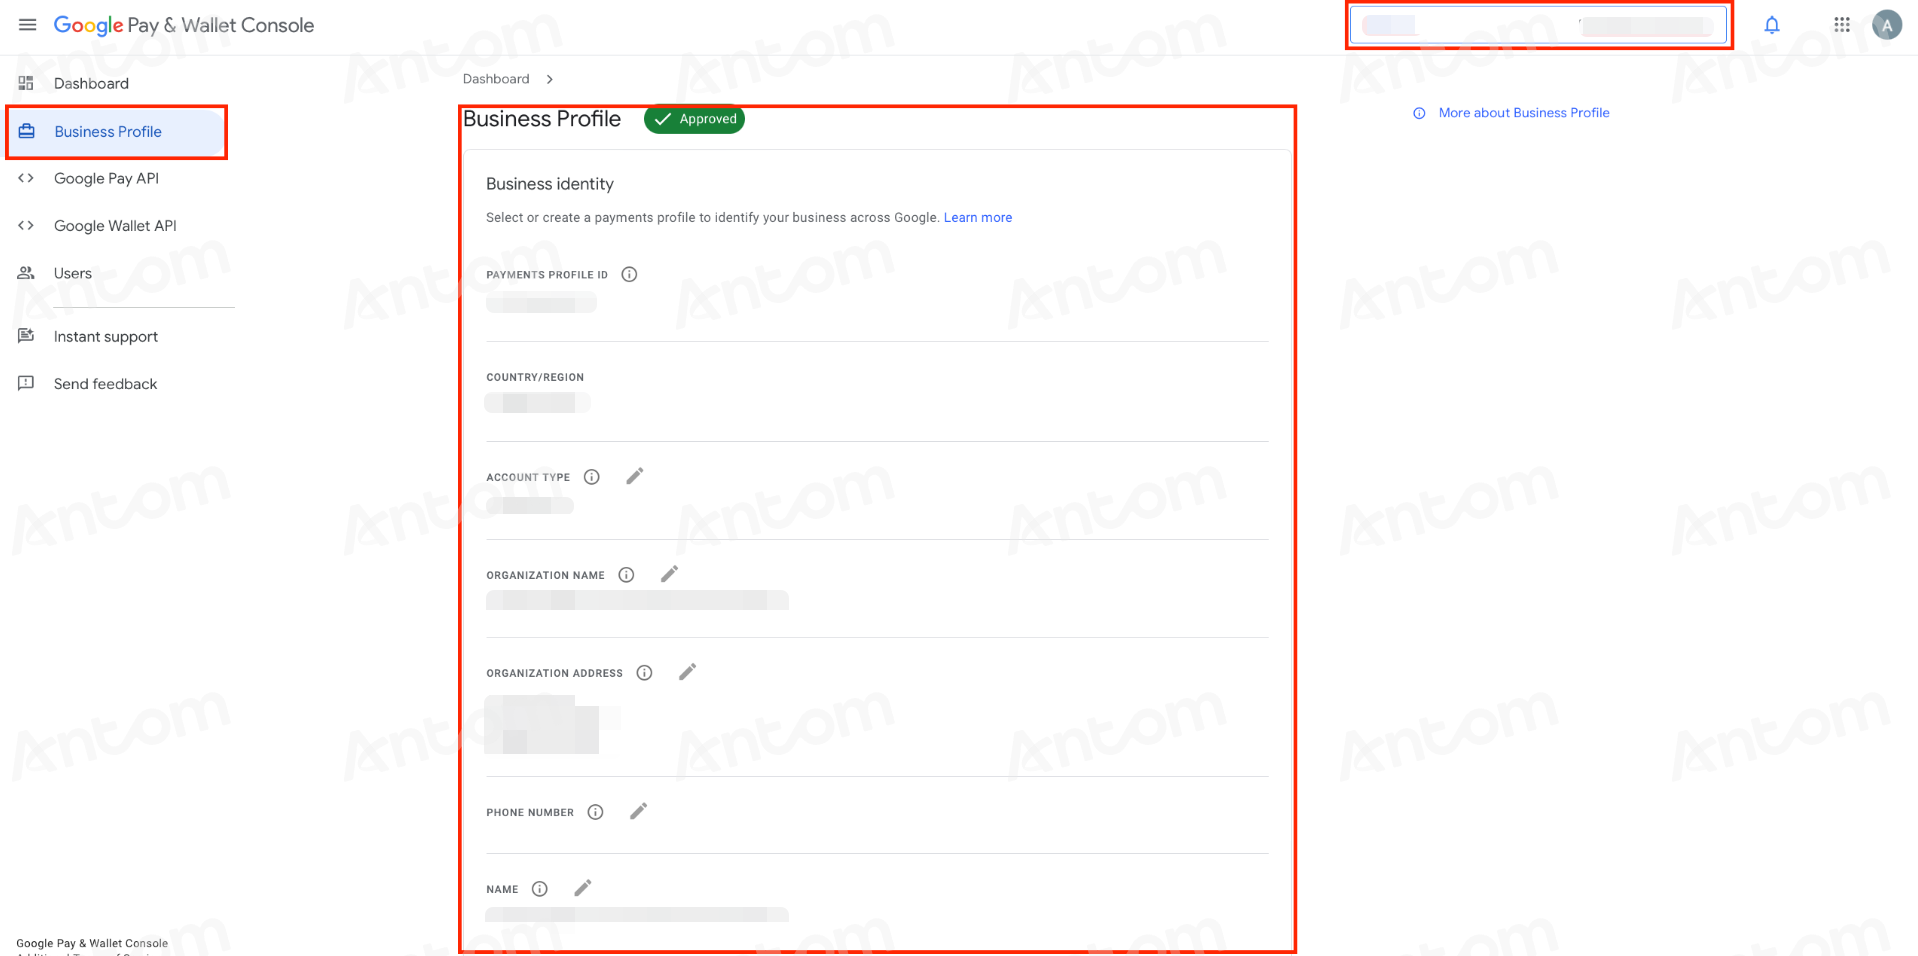
- Register an account and provide your business information as guided on the page. Your Google Pay ID is located in the upper-right corner of the console.
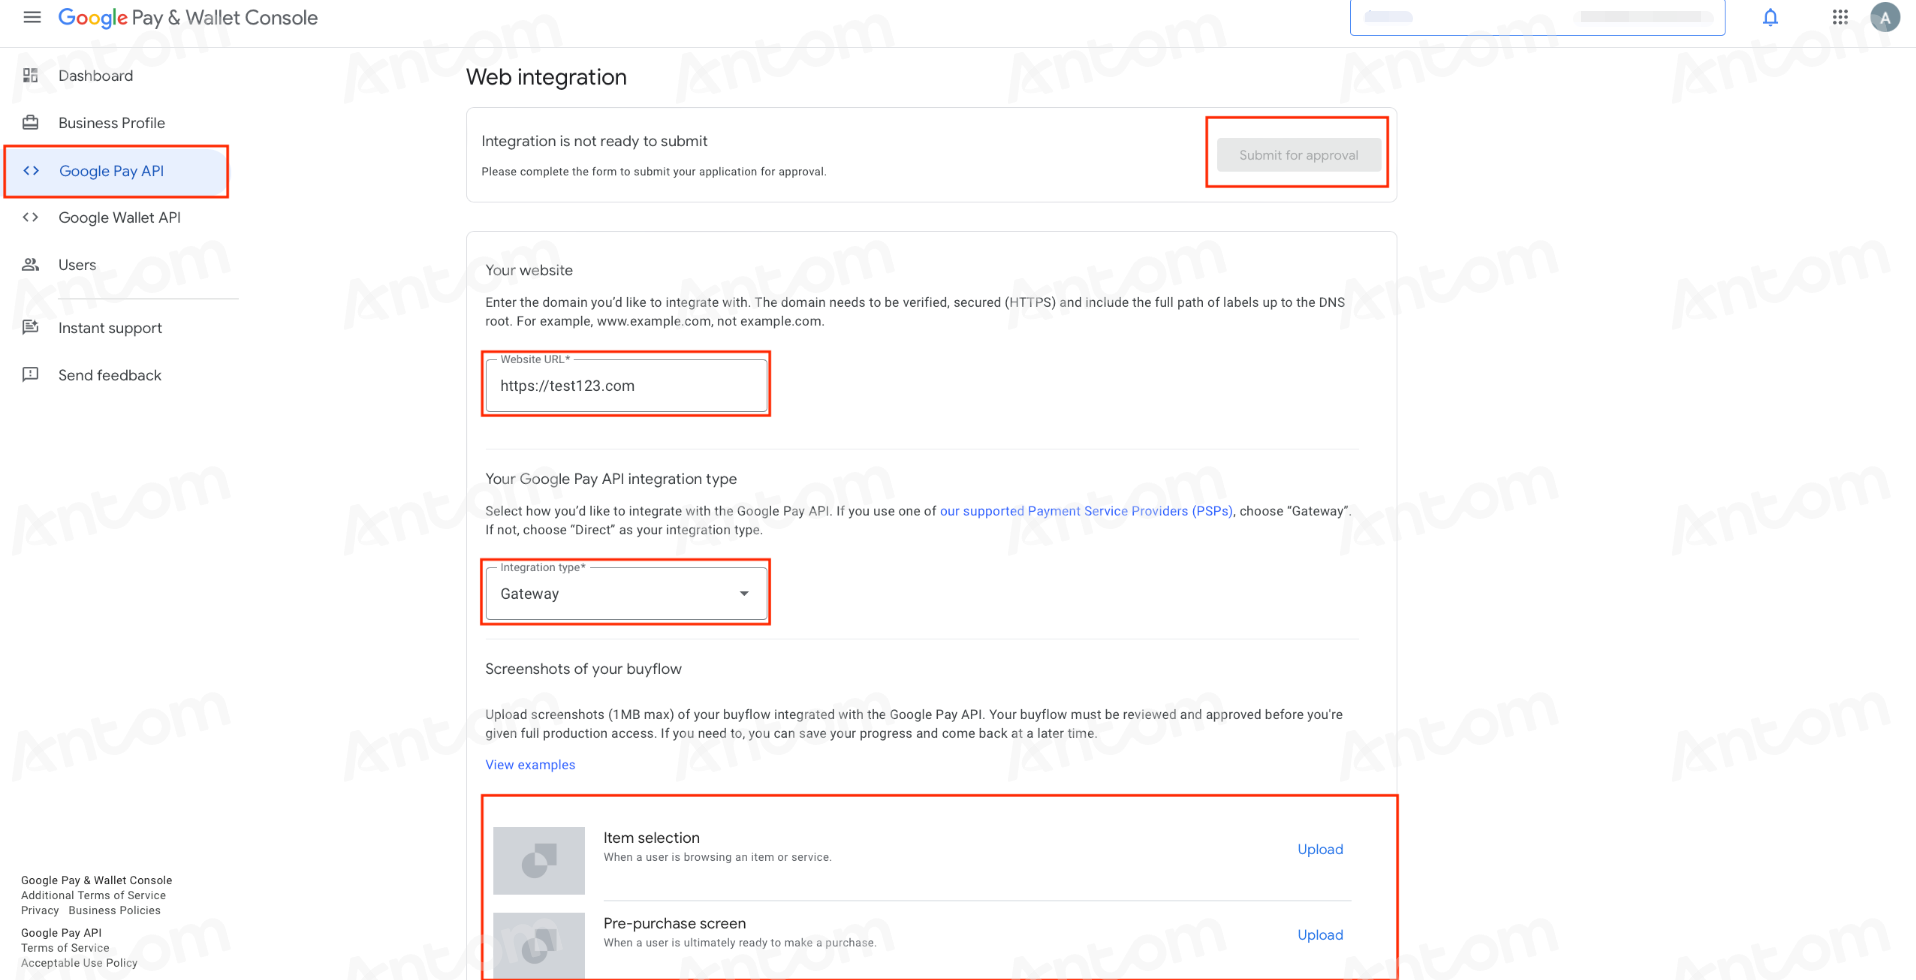
- Complete the Google Pay configuration as instructed:
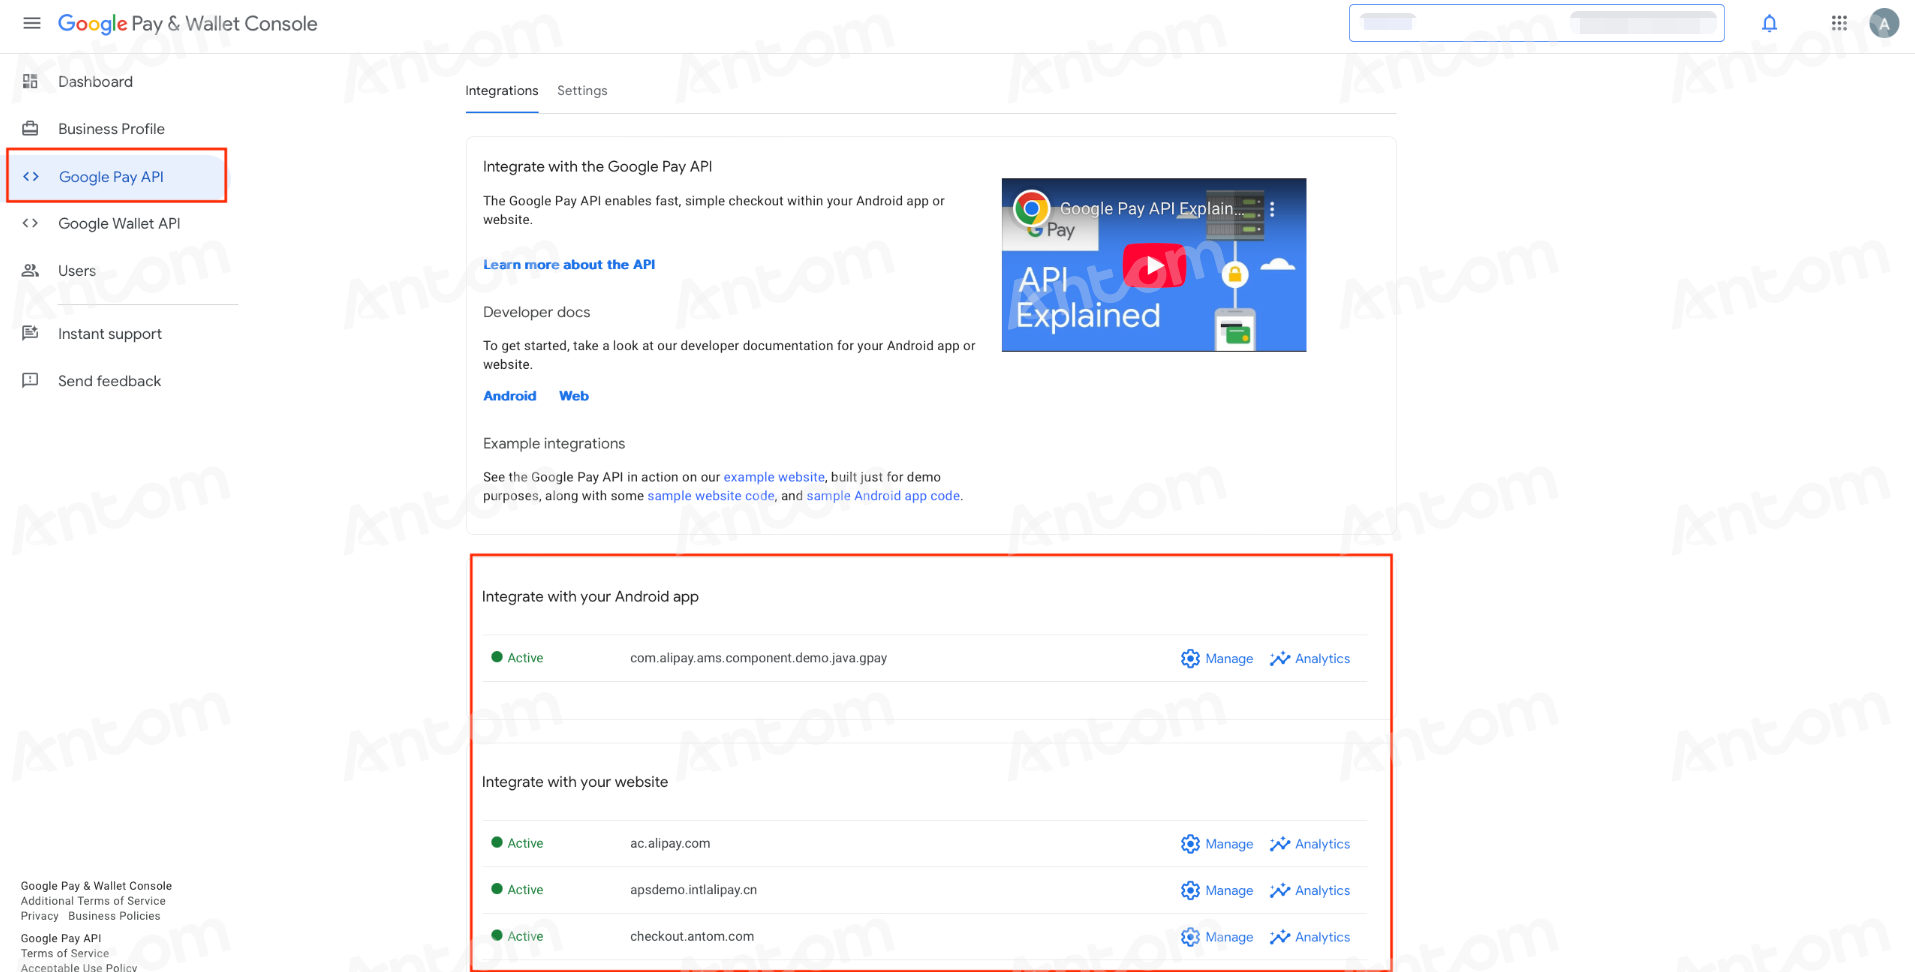
- Configure domain allowlists: To ensure payment security, you must authorize your business domain(s). In the console, navigate to Business Profile > Google Pay API. Under the Integrate with your website section, click + Add website to include all official domains of your website.
Note: Web Element is implemented using Google Pay’s JavaScript library and cannot be used directly within a WebView in mobile applications. The payment page must be opened in a mobile browser. - Before you start integrating, read Integration guide and API overview to understand the integration steps of the server-side API and the precautions for calling the API. Furthermore, ensure the following prerequisites are met:
- Obtained your client ID
- Complete the key configuration
- Complete the configuration of paymentNotifyUrl to receive the asynchronous notification
- Integrate the server-side SDK package, install the server-side library, and initialize a request instance. For more details, refer to Server-side SDKs.
- Integrate the client-side SDK package by following the steps detailed in Integrate the SDK package for Web/WAP, and ensure to use the latest SDK version or no lower than 1.46.0.
Start your integration by taking the following steps:
- Create a payment session
- Invoke Payment Element
- Obtain the payment result
- Capture
Step 1: Create a payment session
Server-side
Call the createPaymentSession (One-time Payments) API with order information to create a payment session and obtain the paymentSessionData required to invoke Payment Element. You can choose to either render Google Pay by specifying it yourself or use the Payment Element-rendered payment method list. Step 2: Invoke Payment Element
Client-side
Follow Step 2: Invoke Payment Element to use paymentSessionData to invoke Payment Element on your client. After the buyer clicks to submit payment, Payment Element will handle the entire flow based on the selected payment method, including displaying QR codes, redirecting to payment pages, performing 3DS authentication, and returning to the merchant’s result page. Step 3: Obtain the payment result
Server-side
After the buyer completes payment or the payment times out, you can obtain the payment result either by receiving asynchronous notifications from Antom or by proactively querying the result. For detailed steps, refer to Obtain the payment result. Step 4: Capture
Server-side
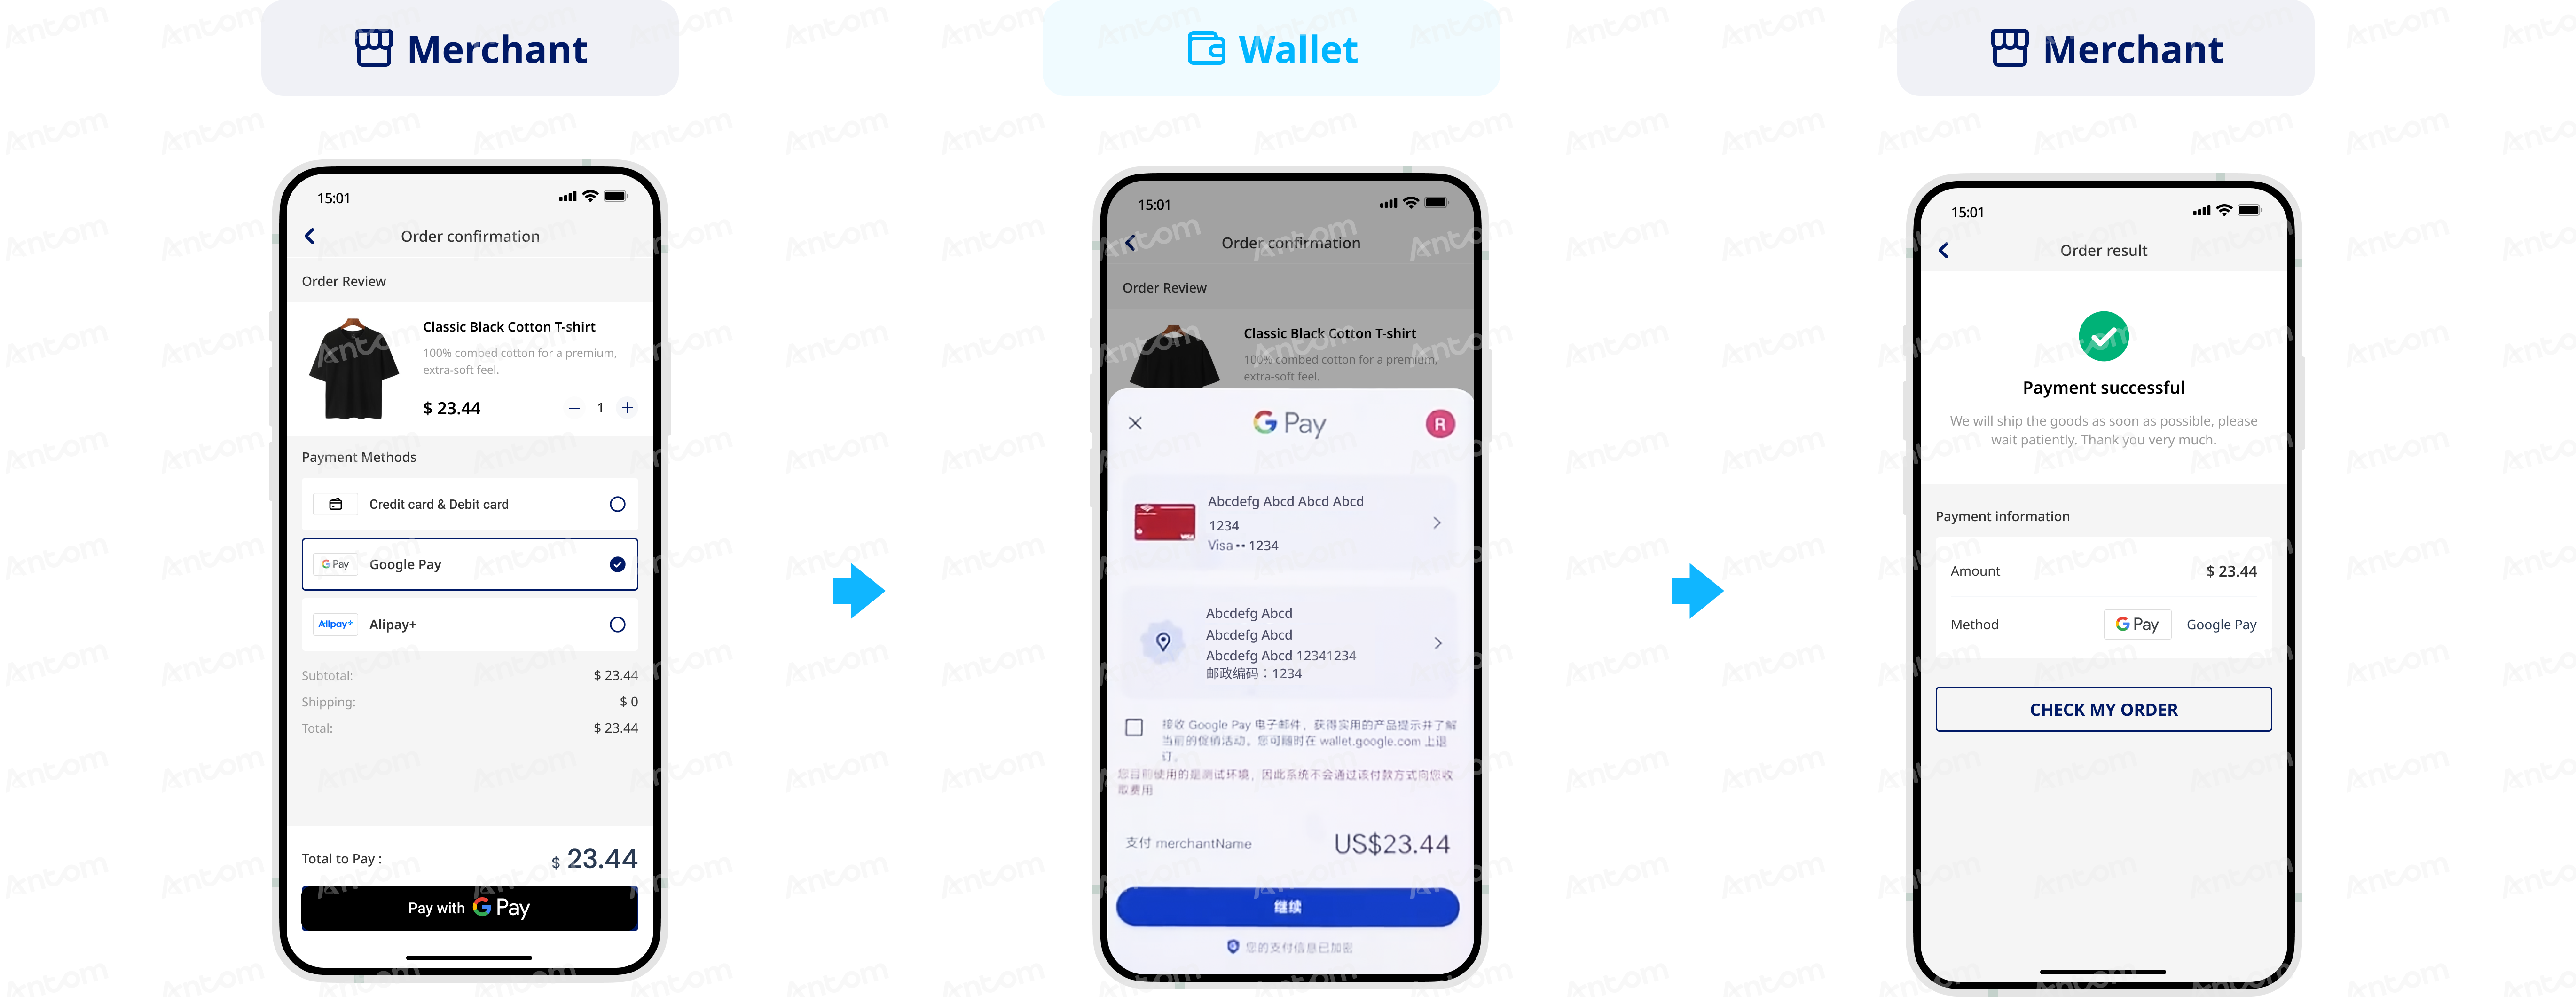
Antom provides both automatic and manual capture methods. You can choose based on your business needs. After initiating capture, you can obtain the result via asynchronous notification or active inquiry. You should decide whether to ship goods based on the capture result. For specific operations, refer to Capture. The following figures demonstrate the user experience of paying with Google Pay: - Before using Payment Element, you must complete the onboarding and publishing process in the Google Pay Merchant Console:
- Register an account and provide your business information as guided on the page. Your Google Pay ID is located in the upper-right corner of the console.
- Complete the Google Pay configuration as instructed:
- Publish the application to Google Play according to Google Pay's requirements.
- Before you start integrating, read Integration guide and API overview to understand the integration steps of the server-side API and the precautions for calling the API. Furthermore, ensure the following prerequisites are met:
- Obtained your client ID
- Complete the key configuration
- Complete the configuration of paymentNotifyUrl to receive the asynchronous notification
- Integrate the server-side SDK package, install the server-side library, and initialize a request instance. For more details, refer to Server-side SDKs.
- Integrate the client-side SDK package by following the steps detailed in Integrate the SDK package for Android. Ensure to use the latest SDK version or no lower than 1.46.0, and use target API level 24 or later.
- Integrate the Antom Google Pay plugin:
- Maven integration: Add the dependency to the build.gradle file using the following code:
dependencies {
  implementation 'com.alipay.antom.sdk:plugin-googlepay:1.0.0'
}
- Manual integration: Contact Antom Technical Support to obtain the Google Pay .aar file. After adding the Google Pay plugin, you also need to add the official Google SDK to the build.gradle file to ensure that the required resources are correctly referenced. For more information, see Manual integration.
dependencies {
  // 18.1.3 is an example version number. Select the appropriate version based on your actual requirements
  implementation 'com.google.android.gms:play-services-wallet:18.1.3'
}
Start your integration by taking the following steps:
- (Optional) Preload the SDK
- Create a payment session
- Invoke Payment Element
- Obtain the payment result
- Capture
(Optional) Step 1: Preload the SDK
Client-side
Before creating a payment session, it is highly recommended that you preload the SDK to improve the rendering speed of the checkout page, reducing the waiting time for buyers during the payment. Follow the code example below to perform the preloading:
AMSPaymentElement.preload(getApplicationContext());
Step 2: Create a payment session
Server-side
Call the createPaymentSession (One-time Payments) API with order information to create a payment session and obtain the paymentSessionData required to invoke Payment Element. You can choose to either render Google Pay by specifying it yourself or use the Payment Element-rendered payment method list. Step 3: Invoke Payment Element
Client-side
Follow Step 3: Invoke Payment Element to use paymentSessionData to invoke Payment Element on your client. After the buyer clicks to submit payment, Payment Element will handle the entire flow based on the selected payment method, including displaying QR codes, redirecting to payment pages, performing 3DS authentication, and returning to the merchant’s result page. Step 4: Obtain the payment result
Server-side
After the buyer completes payment or the payment times out, you can obtain the payment result either by receiving asynchronous notifications from Antom or by proactively querying the result. You should decide whether to ship goods based on the capture result. For detailed steps, refer to Obtain the payment result. Step 5: Capture
Server-side
Antom provides both automatic and manual capture methods. You can choose based on your business needs. After initiating capture, you can obtain the result via asynchronous notification or active inquiry. For specific operations, refer to Capture. After completing the payment, you can perform the following actions:
For successful payments, if the buyer requests cancellation or a refund on the same day, you can use Antom’s cancellation capability to cancel the order or release funds. Orders not yet completed can also be cancelled directly. For details, refer to Cancel. Different payment methods have varying refund capabilities. To learn about Antom refund rules and how to initiate a refund for a successful transaction, refer to Refund. Antom also offers the following customization options:
- Specify payment methods: You can use API parameters to define which payment methods are displayed in Payment Element, control the order of the payment method list, and configure the display of express payment options.
- Payment method features: Learn about the characteristics of APM and card payments.