
APM payments
Deprecation Notice:
The content of this guide has been deprecated.
We recommend you adopt the Payment Element integration for improved experience.
We recommend you adopt the Payment Element integration for improved experience.
Antom SDK is a pre-built UI component that simplifies the process of integrating Antom payment services. This component offers a simple and quick way to integrate all payment methods supported by Antom, including credit cards, digital wallets, bank transfers, online banking, and more.
The SDK component can automatically adapt to the buyer's device and location, performing tasks such as information collection, redirection, switching between apps, displaying QR codes, and more based on the characteristics of the payment method. You can easily provide a comprehensive payment solution on your website or application, saving a significant amount of time and resources required to build each payment API and process.
Web/WAP
iOS
Android
User experience
The following figures show the user journey of paying on a shopping website or mobile web app:
Web
WAP
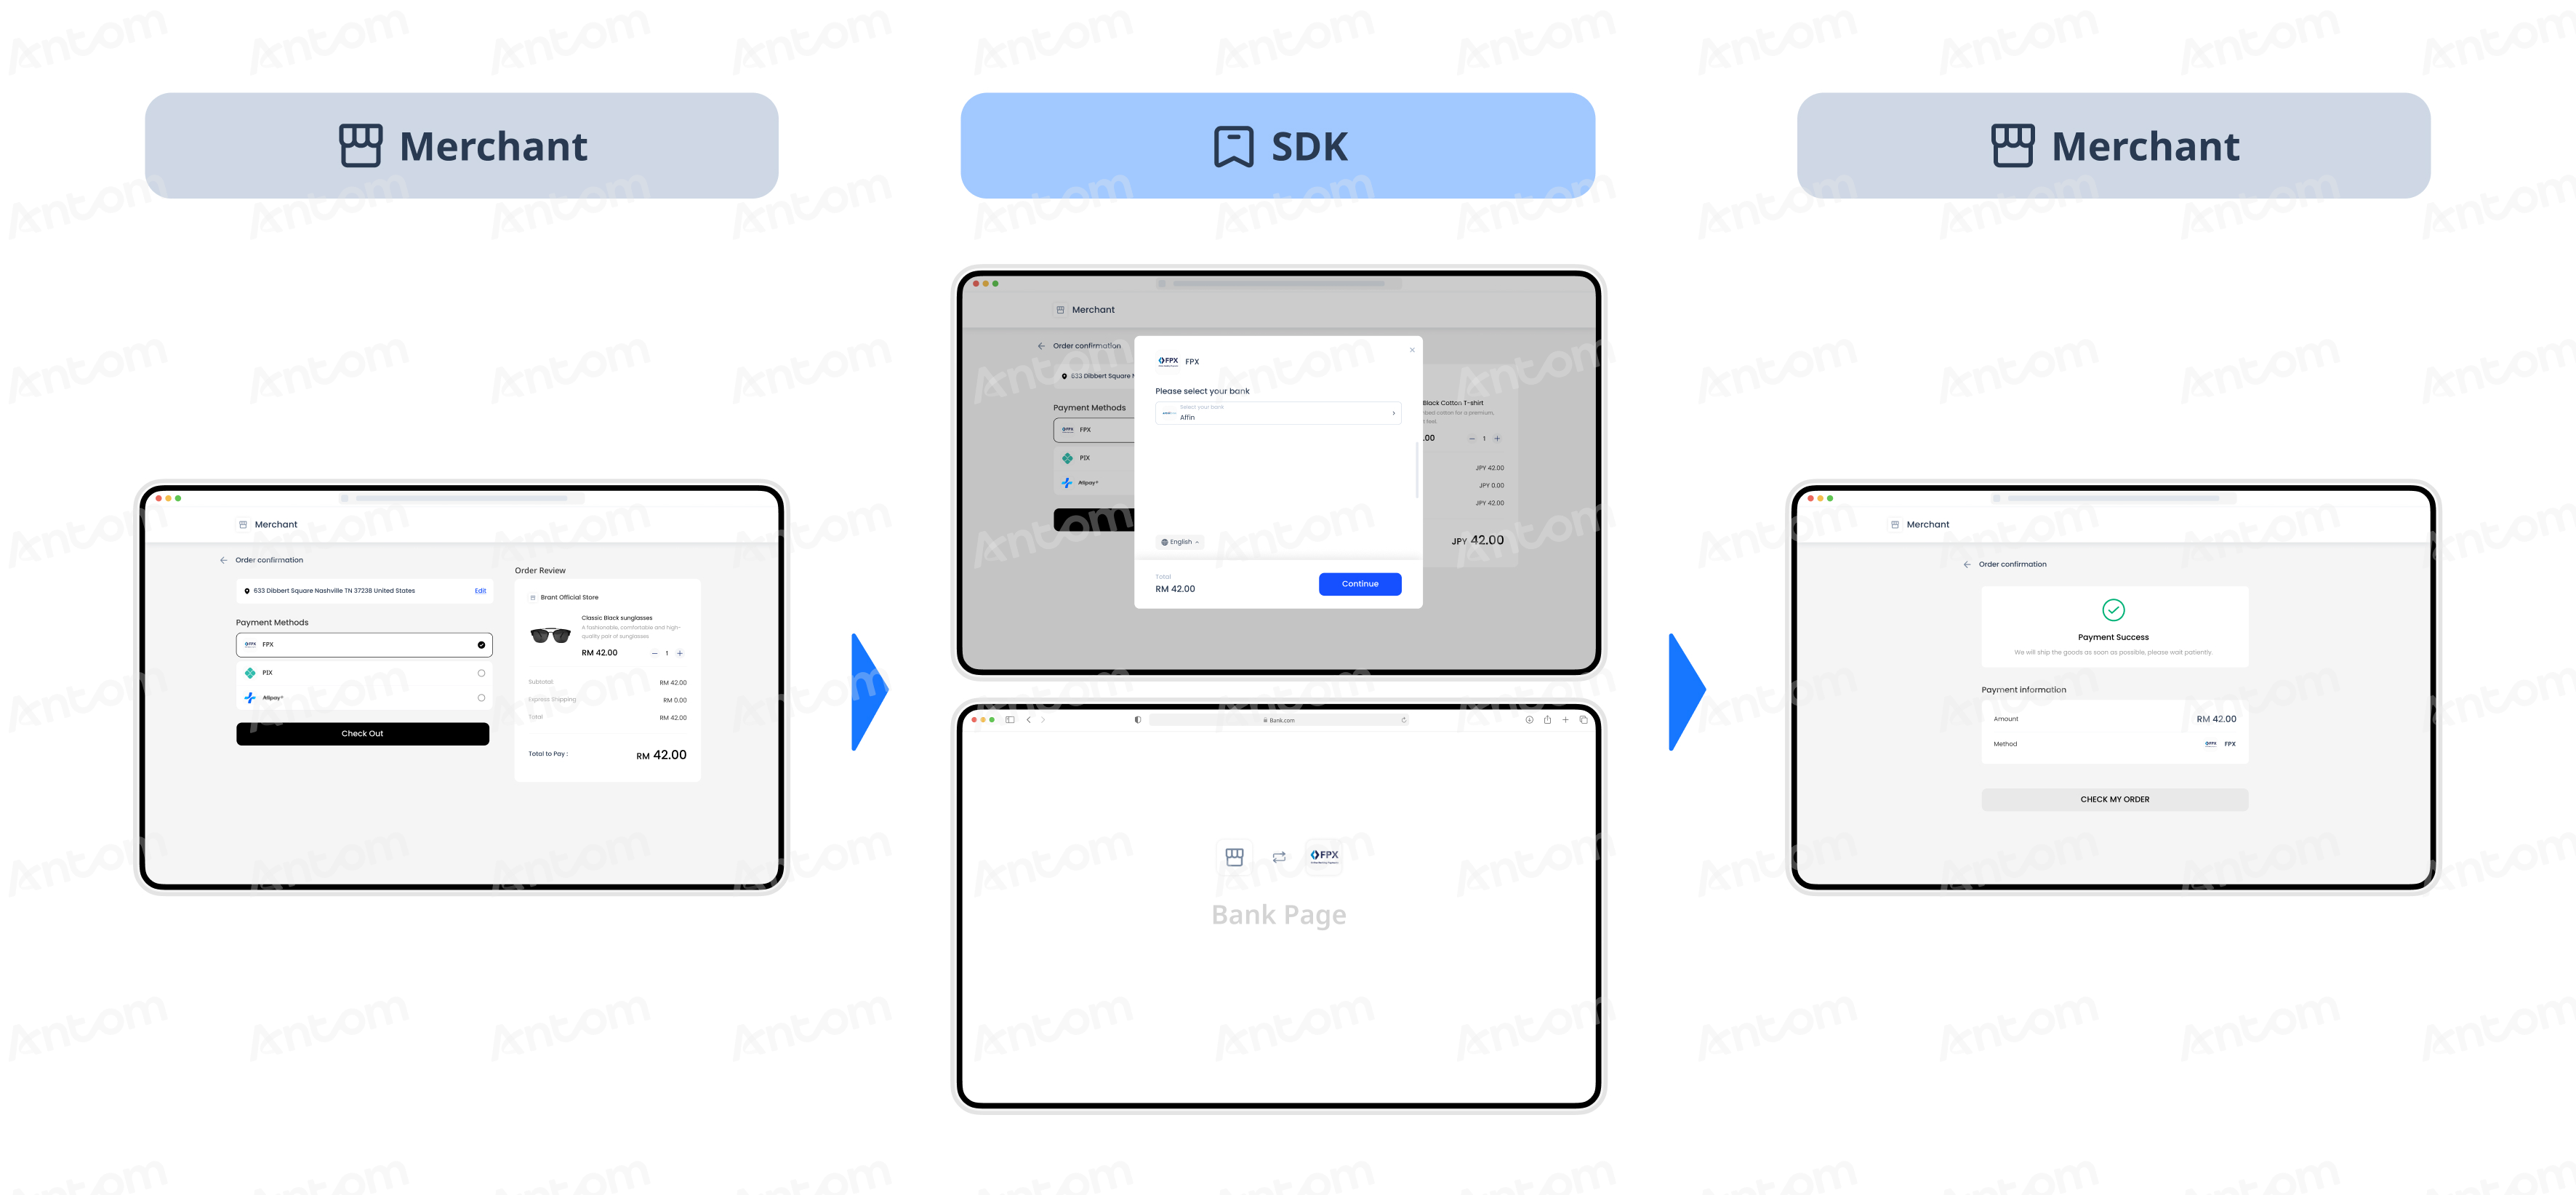
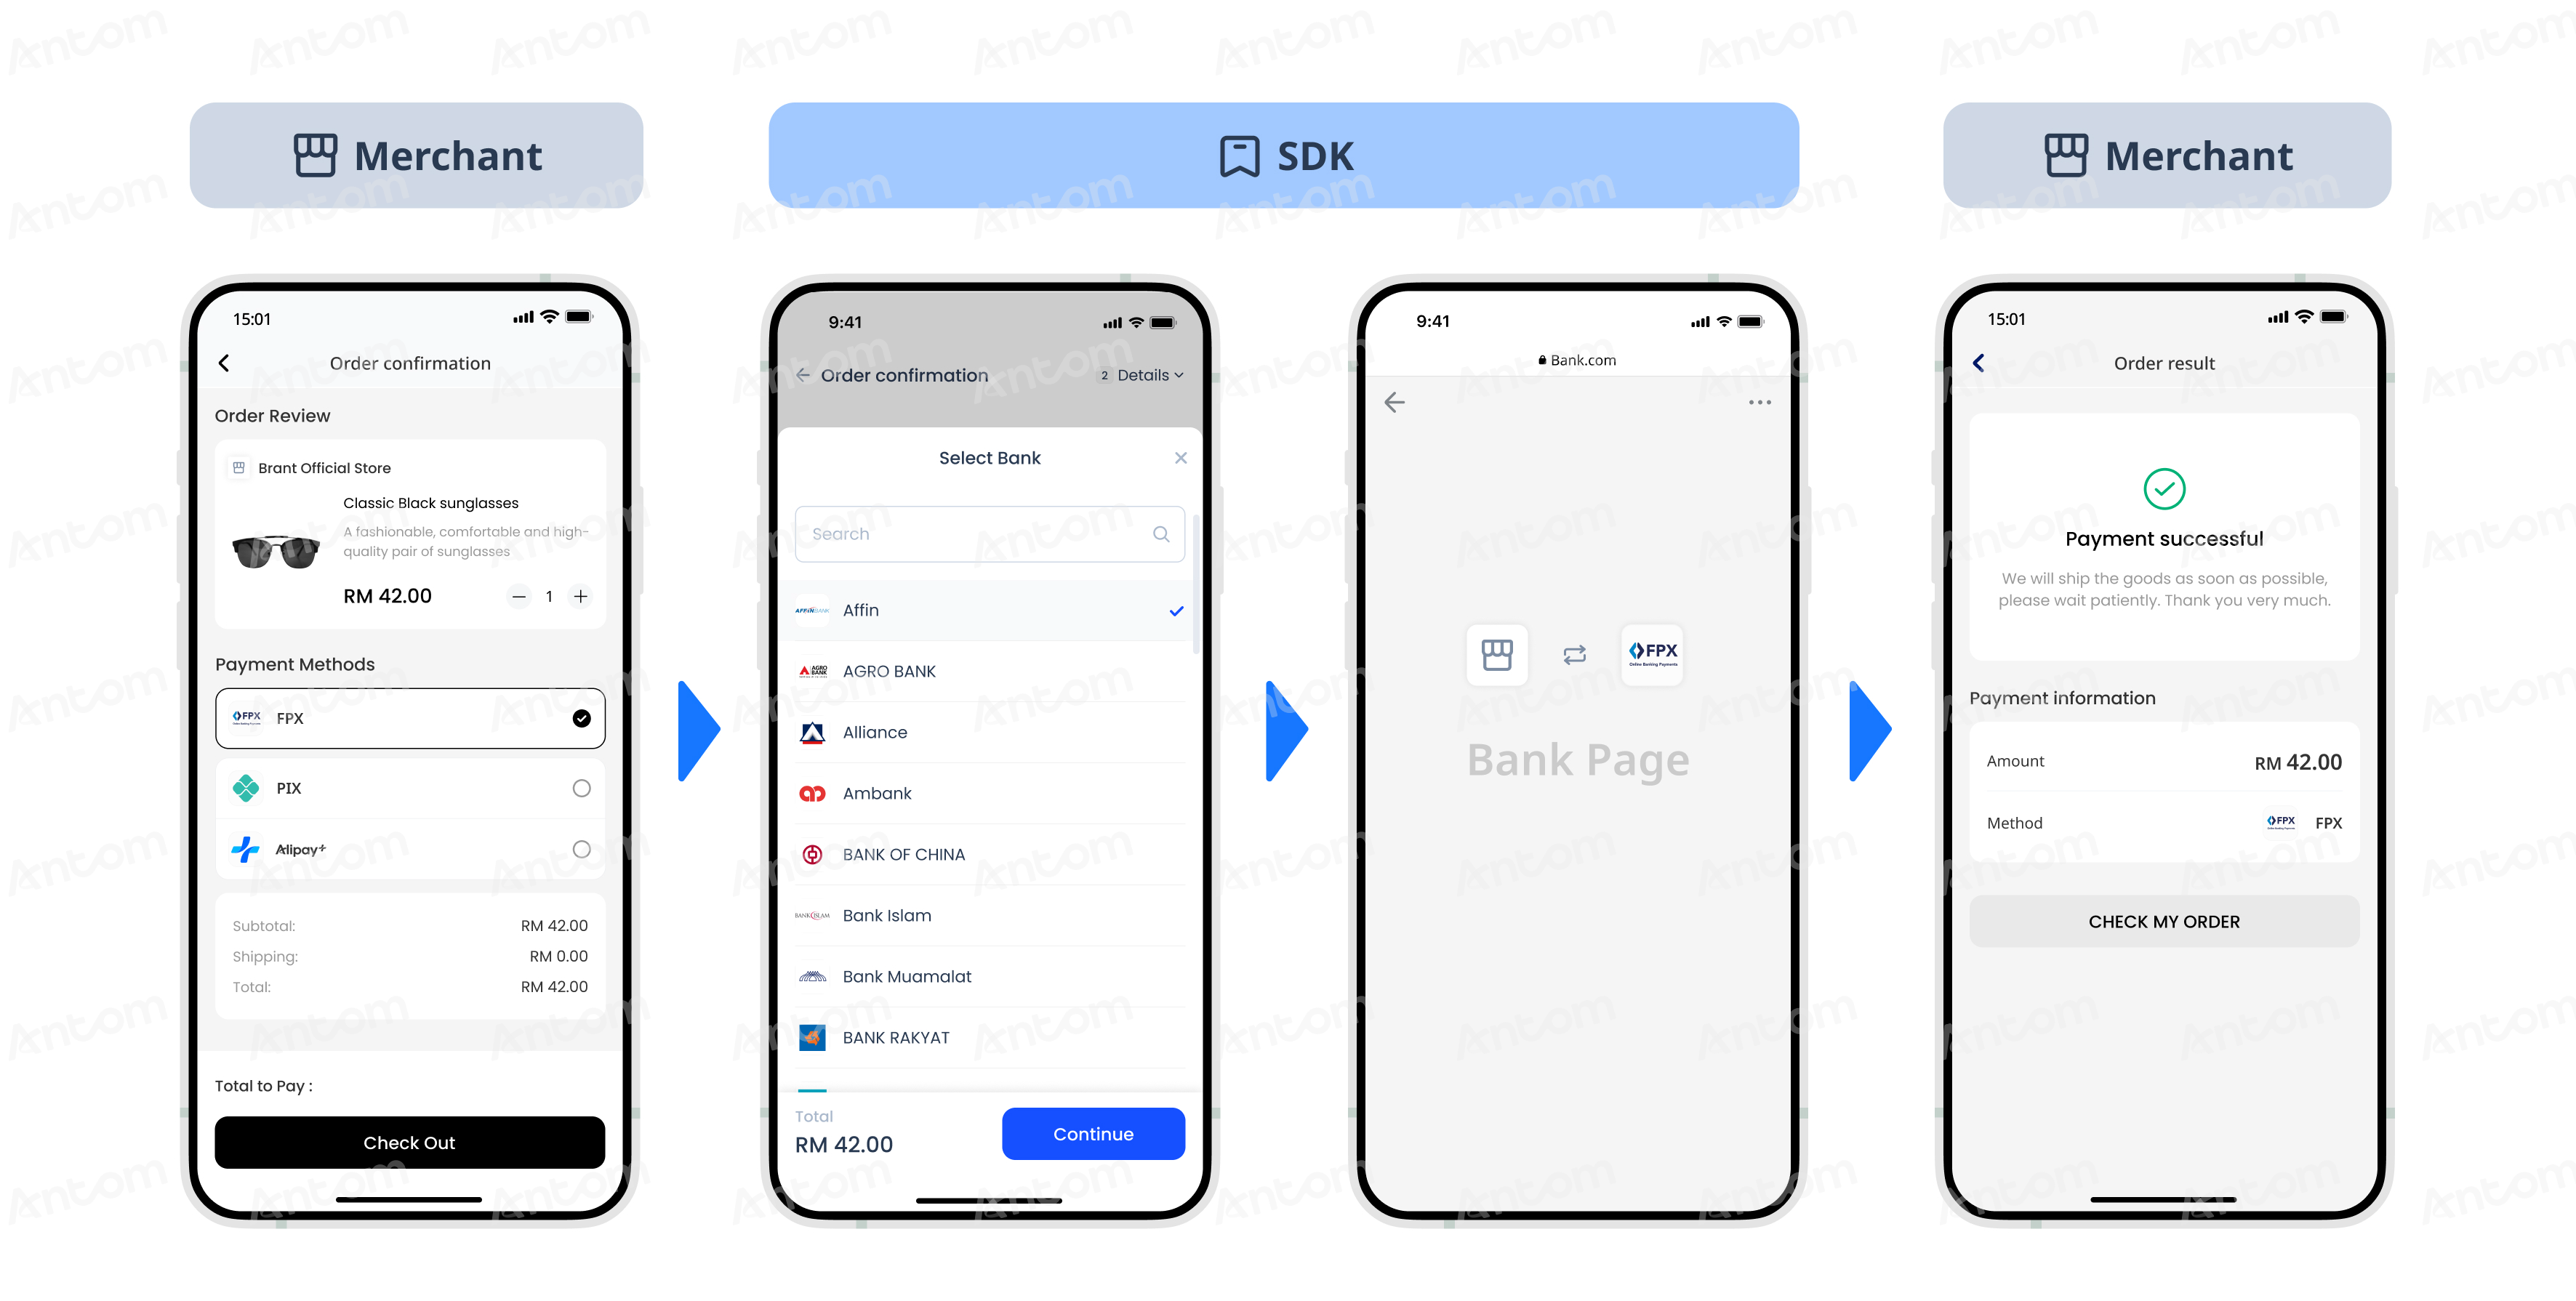
Payment flow
For each payment method, the payment flow is composed of the following steps:
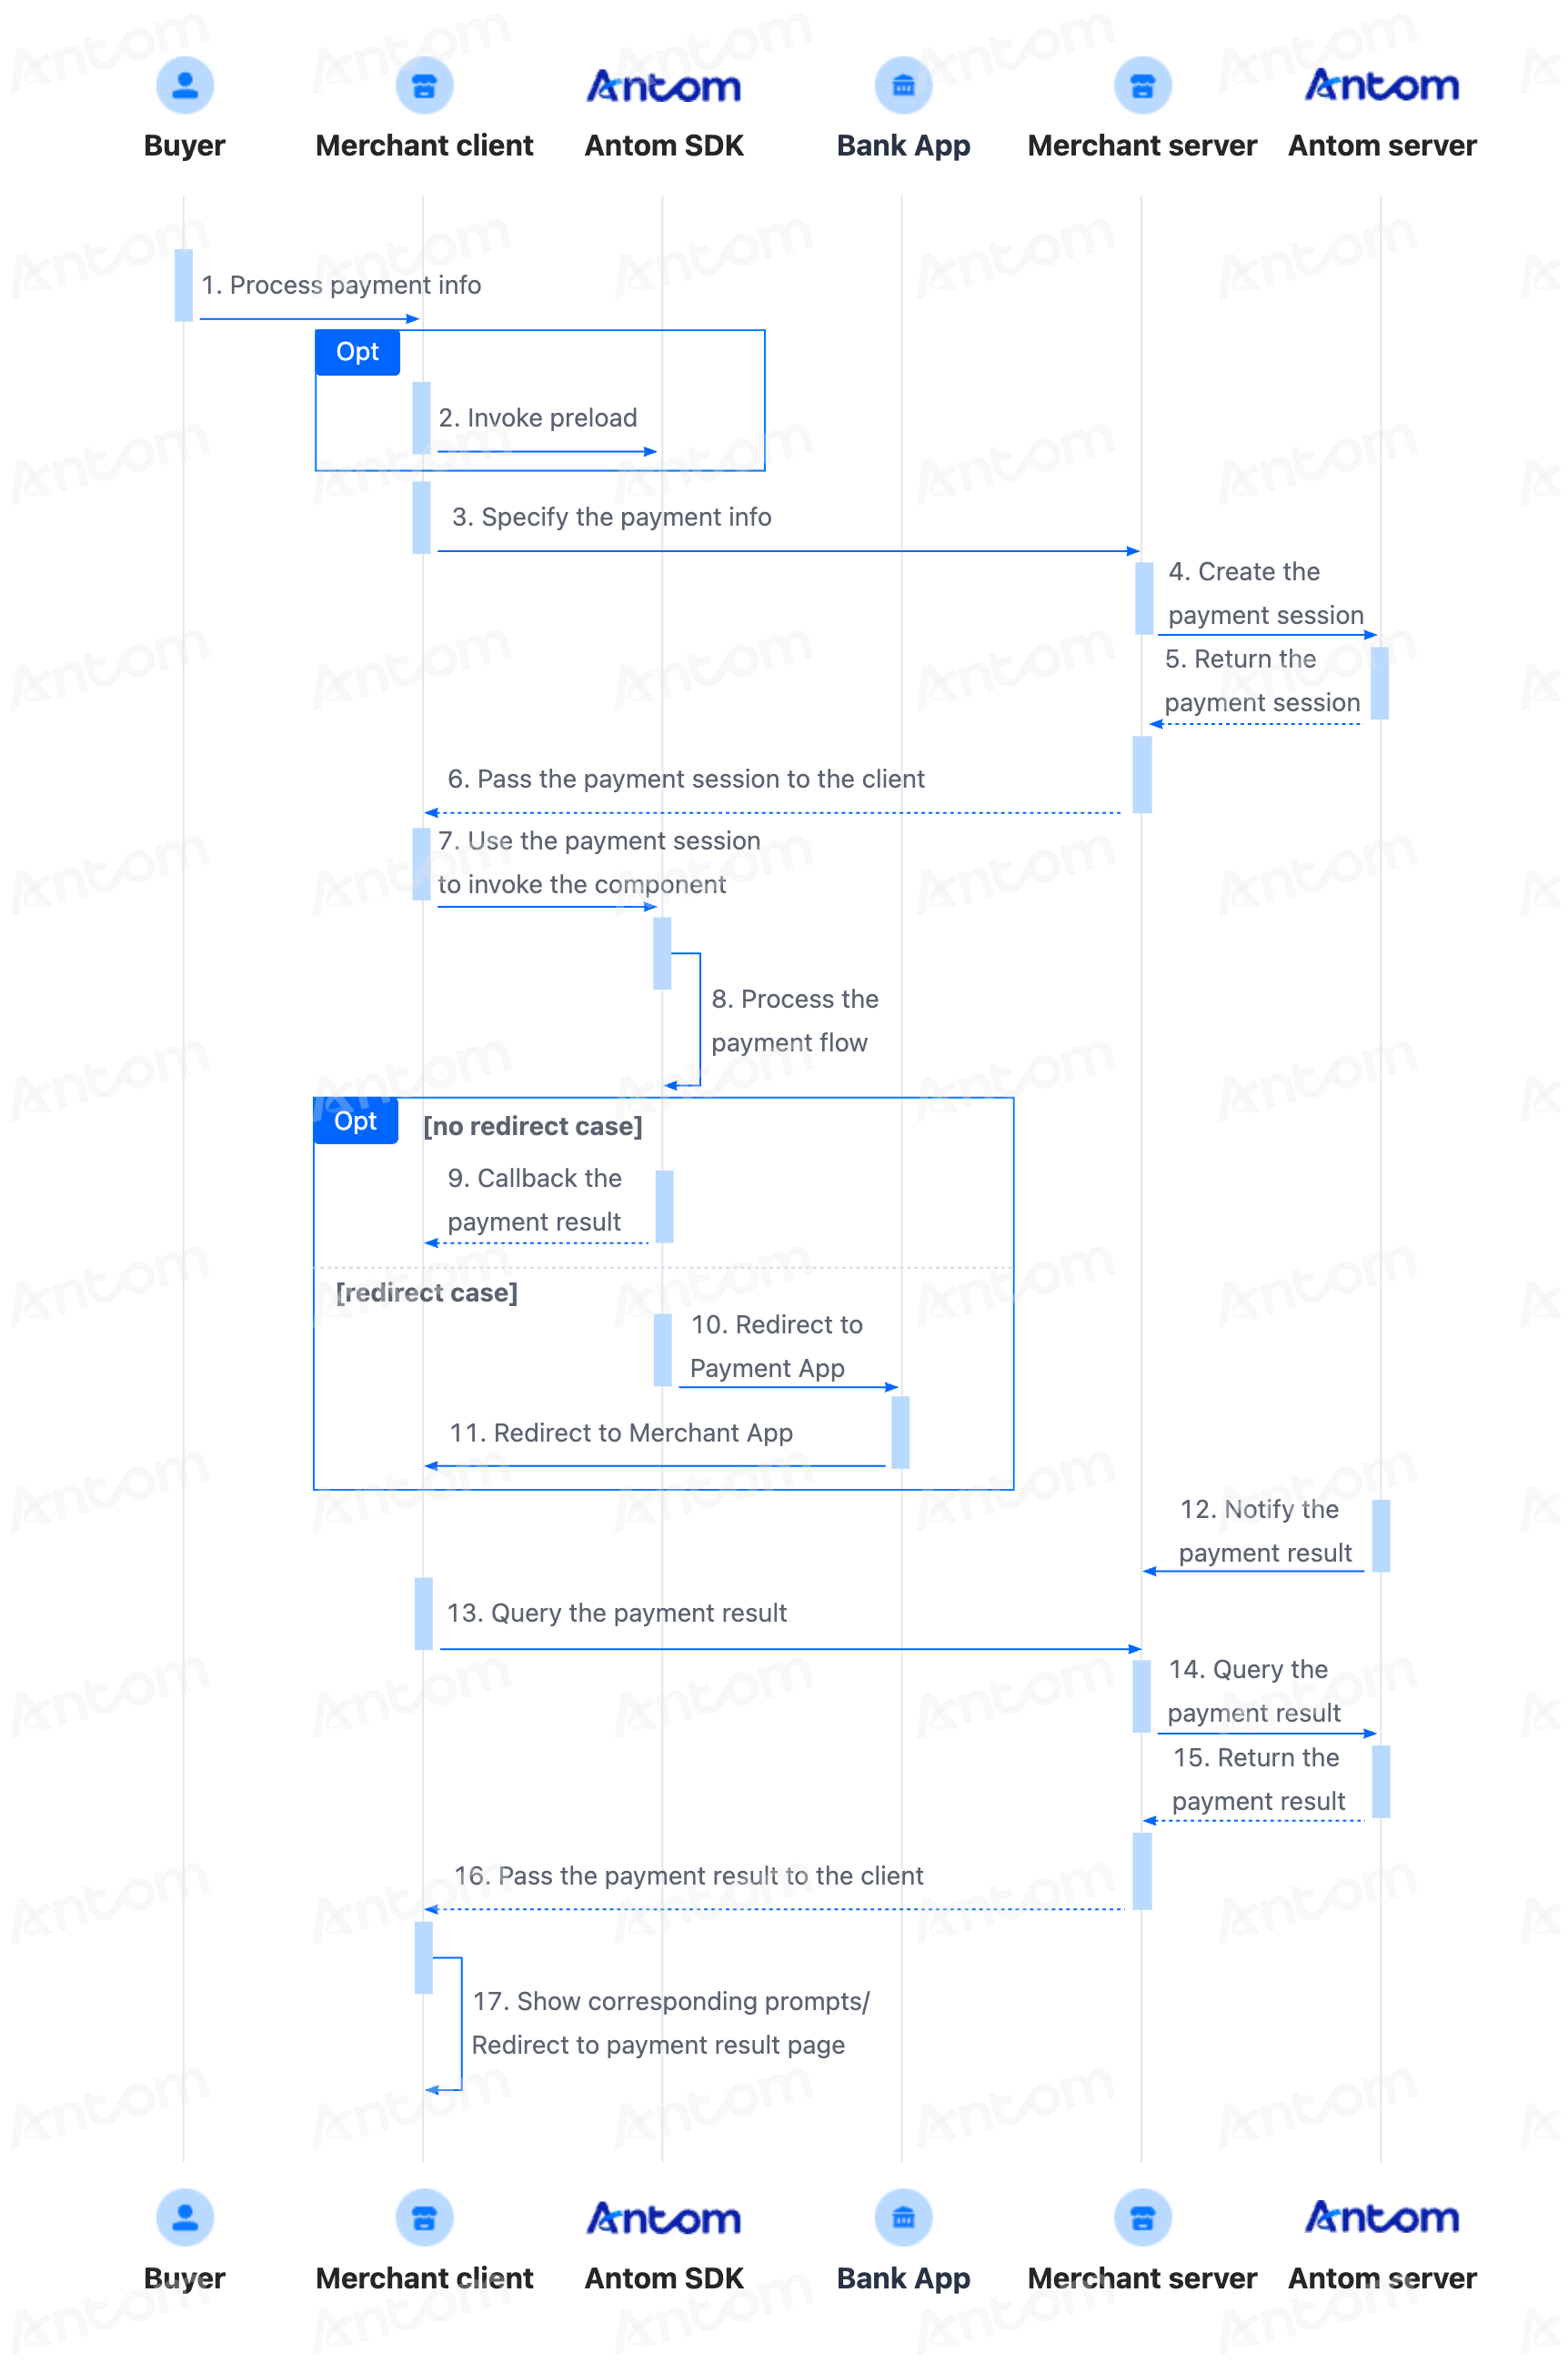
- The buyer lands on the checkout page.
- Create a payment session request.
After the buyer selects a payment method and submits the order, you can obtain the payment session by calling the createPaymentSession (One-time Payments). - Invoke the client SDK.
On the client side, invoke the SDK through the payment session. The SDK will handle information collection, redirection, app invocation, QR code display, verification, and other processes based on the payment method's characteristics. Then the SDK will callback the payment result viaonEventCallbackor redirect to your payment result page. - Confirm the payment result.
Obtain the payment result by using one of the following two methods:
- Asynchronous notification: Specify paymentNotifyUrl in the createPaymentSession (One-time Payments) API to set the address for receiving asynchronous notifications. When the payment is successful or expires, Antom will use notifyPayment to send asynchronous notifications to you.
- Synchronous inquiry: Call the inquiryPayment API to check the payment status.
Integration preparations
Before you start integrating, read the Integration guide and API overview to understand the integration steps of the server-side API and the precautions for calling the API. Furthermore, ensure the following prerequisites are met:
- Obtained your client ID
- Complete the key configuration
- Complete the configuration of paymentNotifyUrl to receive the asynchronous notification
- Integrate the server-side SDK package, install the server-side library, and initialize a request instance. For more details, refer to Server-side SDKs.
- Integrate the client-side SDK package by following the steps of Integrate the SDK package for Web/WAP.
Integration steps
Start your integration by taking the following steps:
- Create a payment session
- Create and invoke the SDK
- Obtain payment result
Step 1: Create a payment session Server-side
When a buyer selects a payment method provided by Antom, you need to collect key information such as the payment request ID, order amount, payment method, order description, payment redirect URL, and payment result notification URL, call the createPaymentSession (One-time Payments) API to create a payment session, and return the payment session to the client.
Creating a payment session includes the following parameters:
The above parameters are the basic parameters for creating a payment session, for full parameters and additional requirements for certain payment methods please refer to createPaymentSession (One-time Payments).
private static void createPaymentSession() {
  AlipayPaymentSessionRequest alipayPaymentSessionRequest = new AlipayPaymentSessionRequest();
  alipayPaymentSessionRequest.setProductCode(ProductCodeType.CASHIER_PAYMENT);

  // replace with your paymentRequestId
  String paymentRequestId = UUID.randomUUID().toString();
  alipayPaymentSessionRequest.setPaymentRequestId(paymentRequestId);

  // set amount
  Amount amount = Amount.builder().currency("SGD").value("4200").build();
  alipayPaymentSessionRequest.setPaymentAmount(amount);

  // set paymentMethod
  PaymentMethod paymentMethod = PaymentMethod.builder().paymentMethodType("SHOPEEPAY_SG").build();
  alipayPaymentSessionRequest.setPaymentMethod(paymentMethod);

  // replace with your orderId
  String orderId = UUID.randomUUID().toString();

  // set buyer info
  Buyer buyer = Buyer.builder().referenceBuyerId("yourBuyerId").build();

  // set order info
  Order order = Order.builder().referenceOrderId(orderId)
      .orderDescription("antom testing order").orderAmount(amount).buyer(buyer).build();
  alipayPaymentSessionRequest.setOrder(order);

  // replace with your notify url
  alipayPaymentSessionRequest.setPaymentNotifyUrl("https://www.yourNotifyUrl.com");

  // replace with your redirect url
  alipayPaymentSessionRequest.setPaymentRedirectUrl("https://www.yourMerchantWeb.com");

  AlipayPaymentSessionResponse alipayPaymentSessionResponse = null;
  try {
      alipayPaymentSessionResponse = CLIENT.execute(alipayPaymentSessionRequest);
  } catch (AlipayApiException e) {
      String errorMsg = e.getMessage();
      // handle error condition
  }
}
The following code shows a sample of the request message:
{
"order": {
  "buyer": {
    "referenceBuyerId": "yourBuyerId"
  },
  "orderAmount": {
    "currency": "SGD",
    "value": "4200"
  },
  "orderDescription": "antom testing order",
  "referenceOrderId": "referenceOrderId01"
},
"paymentAmount": {
  "currency": "SGD",
  "value": "4200"
},
"paymentMethod": {
  "paymentMethodType": "SHOPEEPAY_SG"
},
"paymentNotifyUrl": "https://www.yourNotifyUrl.com",
"paymentRedirectUrl": "https://www.yourMerchantWeb.com",
"paymentRequestId": "paymentRequestId01",
"productCode": "CASHIER_PAYMENT"
}
The following code shows a sample of the response, which contains the following parameters:
- paymentSessionData: the payment session data to be returned to the frontend.
- paymentSessionExpiryTime: the expiration time of the payment session.
{
"paymentSessionData": "gM5Y/Go6+IXMPSOZrYtukCdodtwxuSFsn1vRPSB8CzkDqlb1g2W7dDipOkoMRs/x2W7g7qVhjEM7RUGroIT8Cw==&&SG&&188&&eyJhY3Rpb24iOnsiYXBwIjp7fSwibmVlZFZlcmlmeUFuZFJlc3VtZSI6ZmFsc2UsInNraXBTZGtRdWVyeSI6ZmFsc2UsIndhcCI6e30sIndlYiI6e319LCJjbGllbnRJZCI6IlNBTkRCT1hfNVlCWjBMMlpIUjhSMDg5NzgiLCJleHRlbmRJbmZvIjoie1widmVyc2lvbk1hcFwiOntcIndlYlwiOntcIjEuMS4wXCI6e1widGFyZ2V0V2ViVmVyaXNvblwiOlwiMS4xLjBcIn0sXCIxLjIuMFwiOntcInRhcmdldFdlYlZlcmlzb25cIjpcIjEuMi4wXCJ9fSxcImlPU1wiOntcIjEuMS4wXCI6e1widGFyZ2V0V2ViVmVyaXNvblwiOlwiMS4xLjBcIn0sXCIxLjIuMFwiOntcInRhcmdldFdlYlZlcmlzb25cIjpcIjEuMi4wXCJ9fSxcIkFuZHJvaWRcIjp7XCIxLjEuMFwiOntcInRhcmdldFdlYlZlcmlzb25cIjpcIjEuMS4wXCJ9LFwiMS4yLjBcIjp7XCJ0YXJnZXRXZWJWZXJpc29uXCI6XCIxLjIuMFwifX19fSIsInBheW1lbnRTZXNzaW9uQ29uZmlnIjp7InBheW1lbnRNZXRob2RDYXRlZ29yeVR5cGUiOiJBUE0iLCJwcm9kdWN0U2NlbmUiOiJDQVNISUVSX1BBWU1FTlQiLCJwcm9kdWN0U2NlbmVWZXJzaW9uIjoiMS4wIn19",
"paymentSessionExpiryTime": "2024-01-01T00:00:00+08:00",
"paymentSessionId": "gM5Y/Go6+IXMPSOZrYtukCdodtwxuSFsn1vRPSB8Czn6HfgqNzo2ogbIk1NUQS35",
"result": {
  "resultCode": "SUCCESS",
  "resultMessage": "success.",
  "resultStatus": "S"
}
}
Common questions
Q: Can I use Chinese characters in the value of the request parameters?
A: To avoid incompatibility of a certain payment method, do not use Chinese characters for fields in the request.
Q: How to set the URL to receive the payment notification?
A: Specify paymentNotifyUrl in the createPaymentSession (One-time Payments) API to receive the asynchronous notification about the payment result (notifyPayment), or configure the receiving URL in Antom Dashboard. If the URL is specified in both the request and Antom Dashboard, the value specified in the request takes precedence.
Step 2: Create and invoke the SDK Client-side
The Antom SDK is a component used for handling payment processes. Initiate the SDK by creating a payment session to collect information, switch between apps, and display QR codes based on the payment method specified in the createPaymentSession (One-time Payments) API.
After the buyer selects a payment method on the page, you need to create the SDK and initiate it with a payment session.
1. (Optional) Preload the SDK
Before creating a payment session, it is highly recommended that you preload the SDK to improve the rendering speed of the checkout page, reducing the waiting time for buyers during the payment. Follow the code example below to perform the preloading:
// import { AMSCashierPayment } from '@alipay/ams-checkout';

AMSCashierPayment.preload();
2. Instantiate the SDK
Create the SDK instance by using the
AMSCashierPayment
and specify basic configurations. Configuration objects includes the following parameters:The following sample code shows how to instantiate the SDK:
// Import { AMSCashierPayment } from '@alipay/ams-checkout'

const checkoutApp = new window.AMSCashierPayment({
environment: "sandbox",
locale: "en_US",
onLog: ({code, message}) => {},
onEventCallback: ({code, message}) => {},
});

// Request the server to get paymentSessionDataNote: Each instance can handle only one payment session. It is recommended to create the instance before calling
createComponent
each time.3. Invoke the SDK
Use the
createComponent
function in the instance object to create a payment component:The following sample code shows how to call
createComponent
:async function create(sessionData) {
await checkoutApp.createComponent({
sessionData: sessionData,
});
}Call the
unmount
method to free SDK component resources in the following situations:- When the buyer switches views to exit the checkout page, free the component resources created in the createPaymentSession (One-time Payments).
- When the buyer initiates multiple payments, free the component resources created in the previous createPaymentSession (One-time Payments).
- When the buyer completes the payment and sets notRedirectAfterComplete to true, free the component resources after obtaining specific payment result codes.
// Free SDK component resources
checkoutApp.unmount();
Common questions
Q: What can I do when I receive SDK_CREATEPAYMENT_PARAMETER_ERROR?
A: When you receive this event code, check if the sessionData passed in is correct and complete.
Q: What can I do when I receive SDK_PAYMENT_ERROR or a rendering view error occurred?
A: Check the network request for any exceptions during API initialization, such as network timeouts. Ensure that the environment for creating payment session request is consistent with the environment used for SDK instantiation. Check whether the parameters in the createPaymentSession (One-time Payments) API are passed correctly. If the API exceptions persist, feel free to contact us for further troubleshooting.
4. Display payment results
You can use the payment component to handle payment methods which require a redirect (asynchronous payments), and those that do not (synchronous payments).
Redirect payment
The payment process of some payment methods needs to leave the original web page and jump to the organization's page to complete the payment, such as the payment method of online banking. In this case, the buyer is redirected to the paymentRedirectUrl that you provided in the createPaymentSession (One-time Payments) API after completing the payment. You can obtain the payment result by active query and and show it to the buyer in that URL.
Non-redirect payment
For payment without redirection, the payment result will be given through the
onEventCallback
function. The payment result here is only for front-end display, and the final order status is subject to the server side. You need to customize the processing flow you want for each payment result through the data in the result of onEventCallback
.The following are the possible event codes of the payment result returned by
onEventCallback
.The following sample code shows how to process the
onEventCallback
:function onEventCallback({ code, result }) {
switch (code) {
case 'SDK_PAYMENT_SUCCESSFUL':
// Payment was successful. Redirect the buyer to the payment result page, then confirm the payment result with the server.
break;
case 'SDK_PAYMENT_PROCESSING':
console.log('Check the payment result data', result);
// Payment is being processed. Confirm the payment result with the server. If the payment is successful, redirect the buyer to the payment result page. If the payment fails, guide the buyer to retry payment.
break;
case 'SDK_PAYMENT_FAIL':
console.log('Check the payment result data', result);
// Payment failed. Check the value of result.paymentResultCode in the onEventCallback result data for details. Guide the buyer to retry payment based on the obtained information.
break;
case 'SDK_PAYMENT_CANCEL':
// Payment was canceled. The SDK can be re-invoked with a paymentSessionData within the validity period; if it has expired, the paymentSessionData needs to be re-requested.
break;
case 'SDK_PAYMENT_ERROR':
console.log('Check the payment result data', result);
// The payment status was abnormal. Confirm the payment result with the server. If it is confirmed that the payment has failed, guide the buyer to retry payment.
break;
default:
break;
}
}Step 3: Obtain payment result Server-side
After the buyer completes the payment or the payment times out, Antom sends the corresponding payment results to you through server interactions, you can obtain the payment result by one of the following methods:
- Receive the asynchronous notification
- Inquire about the result
Receive the asynchronous notification
When the payment reaches a final status of success or failure, Antom sends an asynchronous notification to the paymentNotifyUrl specified in the createPaymentSession (One-time Payments) API through the notifyPayment API. When you receive the notification from Antom, you are required to return a response as instructed in Return a receipt acknowledgment message.
Antom allows you to specify the URL in paymentNotifyUrl parameter within the createPaymentSession (One-time Payments) API. If the URL for each payment is the same, you can also configure it in the Antom Dashboard.
The following code shows a sample of the notification request:
{
"notifyType": "PAYMENT_RESULT",
"result": {
  "resultCode": "SUCCESS",
  "resultStatus": "S",
  "resultMessage": "success"
},
"paymentRequestId": "paymentRequestId01",
"paymentId": "20240101123456789XXXX",
"paymentAmount": {
  "value": "4200",
  "currency": "SGD"
},
"paymentCreateTime": "2024-01-01T00:00:00+08:00",
"paymentTime": "2024-01-01T00:01:00+08:00"
}
How to verify the signature of the notification and make a response to the notification, see Sign a request and verify the signature.
Common questions
Q: When will the notification be sent?
A: It depends on whether the payment is completed:
- If the payment is successfully completed, Antom will usually send you an asynchronous notification within 3 to 5 seconds. For some payment methods like cash payment, the notification might take a bit longer.
- If the payment is not completed, Antom needs to close the order first before sending an asynchronous notification. The time it takes for different payment methods to close the order varies, usually defaulting to 14 minutes.
Q: Will the asynchronous notification be re-sent?
A: Yes, the asynchronous notification will be re-sent automatically within 24 hours for the following cases:
- If you didn't receive the asynchronous notification due to network reasons.
- If you receive an asynchronous notification from Antom, but you didn't make a response to the notification in the Sample code format.
The notification can be resent up to 8 times or until a correct response is received to terminate delivery. The sending intervals are as follows: 0 minutes, 2 minutes, 10 minutes, 10 minutes, 1 hour, 2 hours, 6 hours, and 15 hours.
Q: When responding to asynchronous notification, do I need to add a digital signature?
A: If you receive an asynchronous notification from Antom, you are required to return the response in the Sample code format, but you do not need to countersign the response.
Q: What are the key parameters in the notification that I need to use?
A: Pay attention to the following key parameters:
- result: indicates the payment result of the order.
- paymentRequestId: indicates the payment request number you generated for consult, cancel, and reconciliation.
- paymentId: indicates the payment order number generated by Antom used for refund and reconciliation.
- paymentAmount: indicates the payment amount.
Inquire about the result
The parameter is not a full set of parameters, please refer to the inquiryPayment API for full set of parameters and additional requirements for certain payment methods.
public static void inquiryPayment() {
  AlipayPayQueryRequest alipayPayQueryRequest = new AlipayPayQueryRequest();

  // replace with your paymentRequestId
  alipayPayQueryRequest.setPaymentRequestId("yourPaymentRequestId");

  AlipayPayQueryResponse alipayPayQueryResponse = null;
  try {
      alipayPayQueryResponse = CLIENT.execute(alipayPayQueryRequest);
  } catch (AlipayApiException e) {
      String errorMsg = e.getMessage();
      // handle error condition
  }
}
The following code shows a sample of the request message:
{
"paymentRequestId": "paymentRequestId01"
}
The following code shows a sample of the response message:
{
"result": {
  "resultCode": "SUCCESS",
  "resultStatus": "S",
  "resultMessage": "Success"
},
"paymentStatus": "SUCCESS",
"paymentRequestId": "paymentRequestId01",
"paymentId": "20240101123456789XXXX",
"paymentAmount": {
  "value": "4200",
  "currency": "SGD"
},
"paymentCreateTime": "2024-01-01T00:00:00+08:00",
"paymentTime": "2024-01-01T00:01:00+08:00",
"paymentMethodType": "SHOPEEPAY_SG"
}
Common questions
Q: How often should I call the inquiryPayment API?
A: Call the inquiryPayment API constantly with an interval of 2 seconds until the final payment result is obtained or an asynchronous payment result notification is received.
Q: What are the key parameters in the notification that I need to use?
A: Pay attention to these key parameters:
- result: represents the result of this inquiryPayment API call, the result of the order needs to be judged according to paymentStatus :
- SUCCESSandFAILrepresent the final result.
- PROCESSINGrepresents the processing.
- paymentAmount: indicates the payment amount.
Sample codes
Full sample codes for front-end:
import { AMSCashierPayment } from '@alipay/ams-checkout'

// (Optional) Preload the SDK. Before creating a payment session, preload the SDK to improve the rendering speed of the checkout page, reducing the waiting time for buyers during the payment.
AMSCashierPayment.preload();

// Listen for the submit event on your web checkout counter.
document
.querySelector("button#submit")
.addEventListener("click", handleSubmit);

async function handleSubmit() {

// Step 1: Get a payment session from your server.
const paymentSessionData = await getPaymentSessionData();


// Step 2: Create and invoke the SDK.
// Create an AMSCashierPayment instance.
const checkoutApp = new window.AMSCashierPayment({
  environment: "sandbox",
  locale: "en_US",
  onLog: ({code, message}) => {},
  onEventCallback: onEventCallback,
});


// Show the checkout ui by invoking createComponent method.
await checkoutApp.createComponent({
  sessionData: paymentSessionData,
});
}

// Handle payment results.
const onEventCallback = function({ code, result }) {
switch (code) {
  case 'SDK_PAYMENT_SUCCESSFUL':
    // Payment was successful. Redirect the buyer to the payment result page, then confirm the payment result with the server.
    break;
  case 'SDK_PAYMENT_PROCESSING':
    console.log('Check the payment result data', result);
    // Payment is being processed. Confirm the payment result with the server. If the payment is successful, redirect the buyer to the payment result page. If the payment fails, guide the buyer to retry payment.
    break;
  case 'SDK_PAYMENT_FAIL':
    console.log('Check the payment result data', result);
    // Payment failed. Check the value of result.paymentResultCode in the onEventCallback result data for details. Guide the buyer to retry payment based on the obtained information.
    break;
  case 'SDK_PAYMENT_CANCEL':
    // Payment was canceled. The SDK can be re-invoked with a paymentSessionData within the validity period; if it has expired, the paymentSessionData needs to be re-requested.
    break;
  case 'SDK_PAYMENT_ERROR':
    console.log('Check the payment result data', result);
    // The payment status was abnormal. Confirm the payment result with the server. If it is confirmed that the payment has failed, guide the buyer to retry payment.
    break;
  case 'SDK_FORM_VERIFICATION_FAILED':
    // Verification failed after form submission. Guide the buyer to confirm the input and retry payment.
    break;
  default:
    break;
}
}
Event codes
Status codes: Returned by
onEventCallback
during the component's runtime lifecycle.User experience
The following figures show the user journey of paying on an app:
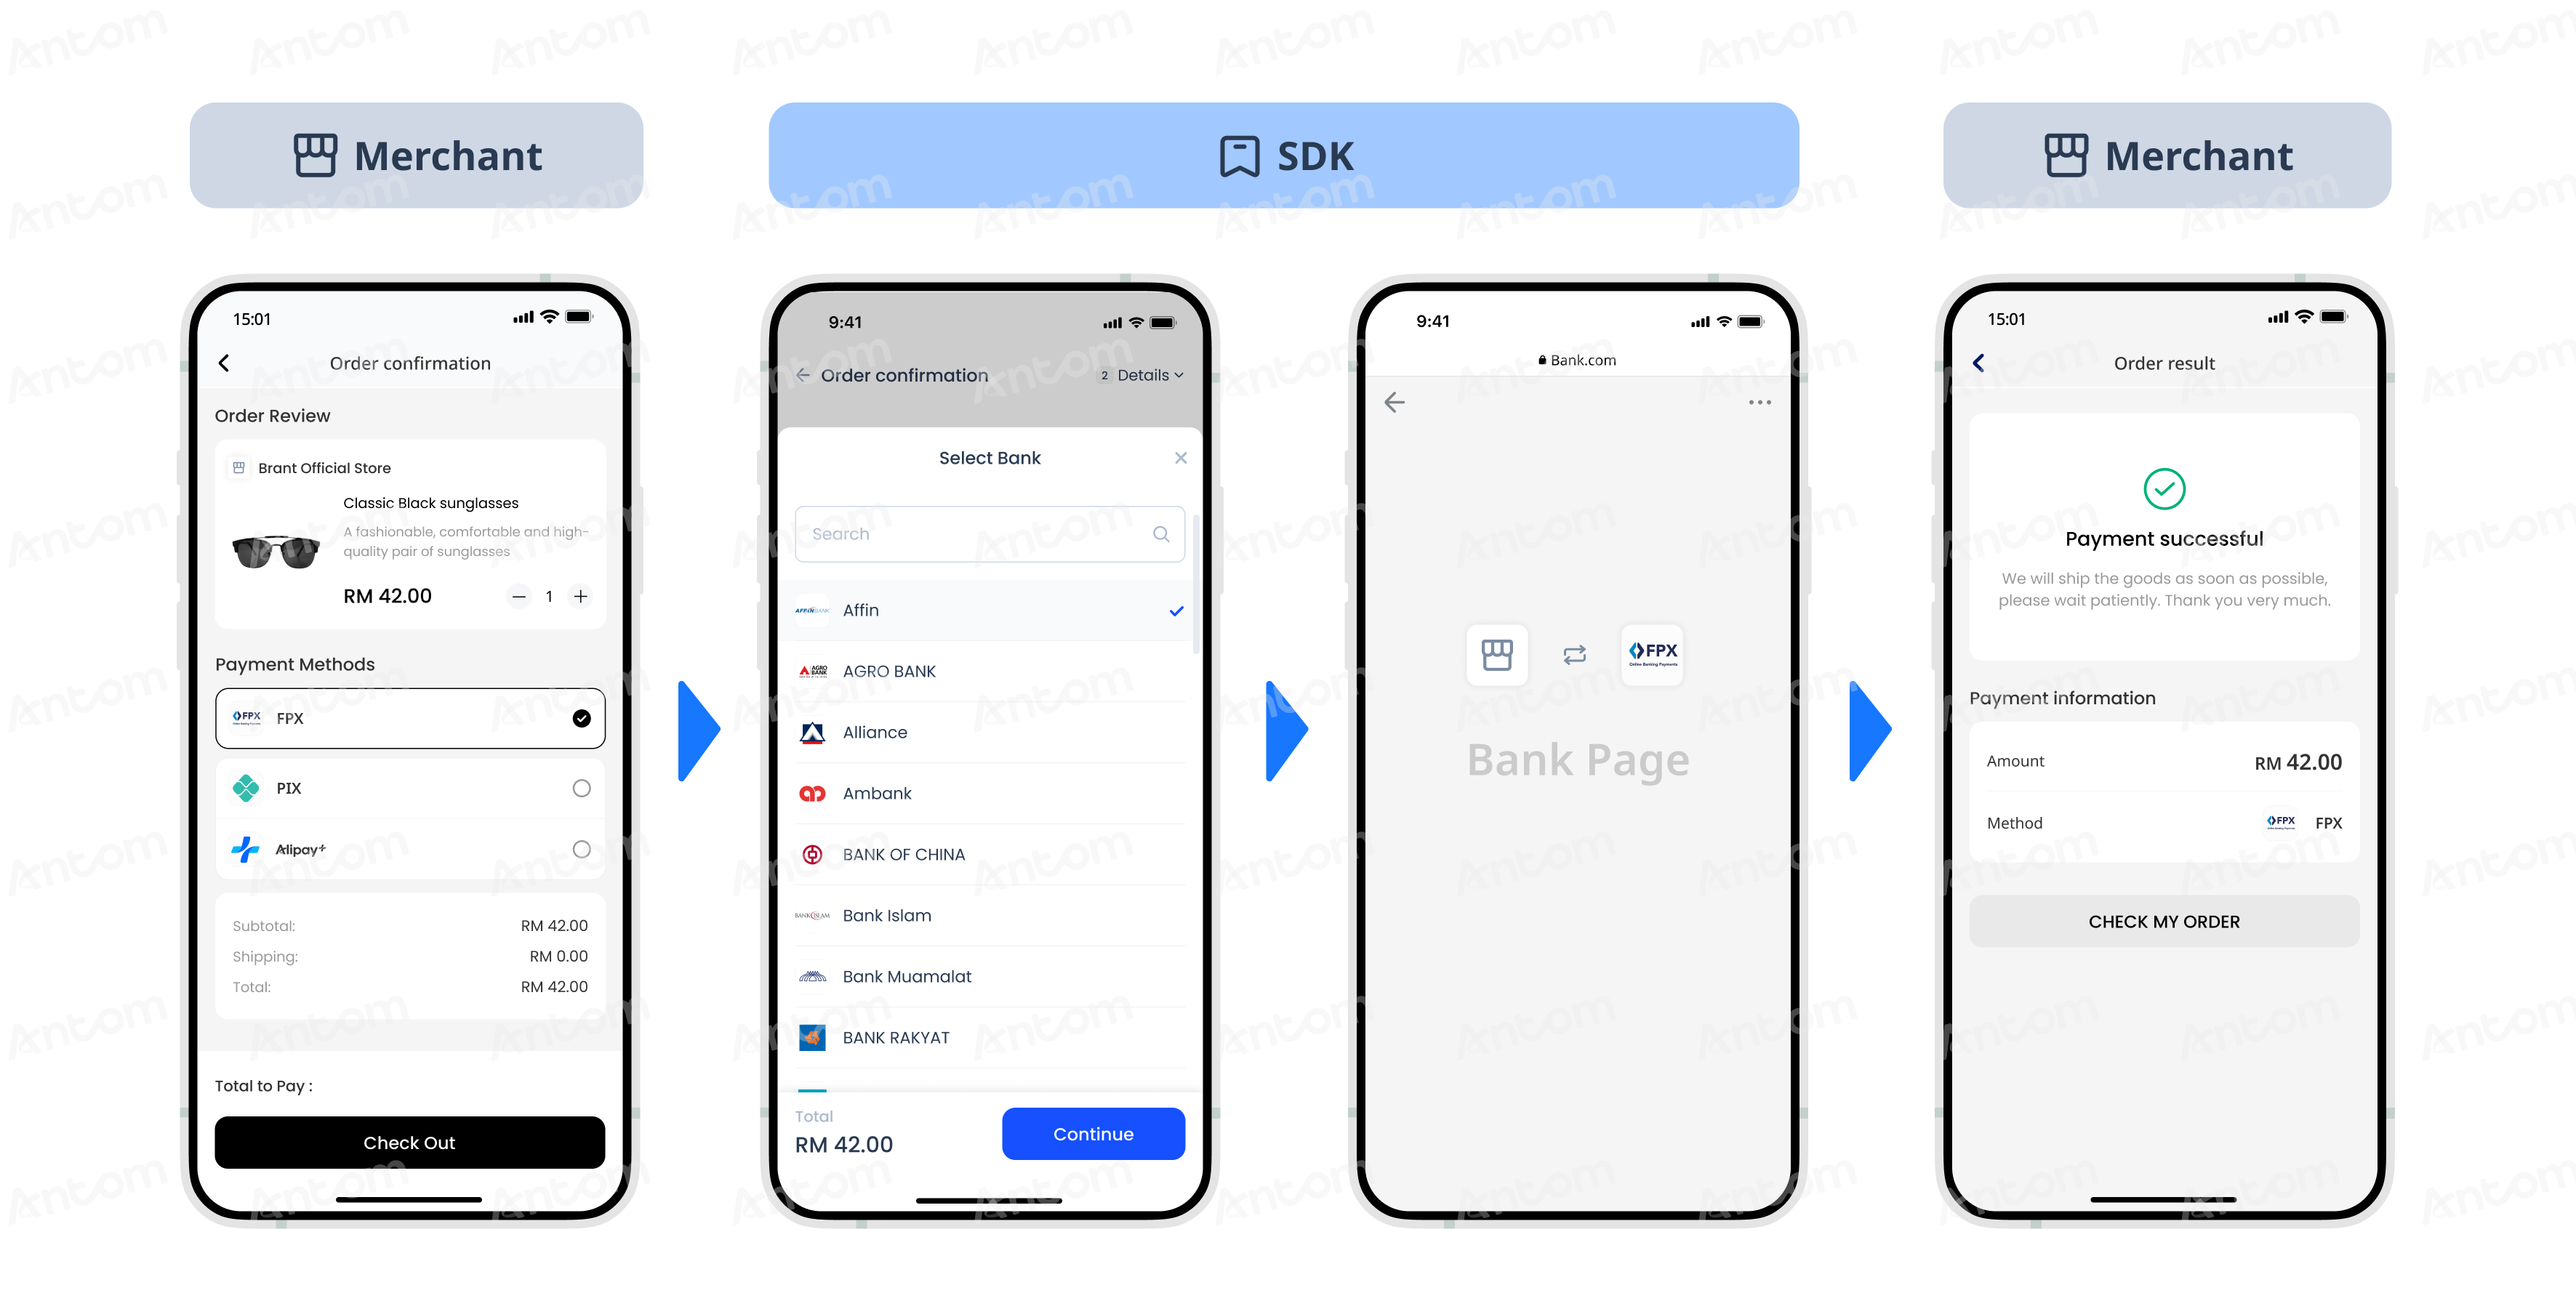
Payment flow
For each payment method, the payment flow is composed of the following steps:
- The buyer lands on the checkout page.
- Create a payment session request.
After the buyer selects a payment method and submits the order, you can obtain the payment session by calling the createPaymentSession (One-time Payments). - Invoke the client SDK.
On the client side, invoke the SDK through the payment session. The SDK will handle information collection, redirection, app invocation, QR code display, verification, and other processes based on the payment method's characteristics. Then the SDK will callback the payment result viaonEventCallbackor redirect to your payment result page. - Confirm the payment result.
Obtain the payment result by using one of the following two methods:
- Asynchronous notification: Specify paymentNotifyUrl in the createPaymentSession (One-time Payments) API to set the address for receiving asynchronous notifications. When the payment is successful or expires, Antom will use notifyPayment to send asynchronous notifications to you.
- Synchronous inquiry: Call the inquiryPayment API to check the payment status.
Integration preparations
Before you start integrating, read the Integration guide and API overview to understand the integration steps of the server-side API and the precautions for calling the API. Furthermore, ensure the following prerequisites are met:
- Obtained your client ID
- Complete the key configuration
- Complete the configuration of paymentNotifyUrl to receive the asynchronous notification
- Integrate the server-side SDK package, install the server-side library, and initialize a request instance. For more details, refer to Server-side SDKs.
- Integrate the client-side SDK package by following the steps of Integrate the SDK package for iOS.
Note: Currently, Flutter and React Native (RN) development frameworks are not supported.
Integration steps
Start your integration by taking the following steps:
- Create a payment session
- Create and invoke the SDK
- Obtain payment result
Step 1: Create a payment session Server-side
When a buyer selects a payment method provided by Antom, you need to collect key information such as the payment request ID, order amount, payment method, order description, payment redirect URL, and payment result notification URL, call the createPaymentSession (One-time Payments) API to create a payment session, and return the payment session to the client.
Creating a payment session includes the following parameters:
The above parameters are the basic parameters for creating a payment session, for full parameters and additional requirements for certain payment methods please refer to createPaymentSession (One-time Payments).
private static void createPaymentSession() {
  AlipayPaymentSessionRequest alipayPaymentSessionRequest = new AlipayPaymentSessionRequest();
  alipayPaymentSessionRequest.setProductCode(ProductCodeType.CASHIER_PAYMENT);

  // replace with your paymentRequestId
  String paymentRequestId = UUID.randomUUID().toString();
  alipayPaymentSessionRequest.setPaymentRequestId(paymentRequestId);

  // set amount
  Amount amount = Amount.builder().currency("SGD").value("4200").build();
  alipayPaymentSessionRequest.setPaymentAmount(amount);

  // set paymentMethod
  PaymentMethod paymentMethod = PaymentMethod.builder().paymentMethodType("SHOPEEPAY_SG").build();
  alipayPaymentSessionRequest.setPaymentMethod(paymentMethod);

  // replace with your orderId
  String orderId = UUID.randomUUID().toString();

  // set buyer info
  Buyer buyer = Buyer.builder().referenceBuyerId("yourBuyerId").build();

  // set order info
  Order order = Order.builder().referenceOrderId(orderId)
      .orderDescription("antom testing order").orderAmount(amount).buyer(buyer).build();
  alipayPaymentSessionRequest.setOrder(order);

  // replace with your notify url
  alipayPaymentSessionRequest.setPaymentNotifyUrl("https://www.yourNotifyUrl.com");

  // replace with your redirect url
  alipayPaymentSessionRequest.setPaymentRedirectUrl("https://www.yourMerchantWeb.com");

  AlipayPaymentSessionResponse alipayPaymentSessionResponse = null;
  try {
      alipayPaymentSessionResponse = CLIENT.execute(alipayPaymentSessionRequest);
  } catch (AlipayApiException e) {
      String errorMsg = e.getMessage();
      // handle error condition
  }
}
The following code shows a sample of the request message:
{
"order": {
  "buyer": {
    "referenceBuyerId": "yourBuyerId"
  },
  "orderAmount": {
    "currency": "SGD",
    "value": "4200"
  },
  "orderDescription": "antom testing order",
  "referenceOrderId": "referenceOrderId01"
},
"paymentAmount": {
  "currency": "SGD",
  "value": "4200"
},
"paymentMethod": {
  "paymentMethodType": "SHOPEEPAY_SG"
},
"paymentNotifyUrl": "https://www.yourNotifyUrl.com",
"paymentRedirectUrl": "https://www.yourMerchantWeb.com",
"paymentRequestId": "paymentRequestId01",
"productCode": "CASHIER_PAYMENT"
}
The following code shows a sample of the response, which contains the following parameters:
- paymentSessionData: the payment session data to be returned to the frontend.
- paymentSessionExpiryTime: the expiration time of the payment session.
{
"paymentSessionData": "gM5Y/Go6+IXMPSOZrYtukCdodtwxuSFsn1vRPSB8CzkDqlb1g2W7dDipOkoMRs/x2W7g7qVhjEM7RUGroIT8Cw==&&SG&&188&&eyJhY3Rpb24iOnsiYXBwIjp7fSwibmVlZFZlcmlmeUFuZFJlc3VtZSI6ZmFsc2UsInNraXBTZGtRdWVyeSI6ZmFsc2UsIndhcCI6e30sIndlYiI6e319LCJjbGllbnRJZCI6IlNBTkRCT1hfNVlCWjBMMlpIUjhSMDg5NzgiLCJleHRlbmRJbmZvIjoie1widmVyc2lvbk1hcFwiOntcIndlYlwiOntcIjEuMS4wXCI6e1widGFyZ2V0V2ViVmVyaXNvblwiOlwiMS4xLjBcIn0sXCIxLjIuMFwiOntcInRhcmdldFdlYlZlcmlzb25cIjpcIjEuMi4wXCJ9fSxcImlPU1wiOntcIjEuMS4wXCI6e1widGFyZ2V0V2ViVmVyaXNvblwiOlwiMS4xLjBcIn0sXCIxLjIuMFwiOntcInRhcmdldFdlYlZlcmlzb25cIjpcIjEuMi4wXCJ9fSxcIkFuZHJvaWRcIjp7XCIxLjEuMFwiOntcInRhcmdldFdlYlZlcmlzb25cIjpcIjEuMS4wXCJ9LFwiMS4yLjBcIjp7XCJ0YXJnZXRXZWJWZXJpc29uXCI6XCIxLjIuMFwifX19fSIsInBheW1lbnRTZXNzaW9uQ29uZmlnIjp7InBheW1lbnRNZXRob2RDYXRlZ29yeVR5cGUiOiJBUE0iLCJwcm9kdWN0U2NlbmUiOiJDQVNISUVSX1BBWU1FTlQiLCJwcm9kdWN0U2NlbmVWZXJzaW9uIjoiMS4wIn19",
"paymentSessionExpiryTime": "2024-01-01T00:00:00+08:00",
"paymentSessionId": "gM5Y/Go6+IXMPSOZrYtukCdodtwxuSFsn1vRPSB8Czn6HfgqNzo2ogbIk1NUQS35",
"result": {
  "resultCode": "SUCCESS",
  "resultMessage": "success.",
  "resultStatus": "S"
}
}
Common questions
Q: Can I use Chinese characters in the value of the request parameters?
A: To avoid incompatibility of a certain payment method, do not use Chinese characters for fields in the request.
Q: How to set the URL to receive the payment notification?
A: Specify paymentNotifyUrl in the createPaymentSession (One-time Payments) API to receive the asynchronous notification about the payment result (notifyPayment), or configure the receiving URL in Antom Dashboard. If the URL is specified in both the request and Antom Dashboard, the value specified in the request takes precedence.
Step 2: Create and invoke the SDK Client-side
The Antom SDK is a component used for handling payment processes. Initiate the SDK by creating a payment session to collect information, switch between apps, and display QR codes based on the payment method specified in the createPaymentSession (One-time Payments) API.
After the buyer selects a payment method on the page, you need to create the SDK and initiate it with a payment session.
1. (Optional) Preload the SDK
Before creating a payment session, it is highly recommended that you preload the SDK to improve the rendering speed of the checkout page, reducing the waiting time for buyers during the payment. Follow the code example below to perform the preloading:
[[AMSCashierPayment shared] preload];
2. Instantiate the SDK
Create the SDK instance by using the
AMSCashierPayment
and specify basic configurations. Creating an AMSCashierPaymentConfiguration
object includes the following parameters:Implementing the
AMSPaymentProtocol
used for handling corresponding events in subsequent processes. It contains the following method:Note: Each instance can handle only one payment session. It is recommended to create the instance before calling
createComponent
each time.The following sample code shows how to instantiate the SDK:
#import <AMSComponent/AMSComponent-Swift.h>

AMSCashierPaymentConfiguration *componentConfig = [AMSCashierPaymentConfiguration new];
componentConfig.locale = @"en_US";
// Set the sandbox environment. If you leave it empty, the production environment is used by default.
NSDictionary *options = @{@"sandbox": @"true"};
componentConfig.options = options;

[[AMSCashierPayment shared] initConfiguration:componentConfig];

// Set the callback to monitor payment events on the checkout page.
[AMSCashierPayment shared].paymentDelegate = self;

// The server calls the createPaymentSession API to obtain paymentSessionData.
3. Invoke the SDK
Call the
createComponent
method:Call the
onDestroy
method to free SDK component resources in the following situations:- When the buyer exits the checkout page, free the component resources created in the createPaymentSession (One-time Payments).
- When the buyer initiates multiple payments, free the component resources created in the previous createPaymentSession (One-time Payments).
The following sample code shows how to invoke the SDK:
[[AMSCashierPayment shared] createComponent:sessionData];

//Free SDK component resources
[[AMSCashierPayment shared] onDestroy];
4. Display payment results
You can use the payment component to handle payment methods which require a redirect (asynchronous payments), and those that do not (synchronous payments).
Redirect payment
The payment process of some payment methods needs to leave the original web page and jump to the organization's page to complete the payment, such as the payment method of online banking. In this case, the buyer is redirected to the paymentRedirectUrl that you provided in the createPaymentSession (One-time Payments) API after completing the payment. You can obtain the payment result by active query and and show it to the buyer in that URL.
Non-redirect payment
For payment without redirection, the payment result will be given through the
onEventCallback
function. The payment result here is only for front-end display, and the final order status is subject to the server side. You need to customize the processing flow you want for each payment result through the data in the result of onEventCallback
.The following are the possible event codes of the payment result returned by
onEventCallback
.The following sample code shows how to process the
onEventCallback
:#import <AMSComponent/AMSComponent-Swift.h>
#pragma AMSPaymentProtocol
- (void)onEventCallback:(NSString *)eventCode eventResult:(AMSEventResult *)eventResult
{
if ([eventCode isEqualToString:@"SDK_PAYMENT_SUCCESSFUL"]) {
// Payment was successful. Redirect the buyer to the payment result page, then confirm the payment result with the server.
} else if ([eventCode isEqualToString:@"SDK_PAYMENT_PROCESSING"]) {
// Payment is being processed. Confirm the payment result with the server. If the payment is successful, redirect the buyer to the payment result page. If the payment fails, guide the buyer to retry payment.
} else if ([eventCode isEqualToString:@"SDK_PAYMENT_FAIL"]) {
// Payment failed. Check the value of result.paymentResultCode in the onEventCallback result data for details. Guide the buyer to retry payment based on the obtained information.
} else if ([eventCode isEqualToString:@"SDK_PAYMENT_CANCEL"]) {
// Payment was canceled. The SDK can be re-invoked with a paymentSessionData within the validity period; if it has expired, the paymentSessionData needs to be re-requested.
} else if ([eventCode isEqualToString:@"SDK_PAYMENT_ERROR"]) {
// The payment status was abnormal. Confirm the payment result with the server. If it is confirmed that the payment has failed, guide the buyer to retry payment.
}
NSLog(@"eventCode%@ eventResult%@", eventCode, eventResult);
}Step 3: Obtain payment result Server-side
After the buyer completes the payment or the payment times out, Antom sends the corresponding payment results to you through server interactions, you can obtain the payment result by one of the following methods:
- Receive the asynchronous notification
- Inquire about the result
Receive the asynchronous notification
When the payment reaches a final status of success or failure, Antom sends an asynchronous notification to the paymentNotifyUrl specified in the createPaymentSession (One-time Payments) API through the notifyPayment API. When you receive the notification from Antom, you are required to return a response as instructed in Return a receipt acknowledgment message.
Antom allows you to specify the URL in paymentNotifyUrl parameter within the createPaymentSession (One-time Payments) API. If the URL for each payment is the same, you can also configure it in the Antom Dashboard.
The following code shows a sample of the notification request:
{
"notifyType": "PAYMENT_RESULT",
"result": {
  "resultCode": "SUCCESS",
  "resultStatus": "S",
  "resultMessage": "success"
},
"paymentRequestId": "paymentRequestId01",
"paymentId": "20240101123456789XXXX",
"paymentAmount": {
  "value": "4200",
  "currency": "SGD"
},
"paymentCreateTime": "2024-01-01T00:00:00+08:00",
"paymentTime": "2024-01-01T00:01:00+08:00"
}
How to verify the signature of the notification and make a response to the notification, see Sign a request and verify the signature.
Common questions
Q: When will the notification be sent?
A: It depends on whether the payment is completed:
- If the payment is successfully completed, Antom will usually send you an asynchronous notification within 3 to 5 seconds. For some payment methods like cash payment, the notification might take a bit longer.
- If the payment is not completed, Antom needs to close the order first before sending an asynchronous notification. The time it takes for different payment methods to close the order varies, usually defaulting to 14 minutes.
Q: Will the asynchronous notification be re-sent?
A: Yes, the asynchronous notification will be re-sent automatically within 24 hours for the following cases:
- If you didn't receive the asynchronous notification due to network reasons.
- If you receive an asynchronous notification from Antom, but you didn't make a response to the notification in the Sample code format.
The notification can be resent up to 8 times or until a correct response is received to terminate delivery. The sending intervals are as follows: 0 minutes, 2 minutes, 10 minutes, 10 minutes, 1 hour, 2 hours, 6 hours, and 15 hours.
Q: When responding to asynchronous notification, do I need to add a digital signature?
A: If you receive an asynchronous notification from Antom, you are required to return the response in the Sample code format, but you do not need to countersign the response.
Q: What are the key parameters in the notification that I need to use?
A: Pay attention to the following key parameters:
- result: indicates the payment result of the order.
- paymentRequestId: indicates the payment request number you generated for consult, cancel, and reconciliation.
- paymentId: indicates the payment order number generated by Antom used for refund and reconciliation.
- paymentAmount: indicates the payment amount.
Inquire about the result
The parameter is not a full set of parameters, please refer to the inquiryPayment API for full set of parameters and additional requirements for certain payment methods.
public static void inquiryPayment() {
  AlipayPayQueryRequest alipayPayQueryRequest = new AlipayPayQueryRequest();

  // replace with your paymentRequestId
  alipayPayQueryRequest.setPaymentRequestId("yourPaymentRequestId");

  AlipayPayQueryResponse alipayPayQueryResponse = null;
  try {
      alipayPayQueryResponse = CLIENT.execute(alipayPayQueryRequest);
  } catch (AlipayApiException e) {
      String errorMsg = e.getMessage();
      // handle error condition
  }
}
The following code shows a sample of the request message:
{
"paymentRequestId": "paymentRequestId01"
}
The following code shows a sample of the response message:
{
"result": {
  "resultCode": "SUCCESS",
  "resultStatus": "S",
  "resultMessage": "Success"
},
"paymentStatus": "SUCCESS",
"paymentRequestId": "paymentRequestId01",
"paymentId": "20240101123456789XXXX",
"paymentAmount": {
  "value": "4200",
  "currency": "SGD"
},
"paymentCreateTime": "2024-01-01T00:00:00+08:00",
"paymentTime": "2024-01-01T00:01:00+08:00",
"paymentMethodType": "SHOPEEPAY_SG"
}
Common questions
Q: How often should I call the inquiryPayment API?
A: Call the inquiryPayment API constantly with an interval of 2 seconds until the final payment result is obtained or an asynchronous payment result notification is received.
Q: What are the key parameters in the notification that I need to use?
A: Pay attention to these key parameters:
- result: represents the result of this inquiryPayment API call, the result of the order needs to be judged according to paymentStatus :
- SUCCESSandFAILrepresent the final result.
- PROCESSINGrepresents the processing.
- paymentAmount: indicates the payment amount.
Sample codes
Full sample codes for front-end:
#import <AMSComponent/AMSComponent-Swift.h>

// (Optional) Preload the SDK. Before creating a payment session, preload the SDK to improve the rendering speed of the checkout page, reducing the waiting time for buyers during the payment.
[[AMSCashierPayment shared] preload];

// Step 1: Get Antom PaymentSessionData from your server.
NSString *paymentSessionData = "YOUR_PAYMENT_SESSIONDATA";

// Step 2: Create an AMSConfiguration object.
AMSCashierPaymentConfiguration *componentConfig = [AMSCashierPaymentConfiguration new];
componentConfig.locale = @"en_US";

// Set the sandbox environment. If you leave it empty, the production environment is used by default.
NSDictionary *options = @{@"sandbox": @"true"};
componentConfig.options = options;
[[AMSCashierPayment shared] initConfiguration:componentConfig];

// Set the callback to monitor payment events on the checkout page.
[AMSCashierPayment shared].paymentDelegate = self;

// Create and render the component.
[[AMSCashierPayment shared] createComponent:paymentSessionData];

#pragma AMSPaymentProtocol
- (void)onEventCallback:(NSString *)eventCode eventResult:(AMSEventResult *)eventResult
{
  if ([eventCode isEqualToString:@"SDK_PAYMENT_SUCCESSFUL"]) {
      // Payment was successful. Redirect the buyer to the payment result page, then confirm the payment result with the server.
  } else if ([eventCode isEqualToString:@"SDK_PAYMENT_PROCESSING"]) {
      // Payment is being processed. Confirm the payment result with the server. If the payment is successful, redirect the buyer to the payment result page. If the payment fails, guide the buyer to retry payment.
  } else if ([eventCode isEqualToString:@"SDK_PAYMENT_FAIL"]) {
      // Payment failed. Check the value of result.paymentResultCode in the onEventCallback result data for details. Guide the buyer to retry payment based on the obtained information.
  } else if ([eventCode isEqualToString:@"SDK_PAYMENT_CANCEL"]) {
      // Payment was canceled. The SDK can be re-invoked with a paymentSessionData within the validity period; if it has expired, the paymentSessionData needs to be re-requested.
  } else if ([eventCode isEqualToString:@"SDK_PAYMENT_ERROR"]) {
      // The payment status was abnormal. Confirm the payment result with the server. If it is confirmed that the payment has failed, guide the buyer to retry payment.
  } else if ([eventCode isEqualToString:@"SDK_FORM_VERIFICATION_FAILED"]) {
     // Verification failed after form submission. Guide the buyer to confirm the input and retry payment.
  }
  NSLog(@"eventCode%@ eventResult%@", eventCode, eventResult);
}

// After the payment is completed or when the buyer exits the checkout page, free SDK component resources.
[[AMSCashierPayment shared] onDestroy];
Event codes
Status codes: Returned by
onEventCallback
during the component's runtime lifecycle.User experience
The following figures show the user journey of paying on an app:
Payment flow
For each payment method, the payment flow is composed of the following steps:
- The buyer lands on the checkout page.
- Create a payment session request.
After the buyer selects a payment method and submits the order, you can obtain the payment session by calling the createPaymentSession (One-time Payments). - Invoke the client SDK.
On the client side, invoke the SDK through the payment session. The SDK will handle information collection, redirection, app invocation, QR code display, verification, and other processes based on the payment method's characteristics. Then the SDK will callback the payment result viaOnCheckoutListeneror redirect to your payment result page. - Confirm the payment result.
Obtain the payment result by using one of the following two methods:
- Asynchronous notification: Specify paymentNotifyUrl in the createPaymentSession (One-time Payments) API to set the address for receiving asynchronous notifications. When the payment is successful or expires, Antom will use notifyPayment to send asynchronous notifications to you.
- Synchronous inquiry: Call the inquiryPayment API to check the payment status.
Integration preparations
Before you start integrating, read the Integration guide and API overview to understand the integration steps of the server-side API and the precautions for calling the API. Furthermore, ensure the following prerequisites are met:
- Obtained your client ID
- Complete the key configuration
- Complete the configuration of paymentNotifyUrl to receive the asynchronous notification
- Integrate the server-side SDK package, install the server-side library, and initialize a request instance. For more details, refer to Server-side SDKs.
- Integrate the client-side SDK package by following the steps of Integrate the SDK package for Android.
Note: Currently, Flutter and React Native (RN) development frameworks are not supported.
Integration steps
Start your integration by taking the following steps:
- Create a payment session
- Create and invoke the SDK
- Obtain payment result
Step 1: Create a payment session Server-side
When a buyer selects a payment method provided by Antom, you need to collect key information such as the payment request ID, order amount, payment method, order description, payment redirect URL, and payment result notification URL, call the createPaymentSession (One-time Payments) API to create a payment session, and return the payment session to the client.
Creating a payment session includes the following parameters:
The above parameters are the basic parameters for creating a payment session, for full parameters and additional requirements for certain payment methods please refer to createPaymentSession (One-time Payments).
private static void createPaymentSession() {
  AlipayPaymentSessionRequest alipayPaymentSessionRequest = new AlipayPaymentSessionRequest();
  alipayPaymentSessionRequest.setProductCode(ProductCodeType.CASHIER_PAYMENT);

  // replace with your paymentRequestId
  String paymentRequestId = UUID.randomUUID().toString();
  alipayPaymentSessionRequest.setPaymentRequestId(paymentRequestId);

  // set amount
  Amount amount = Amount.builder().currency("SGD").value("4200").build();
  alipayPaymentSessionRequest.setPaymentAmount(amount);

  // set paymentMethod
  PaymentMethod paymentMethod = PaymentMethod.builder().paymentMethodType("SHOPEEPAY_SG").build();
  alipayPaymentSessionRequest.setPaymentMethod(paymentMethod);

  // replace with your orderId
  String orderId = UUID.randomUUID().toString();

  // set buyer info
  Buyer buyer = Buyer.builder().referenceBuyerId("yourBuyerId").build();

  // set order info
  Order order = Order.builder().referenceOrderId(orderId)
      .orderDescription("antom testing order").orderAmount(amount).buyer(buyer).build();
  alipayPaymentSessionRequest.setOrder(order);

  // replace with your notify url
  alipayPaymentSessionRequest.setPaymentNotifyUrl("https://www.yourNotifyUrl.com");

  // replace with your redirect url
  alipayPaymentSessionRequest.setPaymentRedirectUrl("https://www.yourMerchantWeb.com");

  AlipayPaymentSessionResponse alipayPaymentSessionResponse = null;
  try {
      alipayPaymentSessionResponse = CLIENT.execute(alipayPaymentSessionRequest);
  } catch (AlipayApiException e) {
      String errorMsg = e.getMessage();
      // handle error condition
  }
}
The following code shows a sample of the request message:
{
"order": {
  "buyer": {
    "referenceBuyerId": "yourBuyerId"
  },
  "orderAmount": {
    "currency": "SGD",
    "value": "4200"
  },
  "orderDescription": "antom testing order",
  "referenceOrderId": "referenceOrderId01"
},
"paymentAmount": {
  "currency": "SGD",
  "value": "4200"
},
"paymentMethod": {
  "paymentMethodType": "SHOPEEPAY_SG"
},
"paymentNotifyUrl": "https://www.yourNotifyUrl.com",
"paymentRedirectUrl": "https://www.yourMerchantWeb.com",
"paymentRequestId": "paymentRequestId01",
"productCode": "CASHIER_PAYMENT"
}
The following code shows a sample of the response, which contains the following parameters:
- paymentSessionData: the payment session data to be returned to the frontend.
- paymentSessionExpiryTime: the expiration time of the payment session.
{
"paymentSessionData": "gM5Y/Go6+IXMPSOZrYtukCdodtwxuSFsn1vRPSB8CzkDqlb1g2W7dDipOkoMRs/x2W7g7qVhjEM7RUGroIT8Cw==&&SG&&188&&eyJhY3Rpb24iOnsiYXBwIjp7fSwibmVlZFZlcmlmeUFuZFJlc3VtZSI6ZmFsc2UsInNraXBTZGtRdWVyeSI6ZmFsc2UsIndhcCI6e30sIndlYiI6e319LCJjbGllbnRJZCI6IlNBTkRCT1hfNVlCWjBMMlpIUjhSMDg5NzgiLCJleHRlbmRJbmZvIjoie1widmVyc2lvbk1hcFwiOntcIndlYlwiOntcIjEuMS4wXCI6e1widGFyZ2V0V2ViVmVyaXNvblwiOlwiMS4xLjBcIn0sXCIxLjIuMFwiOntcInRhcmdldFdlYlZlcmlzb25cIjpcIjEuMi4wXCJ9fSxcImlPU1wiOntcIjEuMS4wXCI6e1widGFyZ2V0V2ViVmVyaXNvblwiOlwiMS4xLjBcIn0sXCIxLjIuMFwiOntcInRhcmdldFdlYlZlcmlzb25cIjpcIjEuMi4wXCJ9fSxcIkFuZHJvaWRcIjp7XCIxLjEuMFwiOntcInRhcmdldFdlYlZlcmlzb25cIjpcIjEuMS4wXCJ9LFwiMS4yLjBcIjp7XCJ0YXJnZXRXZWJWZXJpc29uXCI6XCIxLjIuMFwifX19fSIsInBheW1lbnRTZXNzaW9uQ29uZmlnIjp7InBheW1lbnRNZXRob2RDYXRlZ29yeVR5cGUiOiJBUE0iLCJwcm9kdWN0U2NlbmUiOiJDQVNISUVSX1BBWU1FTlQiLCJwcm9kdWN0U2NlbmVWZXJzaW9uIjoiMS4wIn19",
"paymentSessionExpiryTime": "2024-01-01T00:00:00+08:00",
"paymentSessionId": "gM5Y/Go6+IXMPSOZrYtukCdodtwxuSFsn1vRPSB8Czn6HfgqNzo2ogbIk1NUQS35",
"result": {
  "resultCode": "SUCCESS",
  "resultMessage": "success.",
  "resultStatus": "S"
}
}
Common questions
Q: Can I use Chinese characters in the value of the request parameters?
A: To avoid incompatibility of a certain payment method, do not use Chinese characters for fields in the request.
Q: How to set the URL to receive the payment notification?
A: Specify paymentNotifyUrl in the createPaymentSession (One-time Payments) API to receive the asynchronous notification about the payment result (notifyPayment), or configure the receiving URL in Antom Dashboard. If the URL is specified in both the request and Antom Dashboard, the value specified in the request takes precedence.
Step 2: Create and invoke the SDK Client-side
The Antom SDK is a component used for handling payment processes. Initiate the SDK by creating a payment session to collect information, switch between apps, and display QR codes based on the payment method specified in the createPaymentSession (One-time Payments) API.
After the buyer selects a payment method on the page, you need to create the SDK and initiate it with a payment session.
1. (Optional) Preload the SDK
Before creating a payment session, it is highly recommended that you preload the SDK to improve the rendering speed of the checkout page, reducing the waiting time for buyers during the payment.
Call the
preload
method:Follow the code example below to perform the preloading:
AMSCashierPayment.preload(context.getApplicationContext());
2. Instantiate the SDK
Create the SDK instance by using the
AMSCashierPayment
and specify basic configurations. Creating a configuration object includes the following methods:Note: Each instance can handle only one payment session. It is recommended to create the instance before calling
createComponent
each time.The following sample code shows how to instantiate the SDK:
AMSCashierPaymentConfiguration configuration = new AMSCashierPaymentConfiguration();
configuration.setLocale(new Locale("en", "US"));
// Set the sandbox environment. If you leave it empty, the production environment is used by default.
configuration.setOption("sandbox", "true");
// Set the callback to monitor payment events on the checkout page.
configuration.setOnCheckoutListener(new OnCheckoutListener() {
  @Override
  public void onEventCallback(String eventCode, AMSEventResult eventResult) {
      Log.e(TAG, "onEventCallback eventCode=" + eventCode + " eventResult=" + eventResult.toString());
  }
});
// Instantiate AMSCashierPayment.
AMSCashierPayment checkout = new AMSCashierPayment.Builder(activity, configuration).build();
3. Invoke the SDK
Call the
createComponent
method:Call the
onDestroy
method to free SDK component resources in the following situations:- When the buyer exits the checkout page, free the component resources created in the createPaymentSession (One-time Payments).
- When the buyer initiates multiple payments, free the component resources created in the previous createPaymentSession (One-time Payments).
The following sample code shows how to invoke the SDK:
checkout.createComponent(activity, sessionData);

//Free SDK component resources
checkout.onDestroy();
4. Display payment results
You can use the payment component to handle payment methods which require a redirect (asynchronous payments), and those that do not (synchronous payments).
Redirect payment
The payment process of some payment methods needs to leave the original web page and jump to the organization's page to complete the payment, such as the payment method of online banking. In this case, the buyer is redirected to the paymentRedirectUrl that you provided in the createPaymentSession (One-time Payments) API after completing the payment. You can obtain the payment result by active query and and show it to the buyer in that URL.
Non-redirect payment
For payment without redirection, the payment result will be given through the
onEventCallback
function. The payment result here is only for front-end display, and the final order status is subject to the server side. You need to customize the processing flow you want for each payment result through the data in the result of onEventCallback
.The following are the possible event codes of the payment result returned by
onEventCallback
.The following sample code shows how to process the
onEventCallback
:@Override
public void onEventCallback(String eventCode, AMSEventResult eventResult) {
AlipayLog.e(TAG, "onEventCallback eventCode=" + eventCode + " eventResult=" + eventResult.toString());
if (!TextUtils.isEmpty(eventCode)) {
if ("SDK_PAYMENT_SUCCESSFUL".equals(eventCode)) {
// Payment was successful. Redirect the buyer to the payment result page, then confirm the payment result with the server.
} else if ("SDK_PAYMENT_PROCESSING".equals(eventCode)) {
// Payment is being processed. Confirm the payment result with the server. If the payment is successful, redirect the buyer to the payment result page. If the payment fails, guide the buyer to retry payment.
} else if ("SDK_PAYMENT_FAIL".equals(eventCode)) {
// Payment failed. Check the value of result.paymentResultCode in the onEventCallback result data for details. Guide the buyer to retry payment based on the obtained information.
} else if ("SDK_PAYMENT_CANCEL".equals(eventCode)) {
// Payment was canceled. The SDK can be re-invoked with a paymentSessionData within the validity period; if it has expired, the paymentSessionData needs to be re-requested.
} else if ("SDK_PAYMENT_ERROR".equals(eventCode)) {
// The payment status was abnormal. Confirm the payment result with the server. If it is confirmed that the payment has failed, guide the buyer to retry payment.
}
}
}Step 3: Obtain payment result Server-side
After the buyer completes the payment or the payment times out, Antom sends the corresponding payment results to you through server interactions, you can obtain the payment result by one of the following methods:
- Receive the asynchronous notification
- Inquire about the result
Receive the asynchronous notification
When the payment reaches a final status of success or failure, Antom sends an asynchronous notification to the paymentNotifyUrl specified in the createPaymentSession (One-time Payments) API through the notifyPayment API. When you receive the notification from Antom, you are required to return a response as instructed in Return a receipt acknowledgment message.
Antom allows you to specify the URL in paymentNotifyUrl parameter within the createPaymentSession (One-time Payments) API. If the URL for each payment is the same, you can also configure it in the Antom Dashboard.
The following code shows a sample of the notification request:
{
"notifyType": "PAYMENT_RESULT",
"result": {
  "resultCode": "SUCCESS",
  "resultStatus": "S",
  "resultMessage": "success"
},
"paymentRequestId": "paymentRequestId01",
"paymentId": "20240101123456789XXXX",
"paymentAmount": {
  "value": "4200",
  "currency": "SGD"
},
"paymentCreateTime": "2024-01-01T00:00:00+08:00",
"paymentTime": "2024-01-01T00:01:00+08:00"
}
How to verify the signature of the notification and make a response to the notification, see Sign a request and verify the signature.
Common questions
Q: When will the notification be sent?
A: It depends on whether the payment is completed:
- If the payment is successfully completed, Antom will usually send you an asynchronous notification within 3 to 5 seconds. For some payment methods like cash payment, the notification might take a bit longer.
- If the payment is not completed, Antom needs to close the order first before sending an asynchronous notification. The time it takes for different payment methods to close the order varies, usually defaulting to 14 minutes.
Q: Will the asynchronous notification be re-sent?
A: Yes, the asynchronous notification will be re-sent automatically within 24 hours for the following cases:
- If you didn't receive the asynchronous notification due to network reasons.
- If you receive an asynchronous notification from Antom, but you didn't make a response to the notification in the Sample code format.
The notification can be resent up to 8 times or until a correct response is received to terminate delivery. The sending intervals are as follows: 0 minutes, 2 minutes, 10 minutes, 10 minutes, 1 hour, 2 hours, 6 hours, and 15 hours.
Q: When responding to asynchronous notification, do I need to add a digital signature?
A: If you receive an asynchronous notification from Antom, you are required to return the response in the Sample code format, but you do not need to countersign the response.
Q: What are the key parameters in the notification that I need to use?
A: Pay attention to the following key parameters:
- result: indicates the payment result of the order.
- paymentRequestId: indicates the payment request number you generated for consult, cancel, and reconciliation.
- paymentId: indicates the payment order number generated by Antom used for refund and reconciliation.
- paymentAmount: indicates the payment amount.
Inquire about the result
The parameter is not a full set of parameters, please refer to the inquiryPayment API for full set of parameters and additional requirements for certain payment methods.
public static void inquiryPayment() {
  AlipayPayQueryRequest alipayPayQueryRequest = new AlipayPayQueryRequest();

  // replace with your paymentRequestId
  alipayPayQueryRequest.setPaymentRequestId("yourPaymentRequestId");

  AlipayPayQueryResponse alipayPayQueryResponse = null;
  try {
      alipayPayQueryResponse = CLIENT.execute(alipayPayQueryRequest);
  } catch (AlipayApiException e) {
      String errorMsg = e.getMessage();
      // handle error condition
  }
}
The following code shows a sample of the request message:
{
"paymentRequestId": "paymentRequestId01"
}
The following code shows a sample of the response message:
{
"result": {
  "resultCode": "SUCCESS",
  "resultStatus": "S",
  "resultMessage": "Success"
},
"paymentStatus": "SUCCESS",
"paymentRequestId": "paymentRequestId01",
"paymentId": "20240101123456789XXXX",
"paymentAmount": {
  "value": "4200",
  "currency": "SGD"
},
"paymentCreateTime": "2024-01-01T00:00:00+08:00",
"paymentTime": "2024-01-01T00:01:00+08:00",
"paymentMethodType": "SHOPEEPAY_SG"
}
Common questions
Q: How often should I call the inquiryPayment API?
A: Call the inquiryPayment API constantly with an interval of 2 seconds until the final payment result is obtained or an asynchronous payment result notification is received.
Q: What are the key parameters in the notification that I need to use?
A: Pay attention to these key parameters:
- result: represents the result of this inquiryPayment API call, the result of the order needs to be judged according to paymentStatus :
- SUCCESSandFAILrepresent the final result.
- PROCESSINGrepresents the processing.
- paymentAmount: indicates the payment amount.
Sample codes
Full sample codes for front-end:
// (Optional) Preload the SDK. Before creating a payment session, preload the SDK to improve the rendering speed of the checkout page, reducing the waiting time for buyers during the payment.
AMSCashierPayment.preload(context);

// Step 1: Get Antom PaymentSessionData from your server.
String paymentSessionData = "YOUR_PAYMENT_SESSIONDATA";

AMSCashierPaymentConfiguration configuration = new AMSCashierPaymentConfiguration();
configuration.setLocale(new Locale("en", "US"));
// Set the sandbox environment. If you leave it empty, the production environment is used by default.
configuration.setOption("sandbox", "true");
// Set the callback to monitor payment events on the checkout page.
configuration.setOnCheckoutListener(new OnCheckoutListener() {
  @Override
  public void onEventCallback(String eventCode, AMSEventResult eventResult) {
      AlipayLog.e(TAG, "onEventCallback eventCode=" + eventCode + " eventResult=" + eventResult.toString());

      if (!TextUtils.isEmpty(eventCode)) {
          if ("SDK_PAYMENT_SUCCESSFUL".equals(eventCode)) {
              // Payment was successful. Redirect the buyer to the payment result page, then confirm the payment result with the server.
          } else if ("SDK_PAYMENT_PROCESSING".equals(eventCode)) {
              // Payment is being processed. Confirm the payment result with the server. If the payment is successful, redirect the buyer to the payment result page. If the payment fails, guide the buyer to retry payment.
          } else if ("SDK_PAYMENT_FAIL".equals(eventCode)) {
              // Payment failed. Check the value of result.paymentResultCode in the onEventCallback result data for details. Guide the buyer to retry payment based on the obtained information.
          }else if ("SDK_PAYMENT_CANCEL".equals(eventCode)) {
              // Payment was canceled. The SDK can be re-invoked with a paymentSessionData within the validity period; if it has expired, the paymentSessionData needs to be re-requested.
          } else if ("SDK_PAYMENT_ERROR".equals(eventCode)) {
              // The payment status was abnormal. Confirm the payment result with the server. If it is confirmed that the payment has failed, guide the buyer to retry payment.
          } else if ("SDK_FORM_VERIFICATION_FAILED".equals(eventCode)) {
              // Verification failed after form submission. Guide the buyer to confirm the input and retry payment.
          }
      }
  }
});
// Instantiate AMSCashierPayment.
AMSCashierPayment checkout = new AMSCashierPayment.Builder(activity, configuration).build();

// Create and render the component.
checkout.createComponent(activity, sessionData);

// After the payment is completed or when the buyer exits the checkout page, free SDK component resources.
checkout.onDestroy();
Event codes
Status codes: Returned by
onEventCallback
during the component's runtime lifecycle.