
Store a card (SDK)
Deprecation Notice:
The content of this guide has been deprecated.
This guide instructs you on how to integrate independent card binding through SDK, allowing buyers to bind their bank cards at any stage of the payment process. In this solution, Antom is responsible for collecting and storing the buyer’s card plain information. After the card binding is successfully completed, Antom returns the corresponding card token (cardToken). Since sensitive cardholder data does not pass through your servers, this approach helps you eliminate the compliance burden of PCI-DSS. You are not required to build a PCI-DSS compliant payment environment nor obtain PCI compliance certification. In subsequent transactions, you can directly use the cardToken parameter to initiate payments without collecting the buyer's card information again. For token (cardToken) payments, please refer to Card-on-File (COF) transactions.
User experience
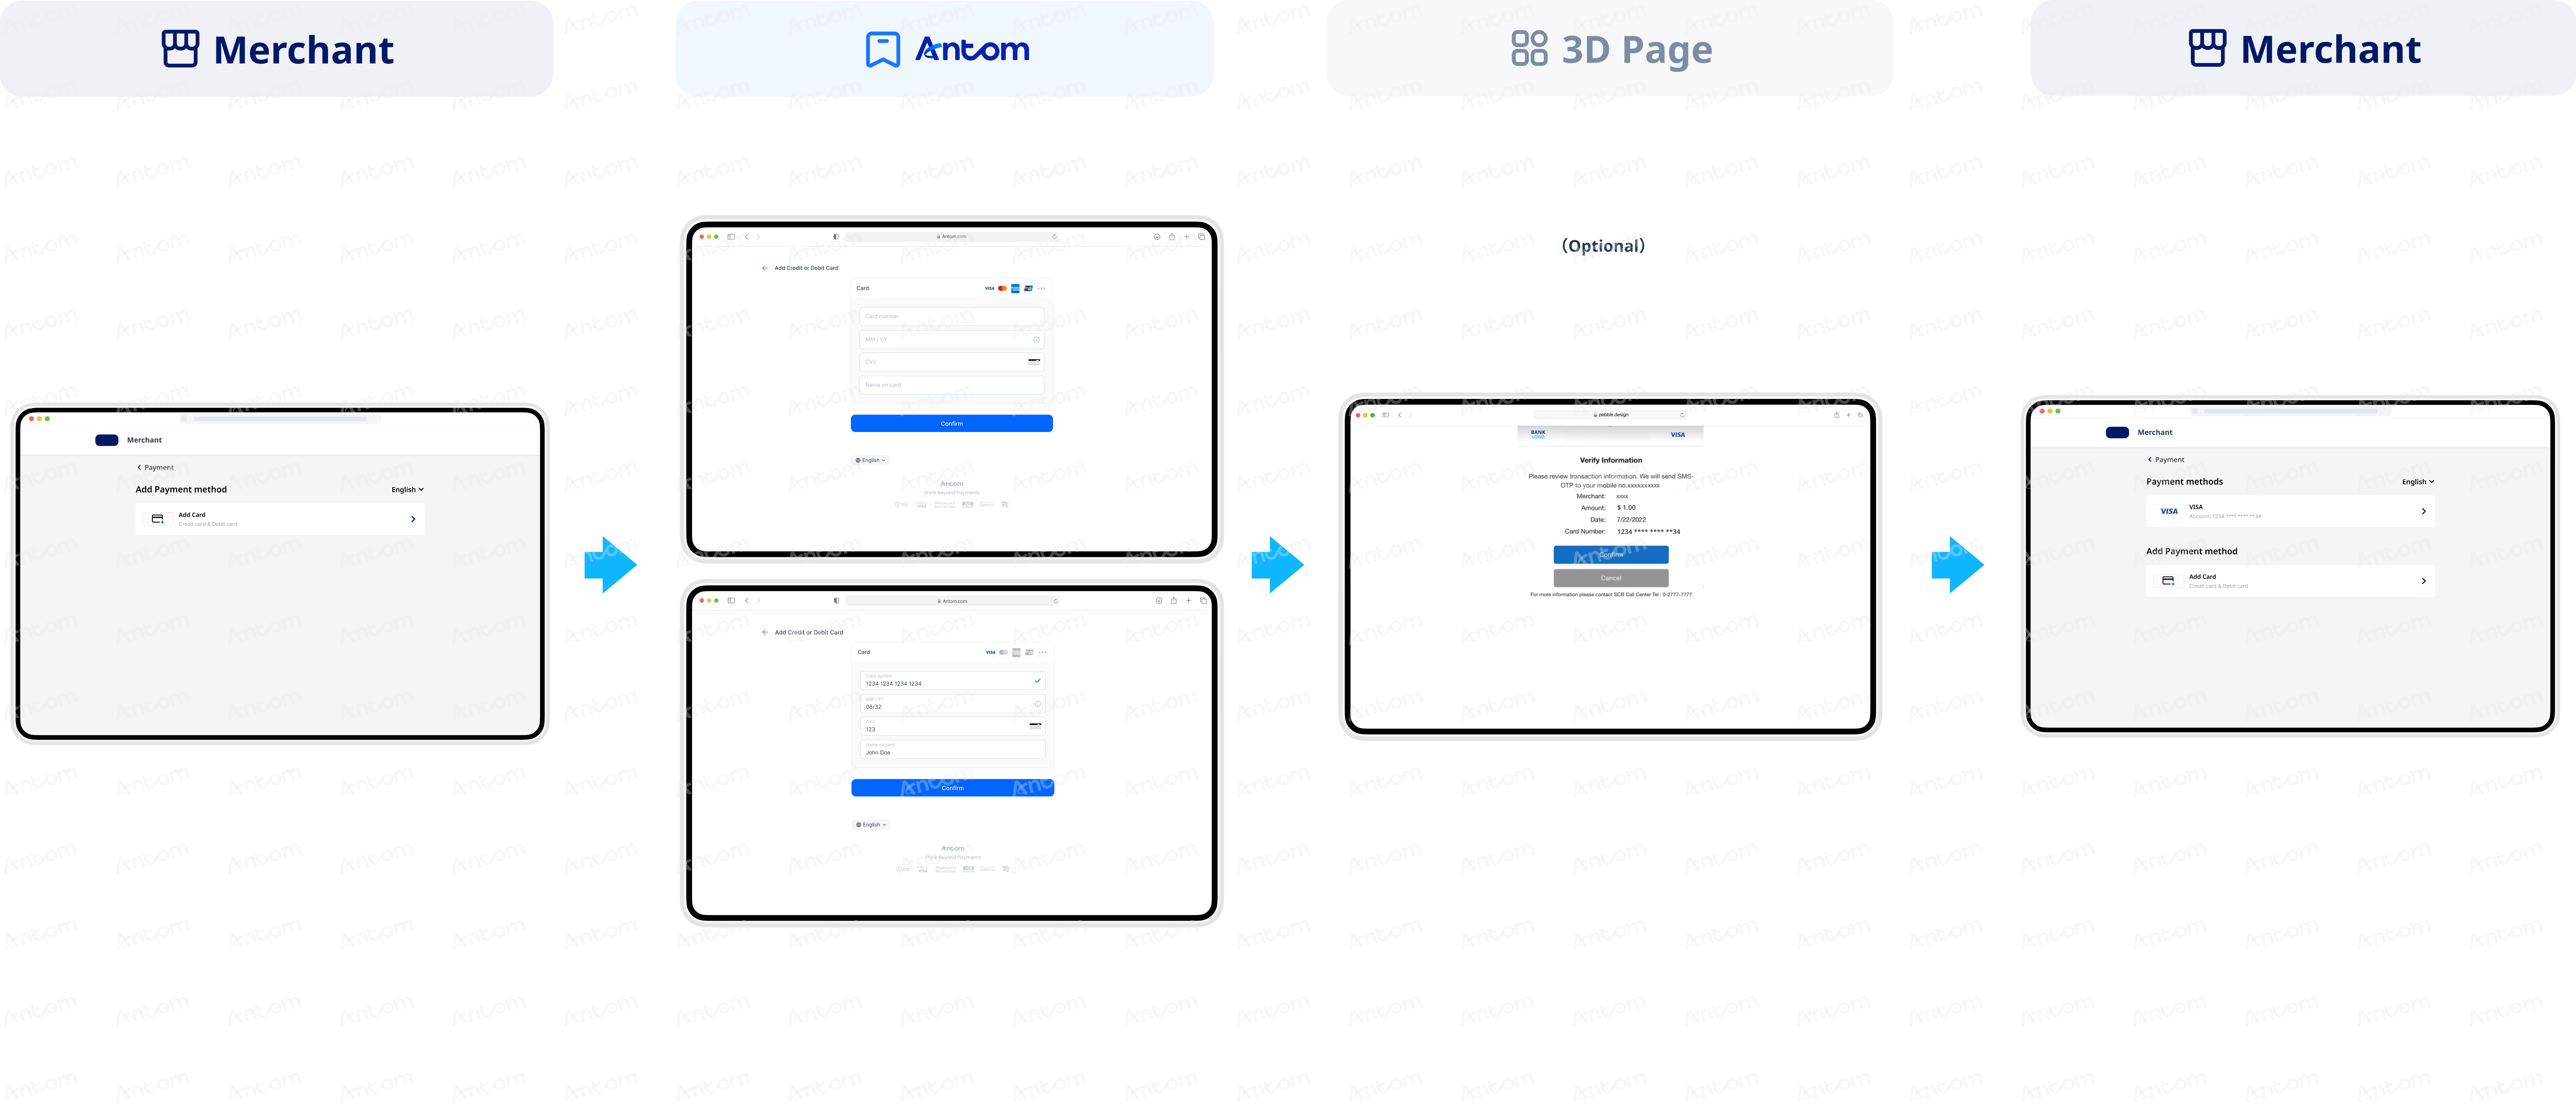
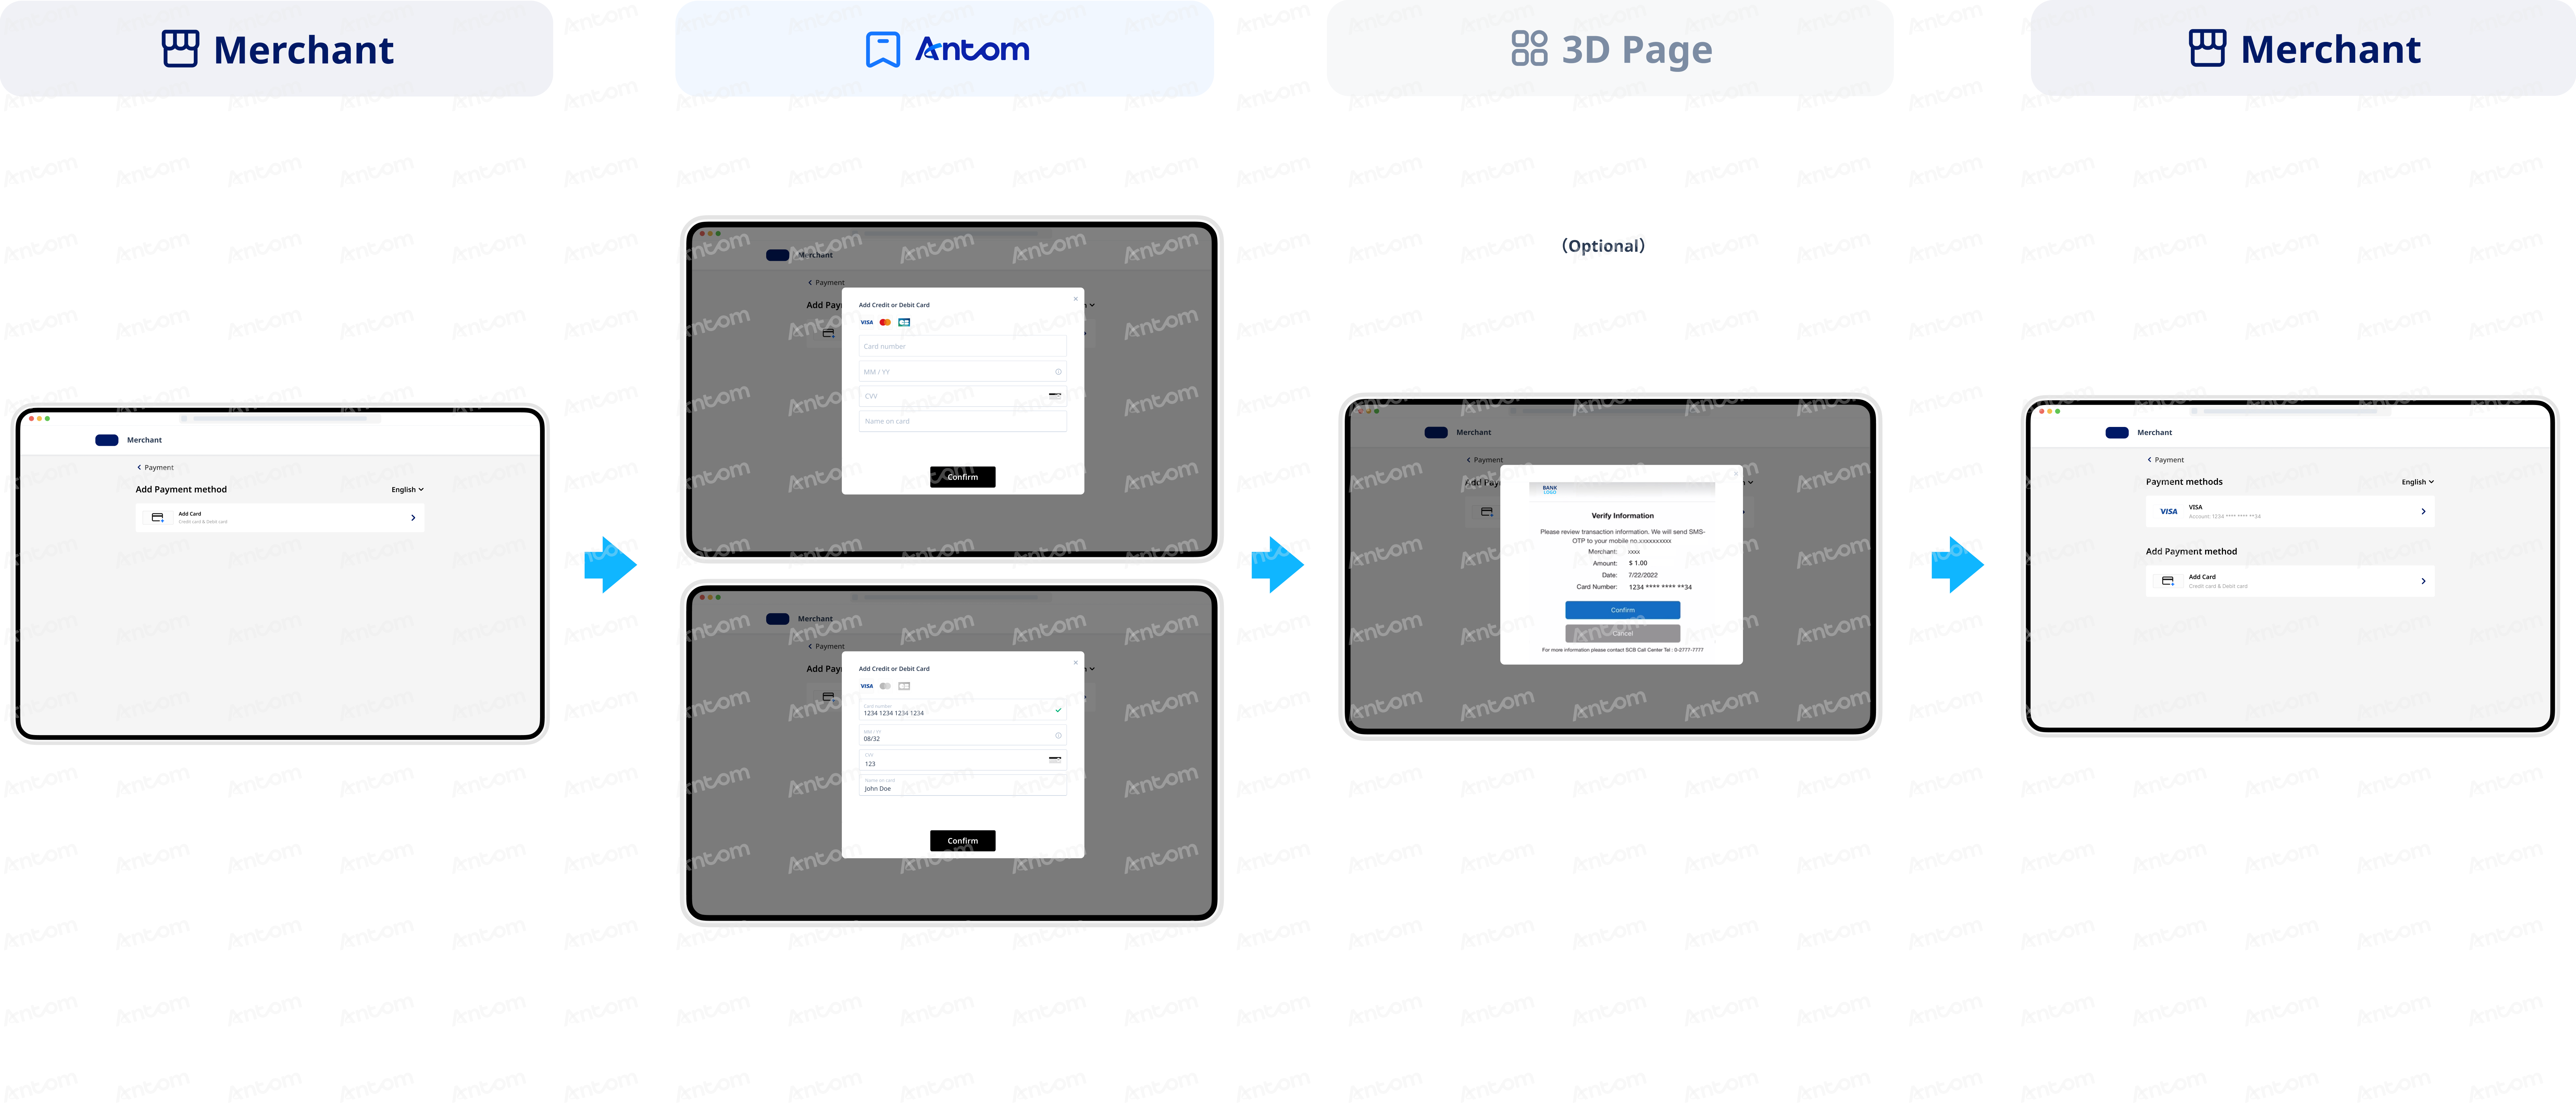
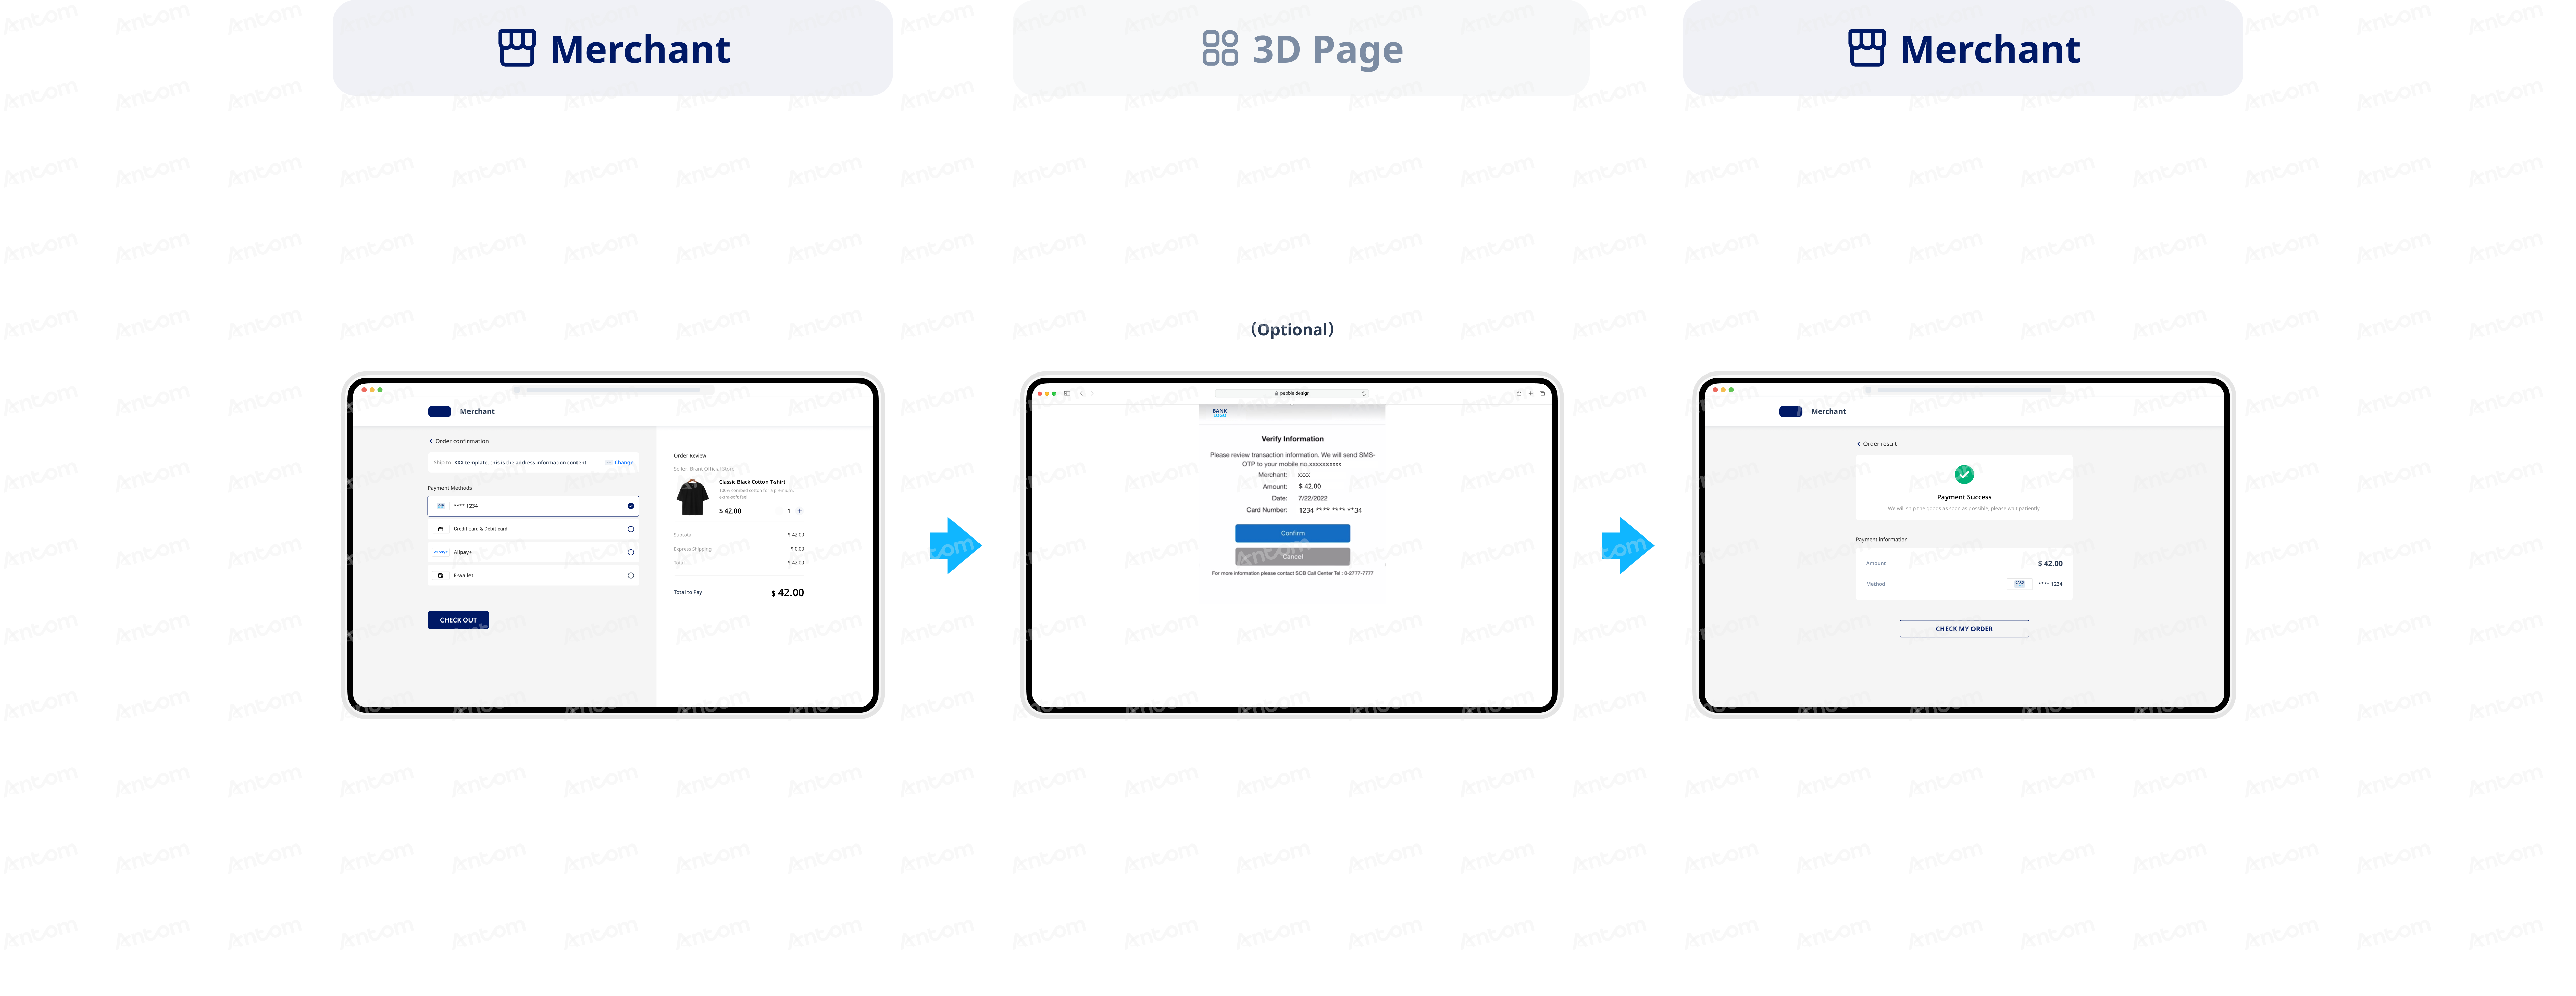
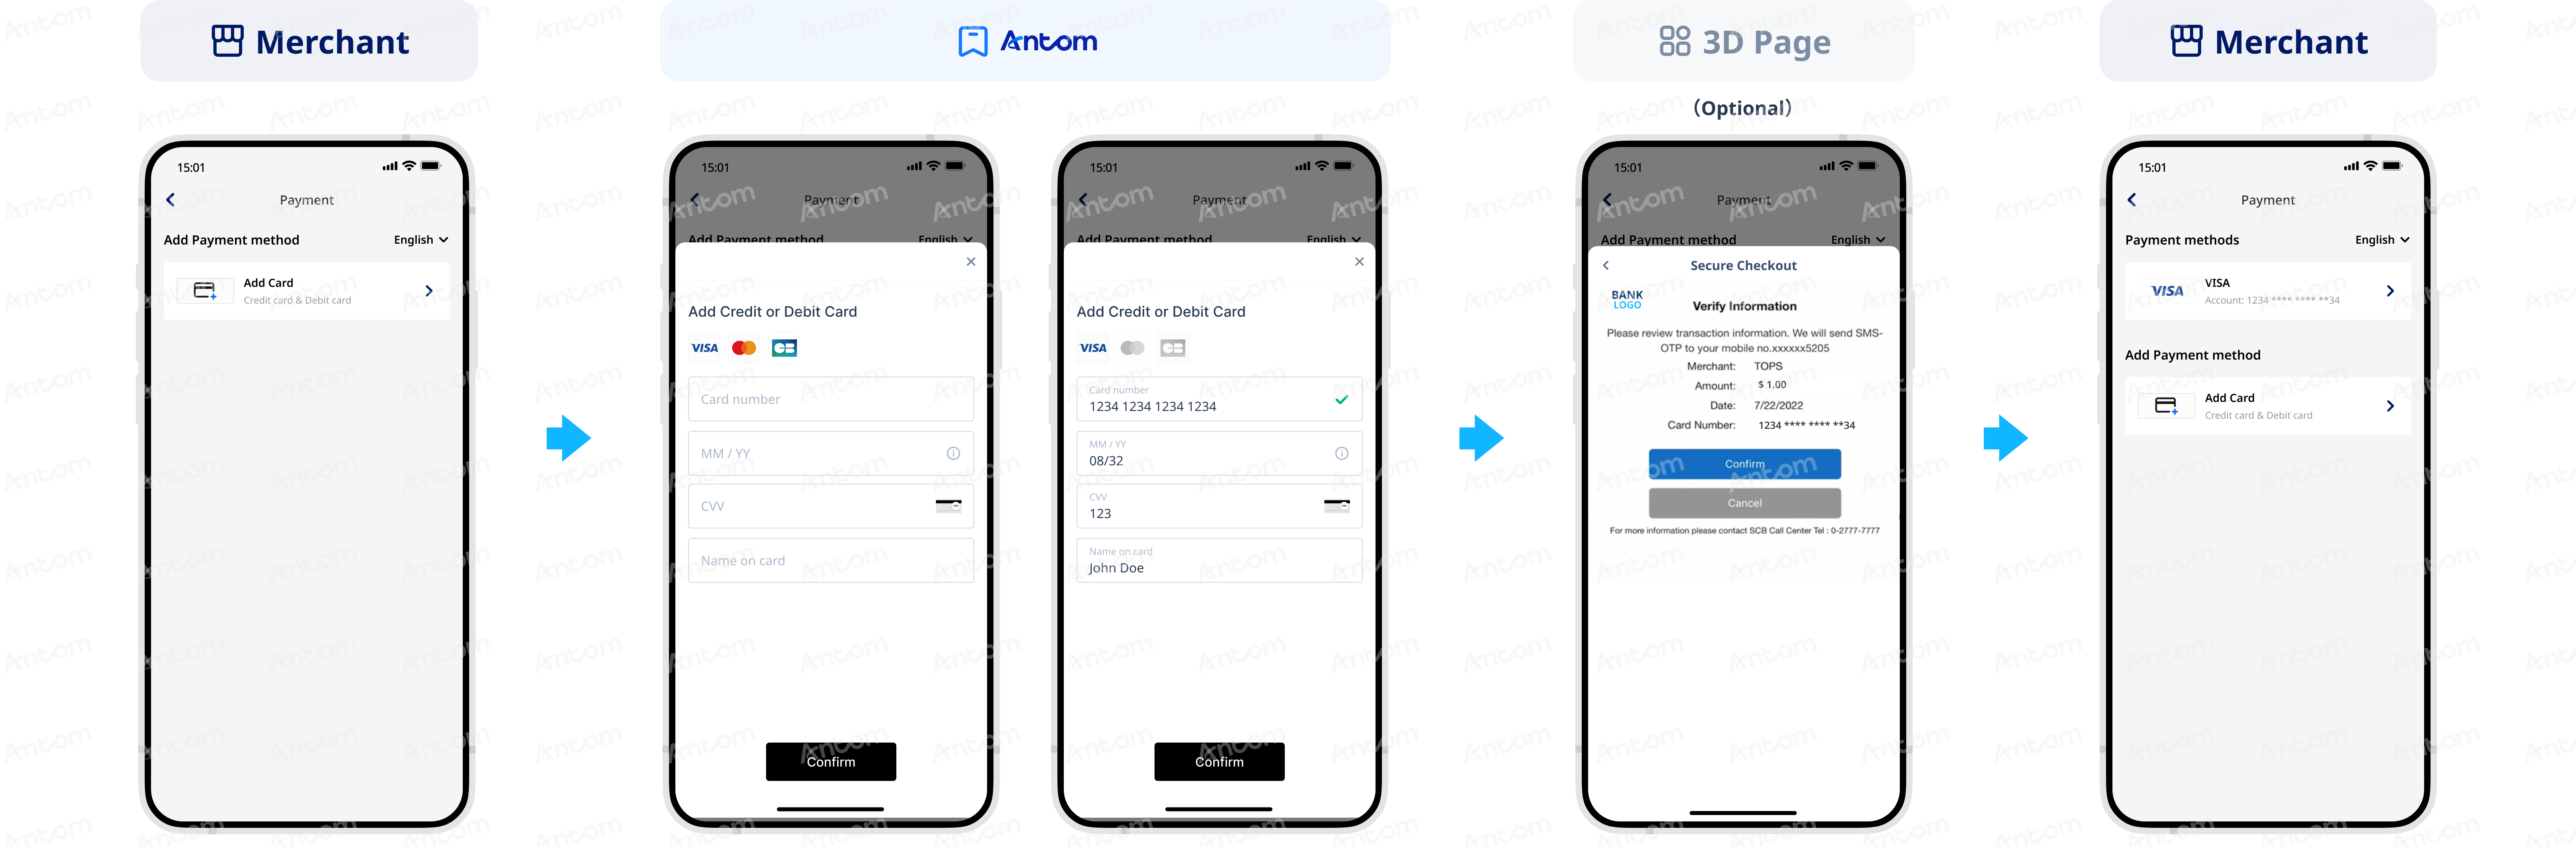
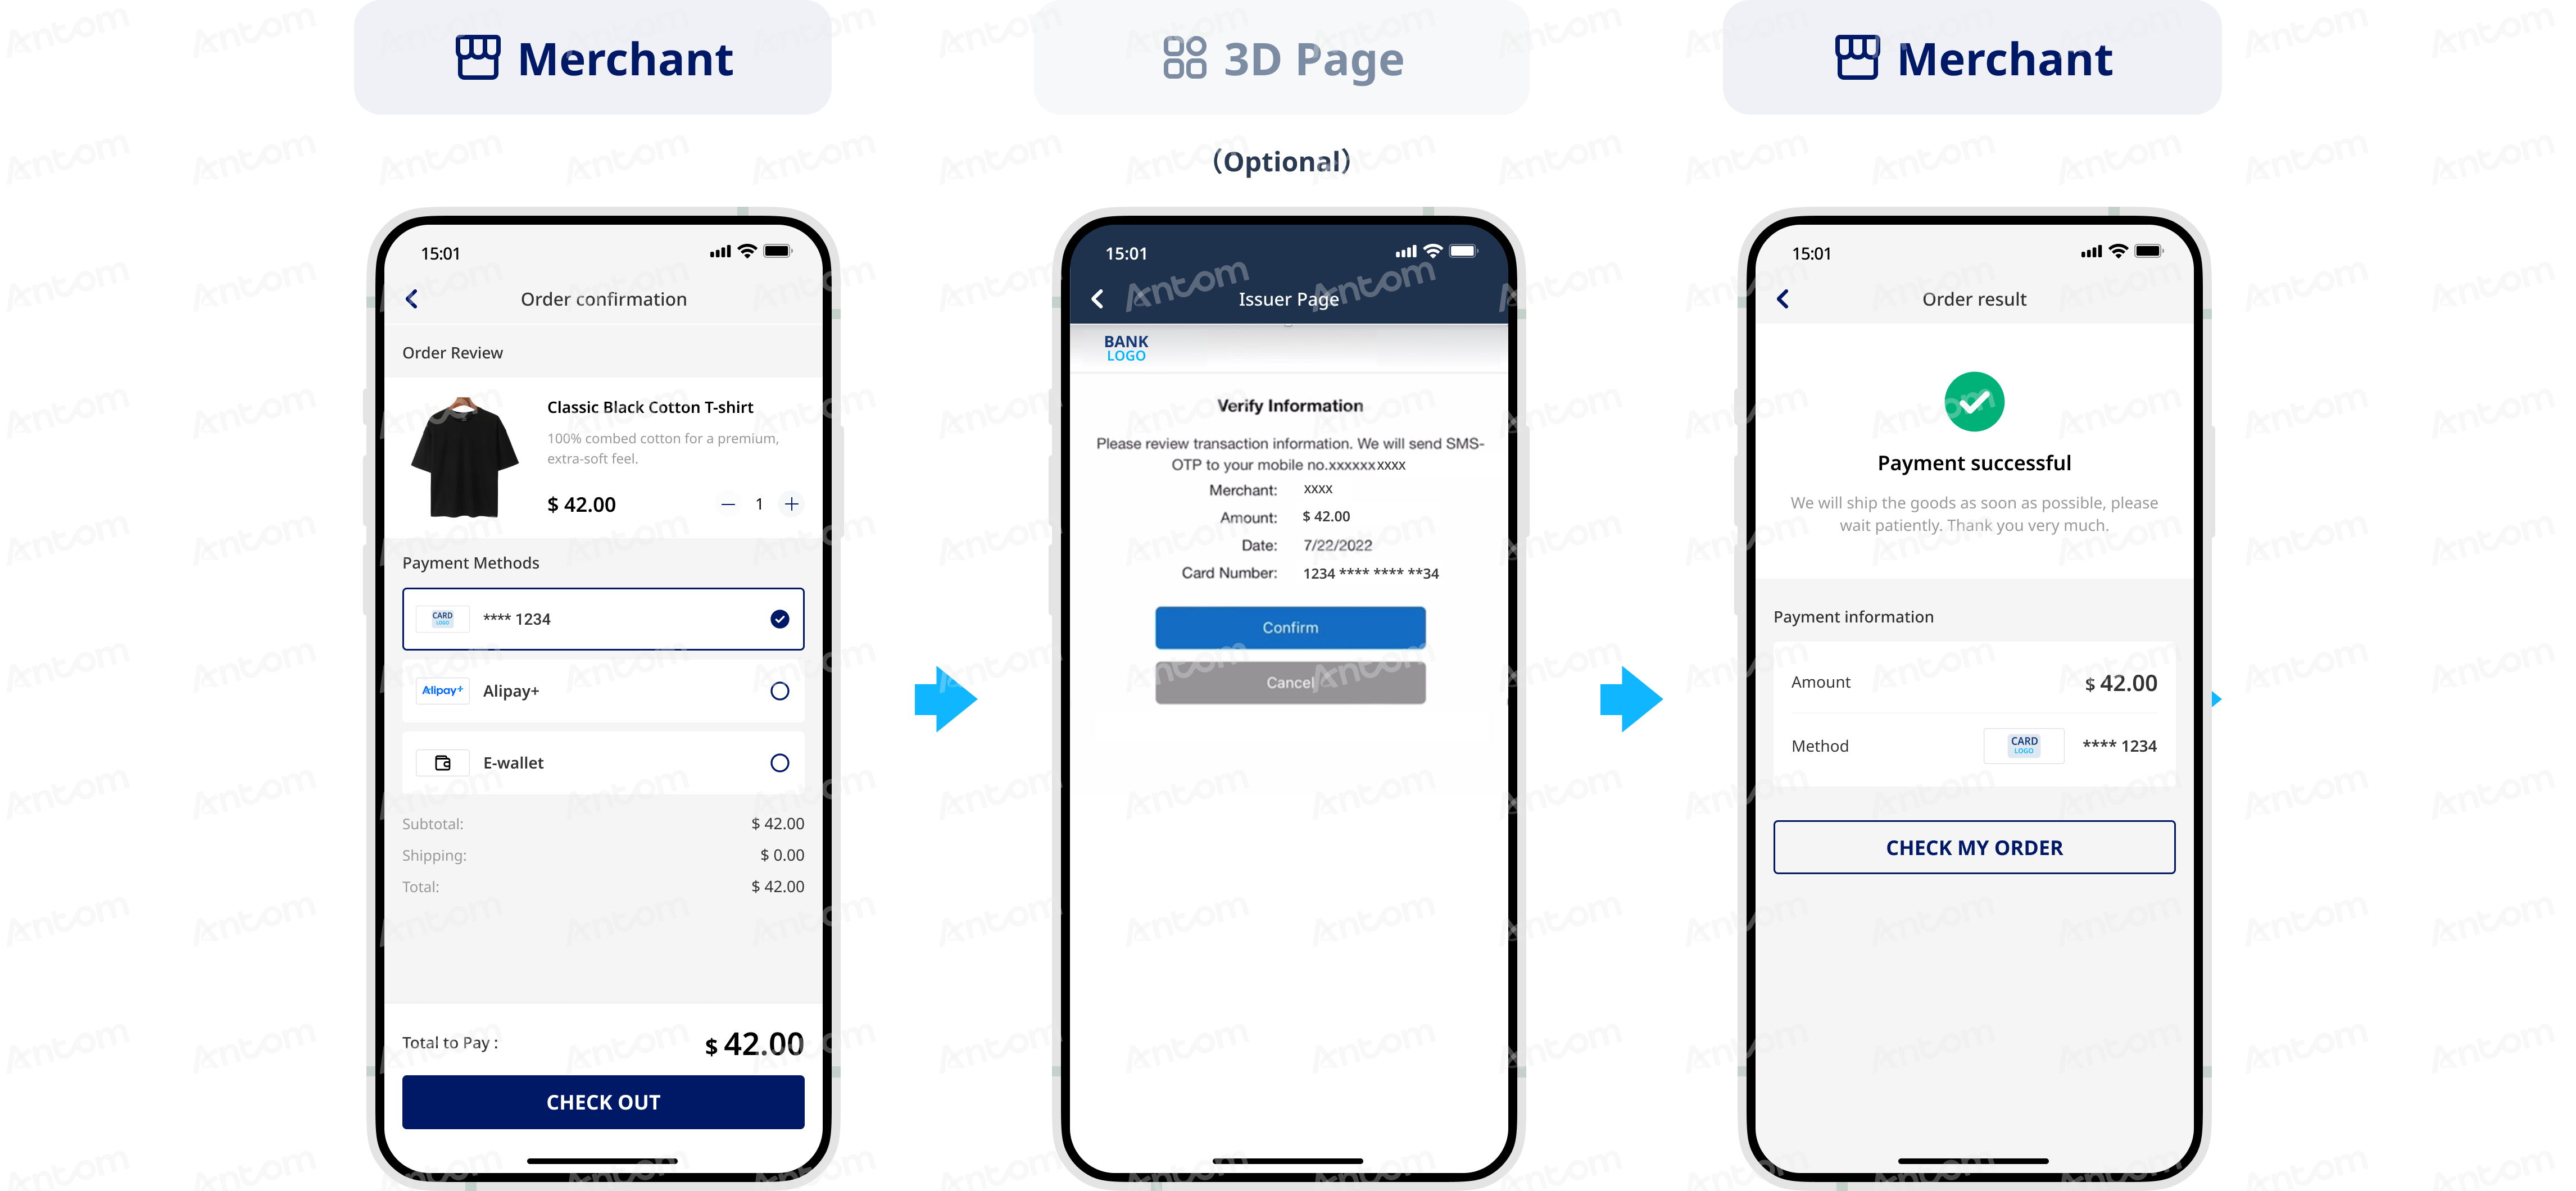
The following images illustrate the user experience on the web and mobile platforms during the card binding process (including both embedded and pop-up card binding experiences) and the subsequent payment flow.
Web
Mobile
Embedded card-binding experience
Pop‑up card‑binding experience
Subsequent payments
Embedded card-binding experience
Pop‑up card‑binding experience
Subsequent payments
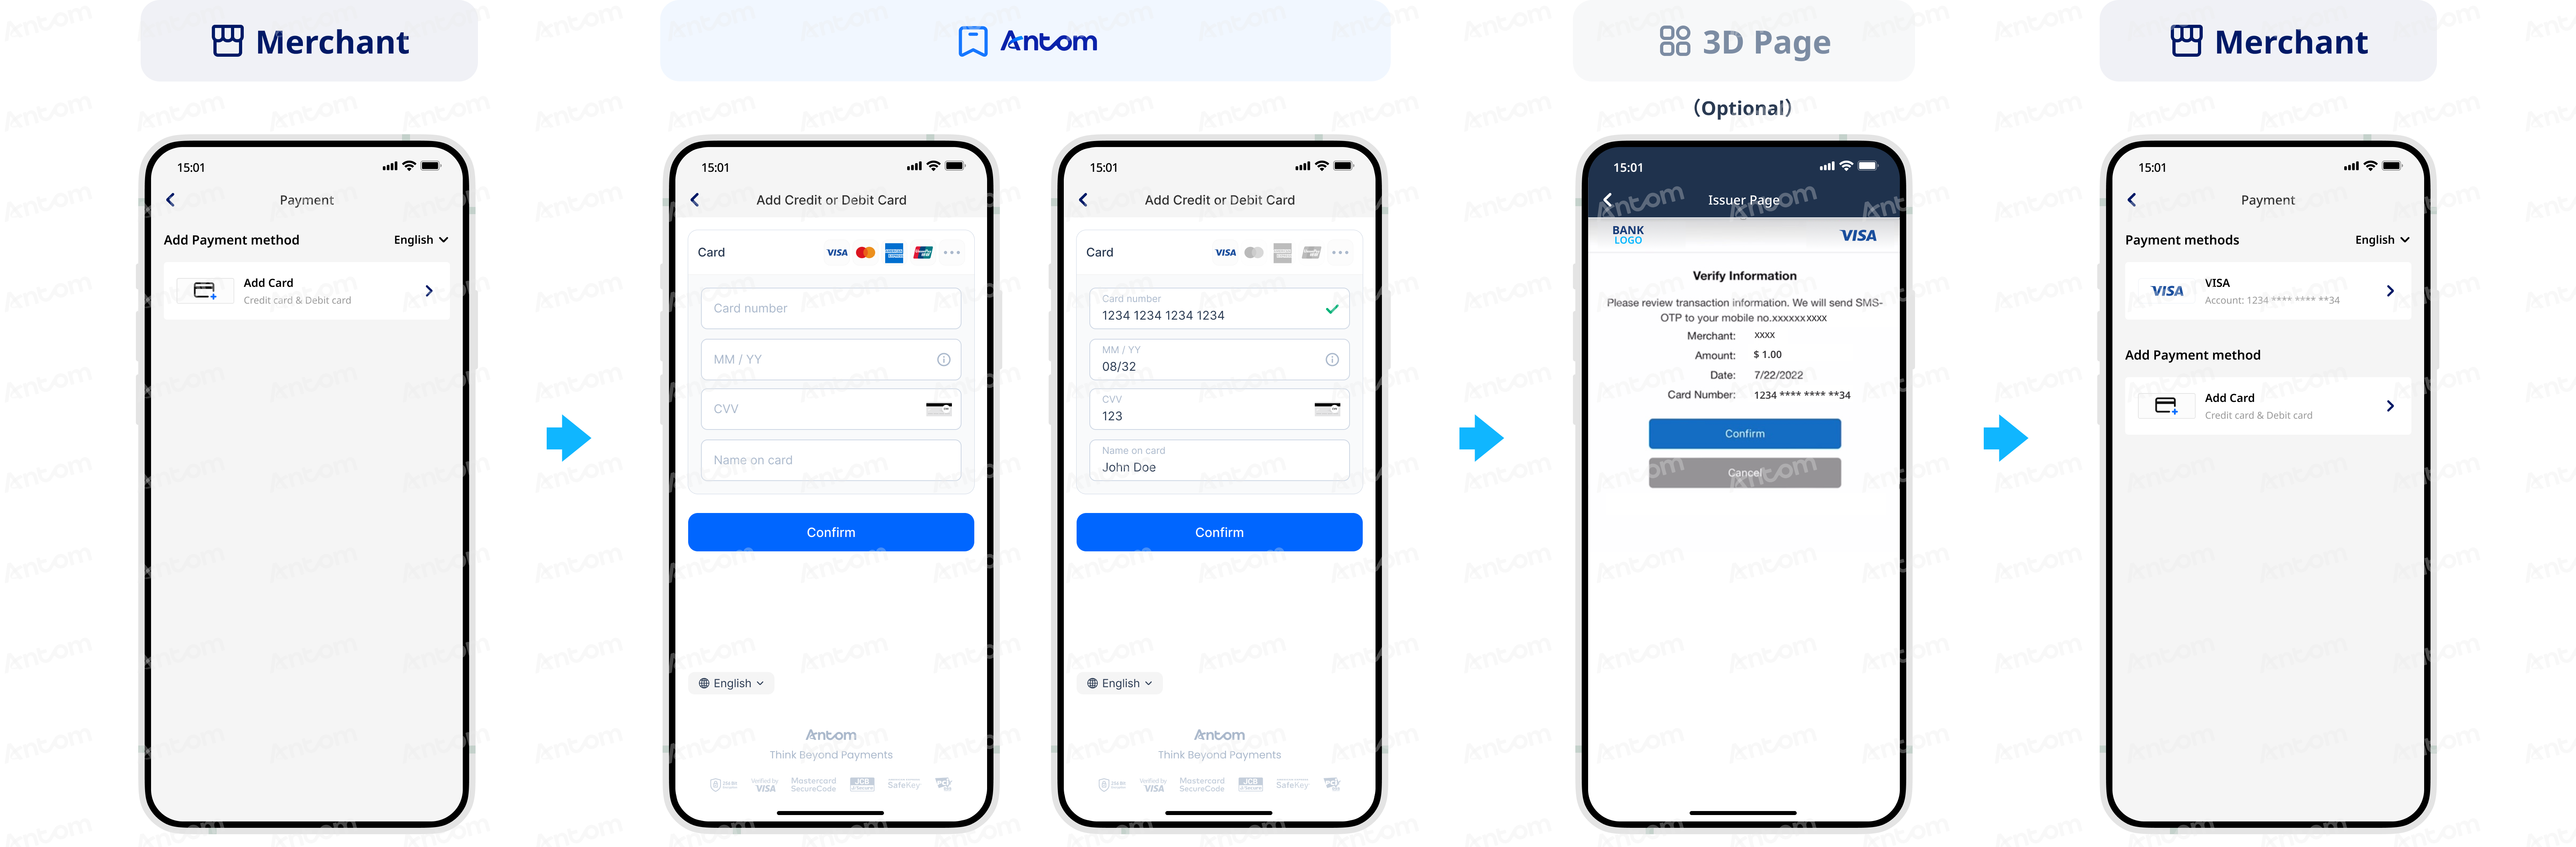
Binding process
The following steps describe the card binding process:
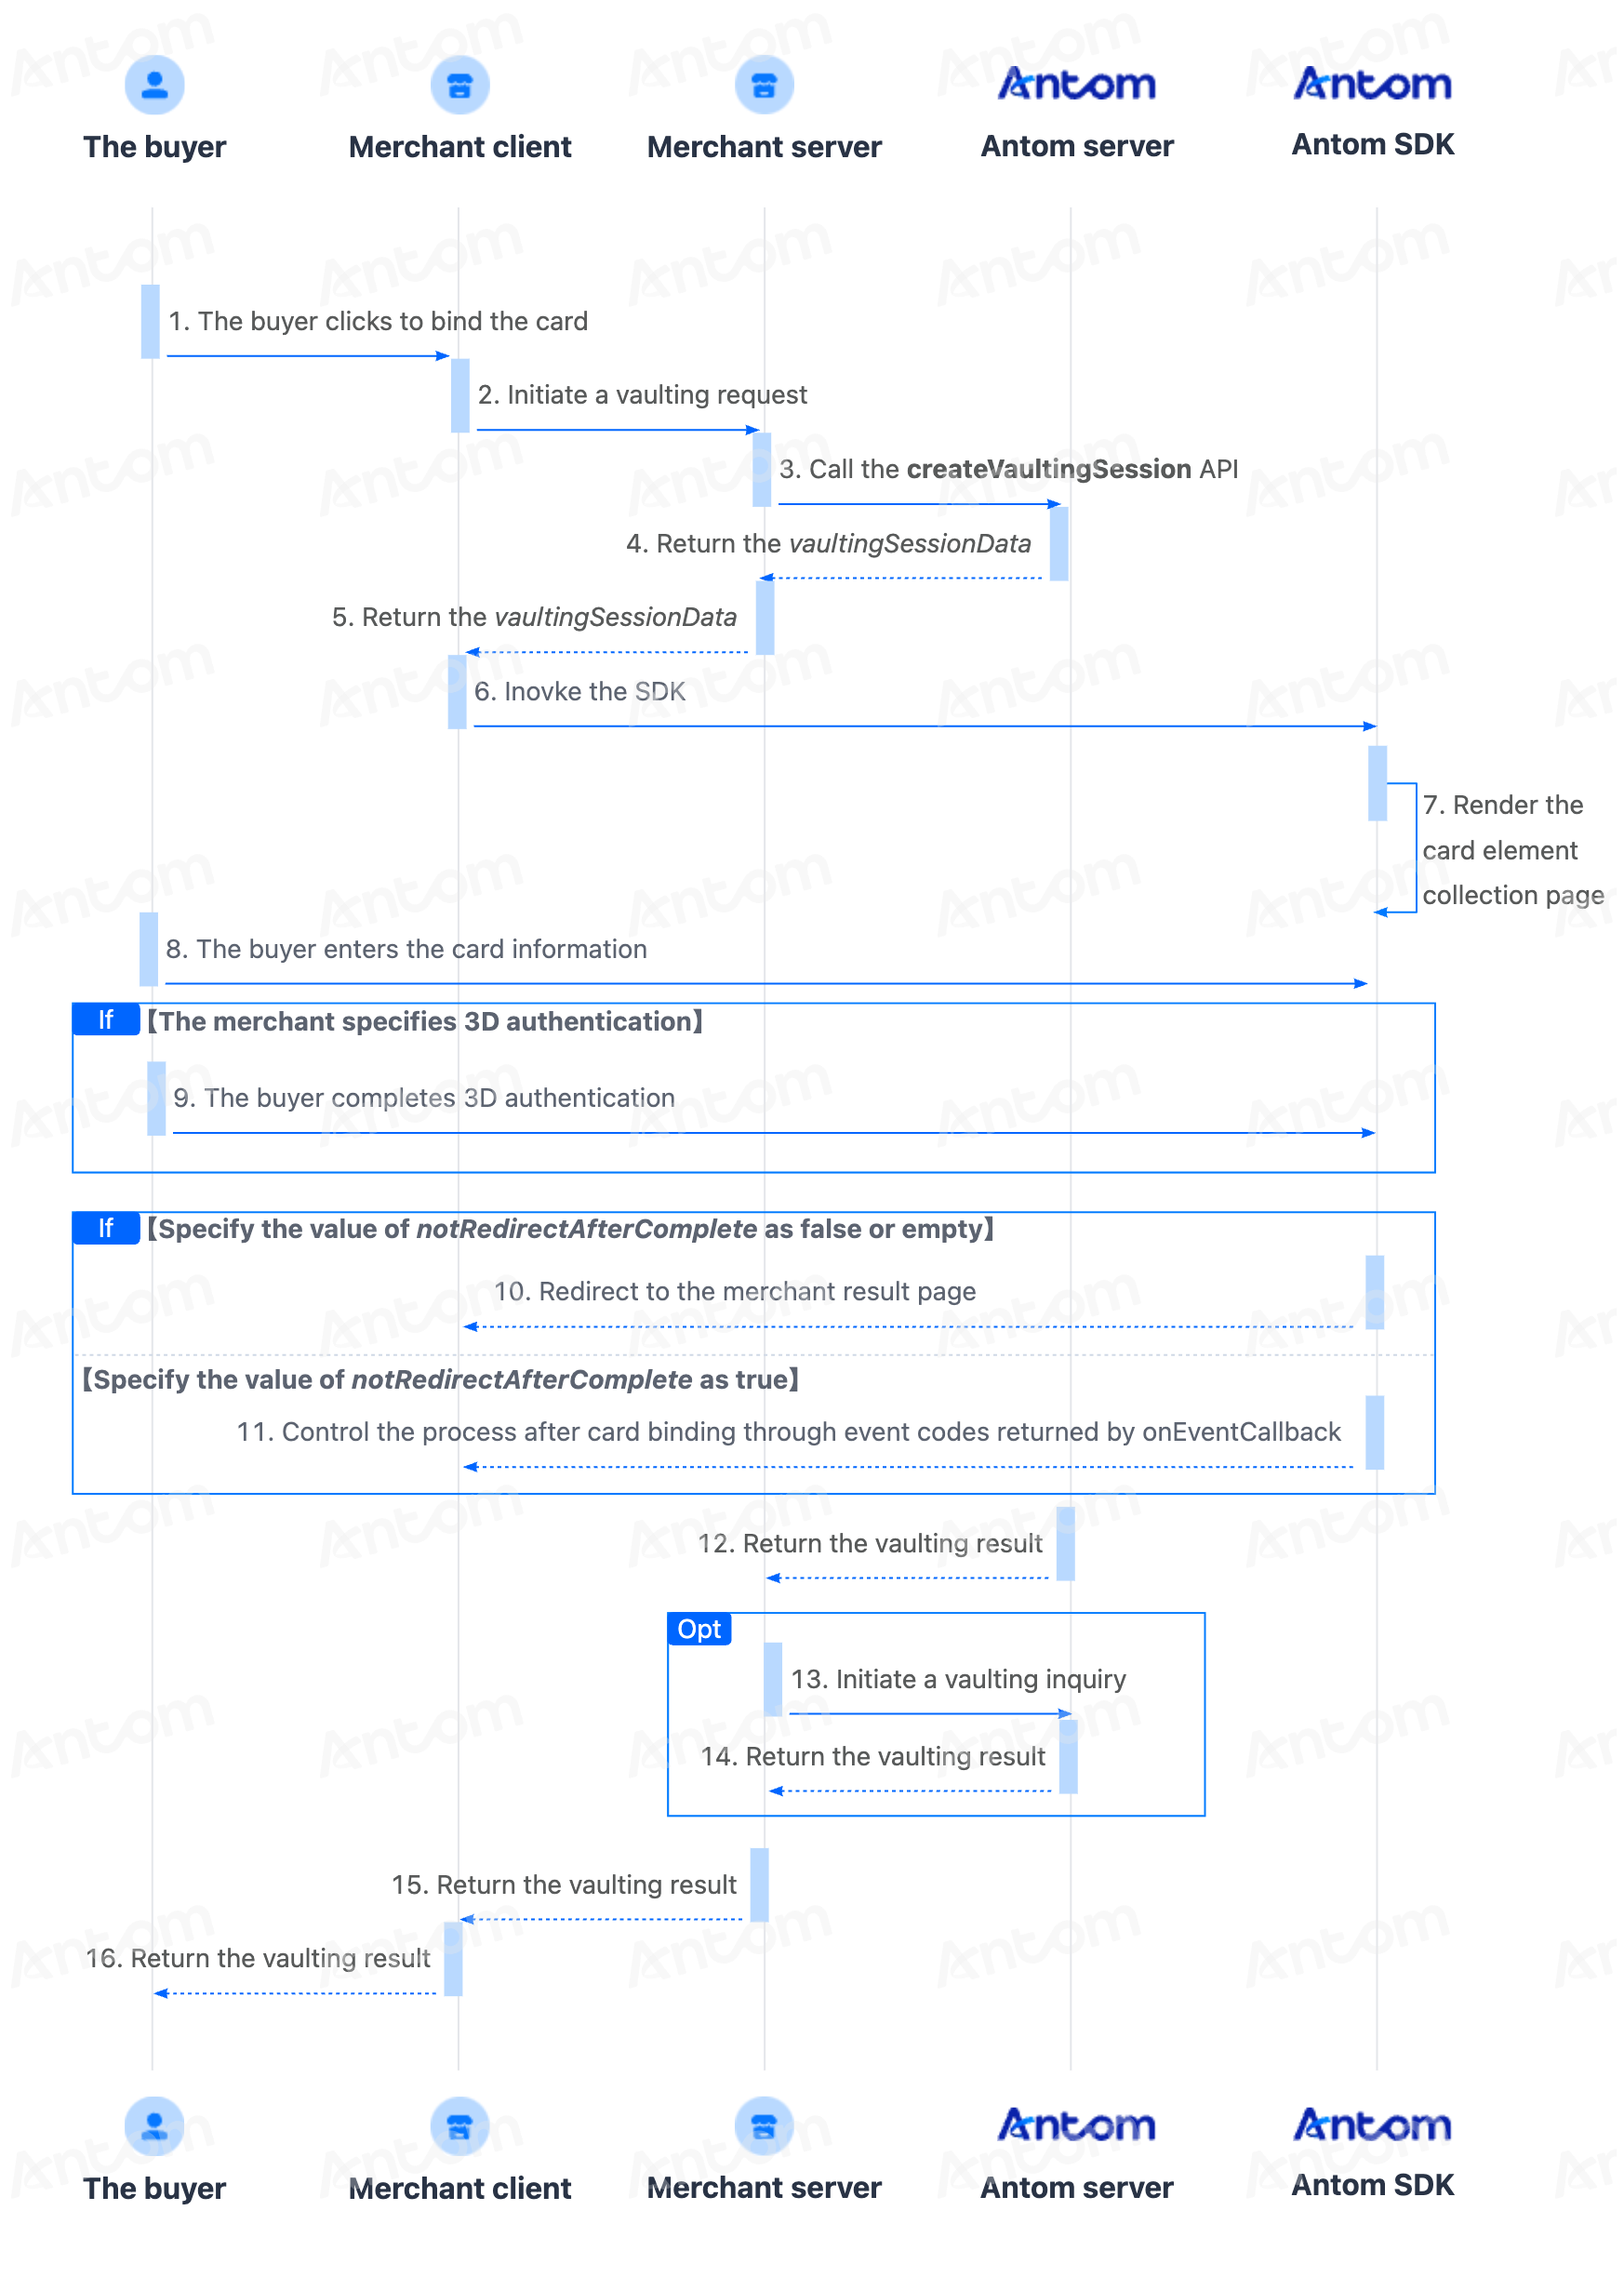
- The buyer clicks to bind a card.
- Call the createVaultingSession API and initiate a card binding request.
After the buyer clicks the card binding button, your server calls the Antom server's createVaultingSession API to initiate the card binding request. - Initiate the SDK component.
Invoke the SDK component with the vaultingSessionData returned from the createVaultingSession API. The SDK presents a page for collecting card details. - The buyer completes the card binding process.
On the card information collection page, the buyer inputs card details to complete card binding. - (Optional) The buyer completes 3D authentication.
If 3D authentication is specified, the buyer needs to complete 3D authentication. - Obtain the card binding result.
You can obtain the card binding result through either of the following two methods:
- Asynchronous notification:Antom will send you the card binding result notifications via the notifyVaulting API.
- Synchronous inquiry: Call the inquireVaulting API to check the card binding status.
Note: On the card binding management page, you must present the masked card number of the buyer’s bound card. For subsequent payments, pass in your request the token obtained from the initial card binding through the notifyVaulting or inquireVaulting API.
Web/WAP
Android
iOS
Integration preparations
Before you start integrating, read the Integration guide and API overview to understand the integration steps of the server-side API and the precautions for calling the API. Furthermore, ensure the following prerequisites are met:
- Obtained your client ID
- Complete the key configuration
- Complete the configuration of vaultingNotificationUrl to receive the asynchronous notification
- Integrate the server-side SDK package, install the server-side library, and initialize a request instance. For more details, refer to Server-side SDKs.
- Integrate the client-side SDK package by following the steps of Integrate the SDK package for Web/WAP.
Integration steps
Follow the steps below to begin your integration:
- (Optional) Preload the card binding page
- Create a vaulting sesssion
- Invoke the SDK component
- Obtain the card binding result
Step 1: (Optional) Preload the card binding page Client-side
It is strongly recommended to perform a preloading process when loading the card‑binding page to enhance the rendering speed of the checkout page. This process does not impact your page performance. Refer to the following code example to implement preloading.
Web/WAP
// import { AMSVaulting } from '@alipay/ams-checkout';

AMSVaulting.preload();
Step 2: Create a vaulting sesssion Server-side
When a buyer selects a payment method provided by Antom, you need to collect key information such as card binding request ID, card binding redirect URL, and card binding result notification URL, call the createVaultingSession API to create a vaulting session, and return the vaulting session to the client.
Creating a payment session includes the following parameters:
Parameter name | Required | Description |
paymentMethodType | Yes | The payment method to be bound. |
vaultingRequestId | Yes | The unique ID generated by the merchant. Every time you initiate card binding, you must have a new ID. |
vaultingNotificationUrl | Yes | The card binding result notification address. |
redirectUrl | No | The URL to be redirected to after card binding. |
is3DSAuthentication | No | Specify whether 3D authentication is required for this card binding request. Set the value to true if 3D authentication is required. For details, refer to 3D Secure 2.Notes:
|
public static void createVaultingSession(){
  AlipayVaultingSessionRequest alipayVaultingSessionRequest = new AlipayVaultingSessionRequest();

  // Replace with your paymentRequestId
  String vaultingRequestId = UUID.randomUUID().toString();
  alipayVaultingSessionRequest.setVaultingRequestId(vaultingRequestId);

  alipayVaultingSessionRequest.setPaymentMethodType("CARD");
  alipayVaultingSessionRequest.setVaultingNotificationUrl("http://www.yourNotifyUrl.com");
  alipayVaultingSessionRequest.setRedirectUrl("http://www.yourRedirectUrl.com");

  // Bind the card
  AlipayVaultingSessionResponse alipayVaultingSessionResponse;
  try{
      alipayVaultingSessionResponse = CLIENT.execute(alipayVaultingSessionRequest);
  }catch (AlipayApiException e){
      String errorMsg = e.getMessage();
      // Handle error condition
  }

}
The following code shows a sample of the request:
{
"paymentMethodType": "CARD",
"redirectUrl": "http://www.yourRedirectUrl.com",
"vaultingNotificationUrl": "http://www.yourNotifyUrl.com",
"vaultingRequestId": "4a17609d-1749-4f53-a2fb-8bdba8d5aad8"
}
The following code shows a sample of the response, which contains the following parameters:
- vaultingSessionData: The vaulting session data to be returned to the client.
- vaultingSessionExpiryTime: The expiration time of the vaulting session.
{
"result": {
  "resultCode": "SUCCESS",
  "resultMessage": "success.",
  "resultStatus": "S"
},
"vaultingSessionData": "qOnxVjFYB/QNieiGGnf3P7XOreGIRi7dSZDMzCzT5DzGLaI5a5paDhEAgmG8IwVuTCHscscPdJg==&&SG&&188&&eyJleHRlbmRJbmZvIjoie1widmVyc2lvbk1hcFwiOntcIndlYlwiOntcIjEuMS4wXCI6e1widGFyZ2V0V2ViVmVyaXNvblwiOlwiMS4xLjBcIn0sXCIxLjIuMFwiOntcInRhcmdldFdlYlZlcmlzb25cIjpcIjEuMi4wXCJ9fSxcImlPU1wiOntcIjEuMS4wXCI6e1widGFyZ2V0V2ViVmVyaXNvblwiOlwiMS4xLjBcIn0sXCIxLjIuMFwiOntcInRhcmdldFdlYlZlcmlzb25cIjpcIjEuMi4wXCJ9fSxcIkFuZHJvaWRcIjp7XCIxLjEuMFwiOntcInRhcmdldFdlYlZlcmlzb25cIjpcIjEuMS4wXCJ9LFwiMS4yLjBcIjp7XCJ0YXJnZXRXZWJWZXJpc29uXCI6XCIxLjIuMFwifX19fSIsInBheW1lbnRTZXNzaW9uQ29uZmlnIjp7InBheW1lbnRNZXRob2RDYXRlZ29yeVR5cGUiOiJDQVJEIiwicHJvZHVjdFNjZW5lIjoiVkFVTFRJTkciLCJwcm9kdWN0U2NlbmVWZXJzaW9uIjoiMS4wIn0sInNraXBSZW5kZXJQYXltZW50TWV0aG9kIjpm******",
"vaultingSessionExpiryTime": "2024-12-31T12:06:05+08:00",
"vaultingSessionId": "********qOnxVjFYB/QNieiGGnf3P7XOreGIRi7fAxqpLf+1appjsXAs5Eq1H"
}
Step 3: Invoke the SDK component Client-side
Use vaultingSessionData to invoke the SDK, and the SDK renders the required card payment element collection page and handles the 3D Secure flow, allowing the buyer to complete a server‑to‑server card binding process.
1. Instantiate the client SDK
Create the SDK instance by using the
AMSVaulting
and specifying the basic parameters. Configuration objects includes the following parameters:Parameter name | Required | Description |
locale | No | It is used to pass in language information. Valid values are listed as follows. You can choose the value to pass based on the region of the payment method. If other values are passed, English is used by default:
|
environment | Yes | It is used to pass in environmental information. Valid values are:
|
onEventCallback | No | When events occur during SDK runtime (such as card binding results or form submission errors), the callback method returns specific event codes. |
The following sample code shows how to instantiate the SDK:
Initialize SDK via npm
Initialize SDK via CDN
Initialize SDK via npm
import { AMSVaulting } from '@alipay/ams-checkout' // Package Management

const checkoutApp = new AMSVaulting({
environment: "sandbox",
locale: "en_US",
onEventCallback: ({ code, result }) => {}
});
Initialize SDK via CDN
const checkoutApp = new window.AMSVaulting({
environment: "sandbox",
locale: "en_US",
onEventCallback: ({ code, result }) => {}
});
The following sample code demonstrates how to obtain the browser language:
let language = navigator.language || navigator.userLanguage;
language = language.replace("-", "_"); // Replace "-" with "_"
2. Create a card binding component
Use the
createComponent
or mountComponent
function in the instance object to create a card binding component. Configuration objects includes the following parameters:Parameter name | Required | Description |
sessionData | Yes | Create a configuration object by using the sessionData parameter: Pass the complete data in the vaultingSessionData parameter obtained in the response through the createVaultingSession API to the sessionData parameter. |
appearance | No | Customized appearance theme configuration, and it contains the following child parameters:
|
notRedirectAfterComplete | No | Boolean type. The valid values are:
Note: The card binding result event code returned by the client is only used as a reference for the redirect operation of the client page. For card binding status updates, refer to the results returned by the server's notifyVaulting or inquireVaulting API. |
There are different ways in which you can make the SDK component display on a page through a pop-up window or embedded on a page, the following are the sample codes:
Pop-up experience
Embedded experience
async function create(sessionData) {
await checkoutApp.createComponent({
  sessionData: sessionData,
  notRedirectAfterComplete: true,
});
}
async function create(sessionData) {
await checkoutApp.mountComponent({
  sessionData: sessionData,
  appearance:{
    showSubmitButton: false, // Configure whether the payment button is rendered by the component.
  },
  notRedirectAfterComplete: true,
},'#ContainerNodeId');
}

checkoutApp.submit().then(({code, message})=>{}) //When using embedded rendering and custom submit button, remember to actively call the submit method to initiate the submission process.
3. Handle SDK callback event codes
According to the configuration of the notRedirectAfterComplete parameter, handle the subsequent process accordingly:
- If you set notRedirectAfterComplete to false, the buyer will be redirected to the vaultingRedirectUrl that you provided in createVaultingSession API after completing the card binding. You can obtain the card binding result by active query in that URL and show it to the buyer.
- If notRedirectAfterComplete istrue, the card binding result will be given through theonEventCallbackmethod. The card binding result here is only for front-end display, and the final order status is subject to the server side.
Event codes
The following are the possible event codes of the card binding result returned by
onEventCallback
:Event code | Message | Solution |
SDK_ASSET_BINDING_SUCCESSFUL | The vaulting is successful. | It is recommended to redirect the buyer to the card binding result page. |
SDK_ASSET_BINDING_PROCESSING | The vaulting is being processed. | Guide the buyer to retry the card‑binding operation based on the provided information. |
SDK_ASSET_BINDING_FAIL | The vaulting failed. | |
SDK_ASSET_BINDING_CANCEL | The buyer exits the vaulting page. | You can re-invoke the SDK with the vaultingSessionData that is within its validity period. If it has expired, you need to request a new vaultingSessionData. |
SDK_ASSET_BINDING_ERROR | The vaulting status is abnormal. | You can wait for the card binding result notification, or guide the buyer to bind the card again. |
The following sample code shows how to process the
onEventCallback
: function onEventCallback({ code, result }) {
switch (code) {
case code:
'SDK_ASSET_BINDING_SUCCESSFUL';
// Card binding successful, release SDK component resources and redirect to the card binding result page.
break;
case code:
'SDK_ASSET_BINDING_FAIL';
// Card binding failed, you can guide the buyer to re-bind the card based on the vaultingResultCode error code prompt information.
break;
case code:
'SDK_ASSET_BINDING_ERROR';
// Card binding exception, you can wait for the card binding result notification or re-guide the buyer to bind the card.
break;
case code:
'SDK_ASSET_BINDING_CANCEL';
// Guide the buyer to try card binding again.
break;
default:
break;
}
}The following are sample codes for card binding results corresponding to frontend event codes:
The card binding is successful
{
"code": "SDK_ASSET_BINDING_SUCCESSFUL",  // Frontend event code
"result": {
  "resultStatus": "S",
  "resultCode": "SUCCESS",
  "resultMessage": "Success"
}
}
The card binding failed
{
"code": "SDK_ASSET_BINDING_FAIL",  // Frontend event code
"result": {
  "resultStatus": "S",
  "resultCode": "SUCCESS",
  "resultMessage": "Success"
},
"vaultingStatus":"FAIL",
"vaultingResultCode":"PROCESS_FAIL",
"vaultingResultMessage":"A general business failure occurred."
}
4. Unmount the component
Call the
unmount
method to free SDK component resources in the following situations:- When the buyer switches views to exit the checkout page, free the component resources created in the createVaultingSession API.
- When the buyer initiates multiple card binding requests, free the component resources created in the previous createVaultingSession API.
- Free the component resources after obtaining the card binding result.
Note: Only one component can be created at a time. If you need to use different vaultingSessionData or recreate the component, you must first execute the unload the method.
// Free SDK component resources.
checkoutApp.unmount();
Step 4: Obtain the card binding result Server-side
You can obtain the card binding result by one of the following methods:
- Receive the asynchronous notification
- Inquire about the result
Receive the asynchronous notification
Inquire about the result
Receive the asynchronous notification
Antom will send you the card binding result notifications via the notifyVaulting API. Follow the steps below for configuration:
1. Configure the webhook URL to receive asynchronous notifications
- If each of your card binding operations has a unique notification URL, it is recommended to set the webhook URL in each request. You can pass the asynchronous notification receiving URL for the specific order through vaultingNotificationUrl in the createVaultingSession API.
The following code shows a sample of the asynchronous notification request:
{
"paymentMethodDetail": {
  "card": {
    "brand": "MASTERCARD",
    "cardToken": "ALIPAY34RlcCU3ZtZ***********************sVYl8x244tyWCloE4MwfmN48sP1+rSPQ==",
    "maskedCardNo": "************1310",
    "networkTransactionId": "112000********575887"
  },
  "paymentMethodType": "CARD"
},
"vaultingRequestId": "VAULT_2025*******348834_AUTO",
"result": {
  "resultCode": "SUCCESS",
  "resultMessage": "success",
  "resultStatus": "S"
}
}
The following table shows the possible values of result.resultStatus in the notification request of authorization result. Please handle the result according to the guidance provided:
result.resultStatus | Message | Further actions |
S | Indicates that the card binding is successful. | It is recommended to store the following parameters for subsequent payments:
|
F | Indicates that the card binding failed. | Please check result.resultCode to identify the specific failure reason. |
2. Verify the asynchronous notification
When you receive an asynchronous notification from Antom, you are required to return the response in the Sample code format, but you do not need to countersign the response.
You need to verify the signature of the authorization payment notification sent by Antom:
import javax.servlet.http.HttpServletRequest;

import org.springframework.http.ResponseEntity;
import org.springframework.web.bind.annotation.PostMapping;
import org.springframework.web.bind.annotation.RequestBody;
import org.springframework.web.bind.annotation.RestController;

import com.alipay.global.api.model.Result;
import com.alipay.global.api.model.ResultStatusType;
import com.alipay.global.api.response.AlipayResponse;
import com.alipay.global.api.tools.WebhookTool;

@RestController
public class PaymentNotifyHandleBySDK {

  /**
   * alipay public key, used to verify signature
   */
  private static final String SERVER_PUBLIC_KEY = "";

  /**
   * payment result notify processor
   * using <a href="https://spring.io">Spring Framework</a>
   *
   * @param request    HttpServletRequest
   * @param notifyBody notify body
   * @return
   */
  @PostMapping("/payNotify")
  public Object payNotifyHandler(HttpServletRequest request, @RequestBody String notifyBody) {

      // retrieve the required parameters from http request
      String requestUri = request.getRequestURI();
      String requestMethod = request.getMethod();

      // retrieve the required parameters from request header
      String requestTime = request.getHeader("request-time");
      String clientId = request.getHeader("client-id");
      String signature = request.getHeader("signature");

      Result result;
      AlipayResponse response = new AlipayResponse();

      try {
          // verify the signature of notification
          boolean verifyResult = WebhookTool.checkSignature(requestUri, requestMethod, clientId, requestTime, signature, notifyBody, SERVER_PUBLIC_KEY);
          if (!verifyResult) {
              throw new RuntimeException("Invalid notify signature");
          }

          // deserialize the notification body

          // update the order status based on the notification result

          // respond to the server that the notification has been received
          result = new Result("SUCCESS", "success", ResultStatusType.S);

      } catch (Exception e) {
          String errorMsg = e.getMessage();
          // Handle error condition
          result = new Result("ERROR", errorMsg, ResultStatusType.F);
      }
      response.setResult(result);
      return ResponseEntity.ok().body(response);
  }

}
Whether the card binding is successful or not, each notification request must be responded to in the format specified below. Otherwise, Antom will resend the asynchronous notification.
{
"result": {
  "resultCode": "SUCCESS",
  "resultStatus": "S",
  "resultMessage": "success"
}
}
Common questions
Q: Will an asynchronous notification be sent immediately after a successful card binding?
A: The asynchronous notification for the card binding result is sent within seconds, typically 3 to 5 seconds after the card binding succeeds.
Q: Will an asynchronous notification be sent if the card binding fails?
A: Yes, it will be sent.
Q: Will the asynchronous notification be re-sent?
A: Yes, the asynchronous notification will be re-sent automatically within 24 hours for the following cases:
- If you didn't receive the asynchronous notification due to network reasons.
- If you receive an asynchronous notification from Antom, but you did not respond to the notification in the Sample code format.
The notification can be resent up to 8 times or until a correct response is received to terminate delivery. The sending intervals are as follows: 0 minutes, 2 minutes, 10 minutes, 10 minutes, 1 hour, 2 hours, 6 hours, and 15 hours.
Q: Do I need to verify the signature upon receiving a card binding result notification?
A: Yes. Signature verification is necessary to ensure that the request was sent to you by Antom. When performing verification, the assembled message must strictly adhere to the following format:
<http-method> <http-uri> <client-id>.<request-time>.<request-body>
. For the <request-body>
part, you must use its original, unprocessed string value.
Q: How long is the validity period of the returned cardToken?
A: The cardToken itself is permanently valid. If the card expires, it will become invalid at the same time. If the card expires, when you call the payment request again, Antom will return the
INVALID_EXPIRATION_DATE
error code. It is recommended that you guide the buyer to re-bind the updated card information.Inquire about the result
In addition to obtaining card binding results through asynchronous notifications, you can also query to get the results. You can inquire about the card binding result by calling the inquireVaulting API using vaultingRequestId from the card binding request.
public static void inquireVaulting(){
  AlipayVaultingQueryRequest alipayVaultingQueryRequest = new AlipayVaultingQueryRequest();

  //Replace with your vaultingRequestId
  alipayVaultingQueryRequest.setVaultingRequestId("c7f3ee64-c472-4d12-b8de-3157804ed55f");

  AlipayVaultingQueryResponse alipayVaultingQueryResponse;
  try{
      alipayVaultingQueryResponse = CLIENT.execute(alipayVaultingQueryRequest);
  }catch (AlipayApiException e){
      String errorMsg = e.getMessage();
      // Handle error condition
  }
}
The following sample code shows a request message:
{
"vaultingRequestId": "VAULT_20250508183612361_AUTO"
}The following sample code shows a response message:
{
"paymentMethodDetail": {
  "card": {
    "brand": "MASTERCARD",
    "cardToken": "ALIPAYEfG2DFbGx2Eh****************************XA7nyWCloE4MwfmN48sP1+rSPQ==",
    "maskedCardNo": "************1310",
    "networkTransactionId": "112000********575887"
  },
  "paymentMethodType": "CARD"
},
"result": {
  "resultCode": "SUCCESS",
  "resultMessage": "success.",
  "resultStatus": "S"
},
"vaultingRequestId": "VAULT_2025********361_AUTO",
"vaultingStatus": "SUCCESS"
}
The table below shows the possible values of result.resultStatus in the response. Please handle the result according to the guidance provided:
result.resultStatus | Message | Further actions |
S | Indicates that the API is called successfully. | You can obtain the card binding result from the vaultingStatus field in the API response.
|
F | Indicates that the API call failed. | For more information about the failure reason, refer to result.resultCode. |
U | Indicates that the API call failed for unknown reasons. | Use the same vaultingRequestId to try again. |
Integration preparations
Before you start integrating, read Integration guide and API overview to understand the integration steps of the server-side API and the precautions for calling the API. Furthermore, ensure the following prerequisites are met:
- Obtained your client ID
- Complete the key configuration
- Complete the configuration of vaultingNotificationUrl to receive the asynchronous notification
- Integrate the server-side SDK package, install the server-side library, and initialize a request instance. For more details, refer to Server-side SDKs.
- Integrate the client-side SDK package by following the steps detailed in Integrate the SDK package for Android, and ensure to use the latest SDK version.
Integration steps
Follow the steps below to begin your integration:
- (Optional) Preload the card binding page
- Create a vaulting sesssion
- Invoke the SDK component
- Obtain the card binding result
Step 1: (Optional) Preload the card binding page Client-side
It is strongly recommended to perform a preloading process when loading the card‑binding page to enhance the rendering speed of the checkout page. This process does not impact your page performance. Refer to the following code example to implement preloading.
Android
AMSVaulting.preload(context.getApplicationContext());
//context-(required)-Android application context object.
Step 2: Create a vaulting sesssion Server-side
When a buyer selects a payment method provided by Antom, you need to collect key information such as card binding request ID, card binding redirect URL, and card binding result notification URL, call the createVaultingSession API to create a vaulting session, and return the vaulting session to the client.
Creating a payment session includes the following parameters:
Creating a payment session includes the following parameters:
Parameter name | Required | Description |
paymentMethodType | Yes | The payment method to be bound. |
vaultingRequestId | Yes | The unique ID generated by the merchant. Every time you initiate card binding, you must have a new ID. |
vaultingNotificationUrl | Yes | The card binding result notification address. |
redirectUrl | No | The URL to be redirected to after card binding. |
is3DSAuthentication | No | Specify whether 3D authentication is required for this card binding request. Set the value to true if 3D authentication is required. For details, refer to 3D Secure 2.Notes:
|
public static void createVaultingSession(){
  AlipayVaultingSessionRequest alipayVaultingSessionRequest = new AlipayVaultingSessionRequest();

  // Replace with your paymentRequestId
  String vaultingRequestId = UUID.randomUUID().toString();
  alipayVaultingSessionRequest.setVaultingRequestId(vaultingRequestId);

  alipayVaultingSessionRequest.setPaymentMethodType("CARD");
  alipayVaultingSessionRequest.setVaultingNotificationUrl("http://www.yourNotifyUrl.com");
  alipayVaultingSessionRequest.setRedirectUrl("http://www.yourRedirectUrl.com");

  // Bind the card
  AlipayVaultingSessionResponse alipayVaultingSessionResponse;
  try{
      alipayVaultingSessionResponse = CLIENT.execute(alipayVaultingSessionRequest);
  }catch (AlipayApiException e){
      String errorMsg = e.getMessage();
      // Handle error condition
  }

}
The following code shows a sample of the request:
{
"paymentMethodType": "CARD",
"redirectUrl": "http://www.yourRedirectUrl.com",
"vaultingNotificationUrl": "http://www.yourNotifyUrl.com",
"vaultingRequestId": "4a17609d-1749-4f53-a2fb-8bdba8d5aad8"
}
The following code shows a sample of the response, which contains the following parameters:
- vaultingSessionData: The vaulting session data to be returned to the client.
- vaultingSessionExpiryTime: The expiration time of the vaulting session.
{
"result": {
  "resultCode": "SUCCESS",
  "resultMessage": "success.",
  "resultStatus": "S"
},
"vaultingSessionData": "qOnxVjFYB/QNieiGGnf3P7XOreGIRi7dSZDMzCzT5DzGLaI5a5paDhEAgmG8IwVuTCHscscPdJg==&&SG&&188&&eyJleHRlbmRJbmZvIjoie1widmVyc2lvbk1hcFwiOntcIndlYlwiOntcIjEuMS4wXCI6e1widGFyZ2V0V2ViVmVyaXNvblwiOlwiMS4xLjBcIn0sXCIxLjIuMFwiOntcInRhcmdldFdlYlZlcmlzb25cIjpcIjEuMi4wXCJ9fSxcImlPU1wiOntcIjEuMS4wXCI6e1widGFyZ2V0V2ViVmVyaXNvblwiOlwiMS4xLjBcIn0sXCIxLjIuMFwiOntcInRhcmdldFdlYlZlcmlzb25cIjpcIjEuMi4wXCJ9fSxcIkFuZHJvaWRcIjp7XCIxLjEuMFwiOntcInRhcmdldFdlYlZlcmlzb25cIjpcIjEuMS4wXCJ9LFwiMS4yLjBcIjp7XCJ0YXJnZXRXZWJWZXJpc29uXCI6XCIxLjIuMFwifX19fSIsInBheW1lbnRTZXNzaW9uQ29uZmlnIjp7InBheW1lbnRNZXRob2RDYXRlZ29yeVR5cGUiOiJDQVJEIiwicHJvZHVjdFNjZW5lIjoiVkFVTFRJTkciLCJwcm9kdWN0U2NlbmVWZXJzaW9uIjoiMS4wIn0sInNraXBSZW5kZXJQYXltZW50TWV0aG9kIjpm******",
"vaultingSessionExpiryTime": "2024-12-31T12:06:05+08:00",
"vaultingSessionId": "********qOnxVjFYB/QNieiGGnf3P7XOreGIRi7fAxqpLf+1appjsXAs5Eq1H"
}
Step 3: Invoke the SDK component Client-side
Use vaultingSessionData to invoke the SDK, and the SDK renders the required card payment element collection page and handles the 3D Secure flow, allowing the buyer to complete a server‑to‑server card binding process.
1. Instantiate the client SDK
Create the SDK instance by using the
AMSVaulting
and specifying the basic parameters. Configuration objects includes the following parameters:Parameter name | Required | Description |
Locale | No | It is used to pass in language information. Valid values are listed as follows. You can choose the value to pass based on the region of the payment method. If other values are passed, English is used by default:
|
Options | No | Used to configure the redirection after the card binding and specify whether to use the sandbox environment. Valid values are:
|
OnCheckoutListener | No | Create a checkout callback listener for handling events in subsequent processes. This API includes the following methods:
Note: The card binding result event codes returned on the client-side are for reference only in page navigation. Vaulting status updates must be based on the results returned by the server-side notifyVaulting or inquireVaulting API. |
The following sample code shows how to instantiate the SDK:
Instantiate the SDK
AMSVaultingConfiguration configuration = new AMSVaultingConfiguration();
configuration.setLocale(new Locale("en", "US"));
// Set sandbox environment
configuration.setOption("sandbox", "true");
// Set checkout callback listener
configuration.setOnCheckoutListener(new OnCheckoutListener() {
  @Override
  public void onEventCallback(String eventCode, AMSEventResult eventResult) {
      Log.e(TAG, "onEventCallback eventCode=" + eventCode + " eventResult=" + eventResult.toString());
  }
});
// Create AMSVaulting instance
AMSVaulting checkout = new AMSVaulting.Builder(activity, configuration).build();
2. Create a card binding component
Use the
createComponent
or mountComponent
function in the instance object to create a card binding component. Configuration objects includes the following parameters:Parameter name | Required | Description |
sessionData | Yes | Create a configuration object by using the sessionData parameter: Pass the complete data in the vaultingSessionData parameter obtained in the response through the createVaultingSession API to the sessionData parameter. |
appearance | No | Customized appearance theme configuration, and it contains the following child parameters:
|
There are different ways in which you can make the SDK component display on a page through a pop-up window or embedded on a page, the following are the sample codes:
Pop-up experience
Embedded experience
checkout.createComponent(activity,sessionData);
//Unmount the component
checkout.onDestroy();
// Trigger rendering of embedded component
Map<String, Object> appearanceConfig = new HashMap<>();
appearanceConfig.put("showSubmitButton", false);
appearanceConfig.put("showSubmitLoading", true);
AMSPaymentAppearance appearance = AMSPaymentAppearance.create(appearanceConfig);
checkout.mountComponent(activity, appearance, sessionData, parentViewGroup);
String dataString = "{"billingAddress":{"zipCode":"310000","region":"CN"}}";
// The user completes input and submits binding
checkout.submit(dataString);3. Handle SDK callback event codes
According to the configuration of the notRedirectAfterComplete parameter, handle the subsequent process accordingly:
- If you set notRedirectAfterComplete to false, the buyer will be redirected to the vaultingRedirectUrl that you provided in createVaultingSession API after completing the card binding. You can obtain the card binding result by active query in that URL and show it to the buyer.
- If notRedirectAfterComplete istrue, the card binding result will be given through theonEventCallbackmethod. The card binding result here is only for front-end display, and the final order status is subject to the server side.
Event codes
The following are the possible event codes of the card binding result returned by
onEventCallback
:Event code | Message | Solution |
SDK_ASSET_BINDING_SUCCESSFUL | The vaulting is successful. | It is recommended to redirect the buyer to the card binding result page. |
SDK_ASSET_BINDING_PROCESSING | The vaulting is being processed. | Guide the buyer to retry the card‑binding operation based on the provided information. |
SDK_ASSET_BINDING_FAIL | The vaulting failed. | |
SDK_ASSET_BINDING_CANCEL | The buyer exits the vaulting page. | You can re-invoke the SDK with the vaultingSessionData that is within its validity period. If it has expired, you need to request a new vaultingSessionData. |
SDK_ASSET_BINDING_ERROR | The vaulting status is abnormal. | You can wait for the card binding result notification, or guide the buyer to bind the card again. |
The following sample code shows how to process the
onEventCallback
: public void onEventCallback(String eventCode, AMSEventResult eventResult) {
Log.e(TAG, "onEventCallback eventCode=" + eventCode + " eventResult=" + eventResult.toString());
if (!TextUtils.isEmpty(eventCode)) {
if ("SDK_ASSET_BINDING_SUCCESSFUL".equals(eventCode)) {
//Card binding successful, need to unmount SDK. It is recommended to redirect to the card binding result page.
} else if ("SDK_ASSET_BINDING_FAIL".equals(eventCode)) {
// Card binding failed. It is recommended to guide the buyer to re-bind the card based on the vaultingResultCode error code prompt information.
} else if ("SDK_ASSET_BINDING_ERROR".equals(eventCode)) {
// Card binding exception. It is recommended to wait for the card binding result notification or re-guide the buyer to bind the card.
} else if ("SDK_ASSET_BINDING_CANCEL".equals(eventCode)) {
// Guide the buyer to try card binding again.
} else{
// Other custom events or errors of concern
}
}
}The following are sample codes for card binding results corresponding to frontend event codes:
The card binding is successful
{
"code": "SDK_ASSET_BINDING_SUCCESSFUL",  // Front-end event code
"result": {
  "resultStatus": "S",
  "resultCode": "SUCCESS",
  "resultMessage": "Success"
}
}
The card binding failed
{
"code": "SDK_ASSET_BINDING_FAIL",  // Front-end event code
"result": {
  "resultStatus": "S",
  "resultCode": "SUCCESS",
  "resultMessage": "Success"
},
"vaultingStatus":"FAIL",
"vaultingResultCode":"PROCESS_FAIL",
"vaultingResultMessage":"A general business failure occurred."
}
4. Unmount the component
Call the
onDestroy()
method to unmount the created component. You need to unmount the component in the following situations:- When the timeout time set by your client is reached.
- When the buyer exits the card binding page.
- When you receive the card binding result callback.
Note: Only one component can be created at a time. If you need to use different vaultingSessionData or recreate the component, you must first execute the unmount method.
checkout.onDestroy();Step 4: Obtain the card binding result Server-side
You can obtain the card binding result by one of the following methods:
- Receive the asynchronous notification
- Inquire about the result
Receive the asynchronous notification
Inquire about the result
Receive the asynchronous notification
Antom will send you the card binding result notifications via the notifyVaulting API. Follow the steps below for configuration:
1. Configure the webhook URL to receive asynchronous notifications
- If each of your card binding operations has a unique notification URL, it is recommended to set the webhook URL in each request. You can pass the asynchronous notification receiving URL for the specific order through vaultingNotificationUrl in the createVaultingSession API.
The following code shows a sample of the asynchronous notification request:
{
"paymentMethodDetail": {
  "card": {
    "brand": "MASTERCARD",
    "cardToken": "ALIPAY34RlcCU3ZtZ***********************sVYl8x244tyWCloE4MwfmN48sP1+rSPQ==",
    "maskedCardNo": "************1310",
    "networkTransactionId": "112000********575887"
  },
  "paymentMethodType": "CARD"
},
"vaultingRequestId": "VAULT_2025*******348834_AUTO",
"result": {
  "resultCode": "SUCCESS",
  "resultMessage": "success",
  "resultStatus": "S"
}
}
The following table shows the possible values of result.resultStatus in the notification request of authorization result. Please handle the result according to the guidance provided:
result.resultStatus | Message | Further actions |
S | Indicates that the card binding is successful. | It is recommended to store the following parameters for subsequent payments:
|
F | Indicates that the card binding failed. | Please check result.resultCode to identify the specific failure reason. |
2. Verify the asynchronous notification
When you receive an asynchronous notification from Antom, you are required to return the response in the Sample code format, but you do not need to countersign the response.
You need to verify the signature of the authorization payment notification sent by Antom:
import javax.servlet.http.HttpServletRequest;

import org.springframework.http.ResponseEntity;
import org.springframework.web.bind.annotation.PostMapping;
import org.springframework.web.bind.annotation.RequestBody;
import org.springframework.web.bind.annotation.RestController;

import com.alipay.global.api.model.Result;
import com.alipay.global.api.model.ResultStatusType;
import com.alipay.global.api.response.AlipayResponse;
import com.alipay.global.api.tools.WebhookTool;

@RestController
public class PaymentNotifyHandleBySDK {

  /**
   * alipay public key, used to verify signature
   */
  private static final String SERVER_PUBLIC_KEY = "";

  /**
   * payment result notify processor
   * using <a href="https://spring.io">Spring Framework</a>
   *
   * @param request    HttpServletRequest
   * @param notifyBody notify body
   * @return
   */
  @PostMapping("/payNotify")
  public Object payNotifyHandler(HttpServletRequest request, @RequestBody String notifyBody) {

      // retrieve the required parameters from http request
      String requestUri = request.getRequestURI();
      String requestMethod = request.getMethod();

      // retrieve the required parameters from request header
      String requestTime = request.getHeader("request-time");
      String clientId = request.getHeader("client-id");
      String signature = request.getHeader("signature");

      Result result;
      AlipayResponse response = new AlipayResponse();

      try {
          // verify the signature of notification
          boolean verifyResult = WebhookTool.checkSignature(requestUri, requestMethod, clientId, requestTime, signature, notifyBody, SERVER_PUBLIC_KEY);
          if (!verifyResult) {
              throw new RuntimeException("Invalid notify signature");
          }

          // deserialize the notification body

          // update the order status based on the notification result

          // respond to the server that the notification has been received
          result = new Result("SUCCESS", "success", ResultStatusType.S);

      } catch (Exception e) {
          String errorMsg = e.getMessage();
          // Handle error condition
          result = new Result("ERROR", errorMsg, ResultStatusType.F);
      }
      response.setResult(result);
      return ResponseEntity.ok().body(response);
  }

}
Whether the card binding is successful or not, each notification request must be responded to in the format specified below. Otherwise, Antom will resend the asynchronous notification.
{
"result": {
  "resultCode": "SUCCESS",
  "resultStatus": "S",
  "resultMessage": "success"
}
}
Common questions
Q: Will an asynchronous notification be sent immediately after a successful card binding?
A: The asynchronous notification for the card binding result is sent within seconds, typically 3 to 5 seconds after the card binding succeeds.
Q: Will an asynchronous notification be sent if the card binding fails?
A: Yes, it will be sent.
Q: Will the asynchronous notification be re-sent?
A: Yes, the asynchronous notification will be re-sent automatically within 24 hours for the following cases:
- If you didn't receive the asynchronous notification due to network reasons.
- If you receive an asynchronous notification from Antom, but you did not respond to the notification in the Sample code format.
The notification can be resent up to 8 times or until a correct response is received to terminate delivery. The sending intervals are as follows: 0 minutes, 2 minutes, 10 minutes, 10 minutes, 1 hour, 2 hours, 6 hours, and 15 hours.
Q: Do I need to verify the signature upon receiving a card binding result notification?
A: Yes. Signature verification is necessary to ensure that the request was sent to you by Antom. When performing verification, the assembled message must strictly adhere to the following format:
<http-method> <http-uri> <client-id>.<request-time>.<request-body>
. For the <request-body>
part, you must use its original, unprocessed string value.
Q: How long is the validity period of the returned cardToken?
A: The cardToken itself is permanently valid. If the card expires, it will become invalid at the same time. If the card expires, when you call the payment request again, Antom will return the
INVALID_EXPIRATION_DATE
error code. It is recommended that you guide the buyer to re-bind the updated card information.Inquire about the result
In addition to obtaining card binding results through asynchronous notifications, you can also query to get the results. You can inquire about the card binding result by calling the inquireVaulting API using vaultingRequestId from the card binding request.
public static void inquireVaulting(){
  AlipayVaultingQueryRequest alipayVaultingQueryRequest = new AlipayVaultingQueryRequest();

  //Replace with your vaultingRequestId
  alipayVaultingQueryRequest.setVaultingRequestId("c7f3ee64-c472-4d12-b8de-3157804ed55f");

  AlipayVaultingQueryResponse alipayVaultingQueryResponse;
  try{
      alipayVaultingQueryResponse = CLIENT.execute(alipayVaultingQueryRequest);
  }catch (AlipayApiException e){
      String errorMsg = e.getMessage();
      // Handle error condition
  }
}
The following sample code shows a request message:
{
"vaultingRequestId": "VAULT_20250508183612361_AUTO"
}The following sample code shows a response message:
{
"paymentMethodDetail": {
  "card": {
    "brand": "MASTERCARD",
    "cardToken": "ALIPAYEfG2DFbGx2Eh****************************XA7nyWCloE4MwfmN48sP1+rSPQ==",
    "maskedCardNo": "************1310",
    "networkTransactionId": "112000********575887"
  },
  "paymentMethodType": "CARD"
},
"result": {
  "resultCode": "SUCCESS",
  "resultMessage": "success.",
  "resultStatus": "S"
},
"vaultingRequestId": "VAULT_2025********361_AUTO",
"vaultingStatus": "SUCCESS"
}
The table below shows the possible values of result.resultStatus in the response. Please handle the result according to the guidance provided:
result.resultStatus | Message | Further actions |
S | Indicates that the API is called successfully. | You can obtain the card binding result from the vaultingStatus field in the API response.
|
F | Indicates that the API call failed. | For more information about the failure reason, refer to result.resultCode. |
U | Indicates that the API call failed for unknown reasons. | Use the same vaultingRequestId to try again. |
Integration preparations
Before you start integrating, read Integration guide and API overview to understand the integration steps of the server-side API and the precautions for calling the API. Furthermore, ensure the following prerequisites are met:
- Obtained your client ID
- Complete the key configuration
- Complete the configuration of vaultingNotificationUrl to receive the asynchronous notification
- Integrate the server-side SDK package, install the server-side library, and initialize a request instance. For more details, refer to Server-side SDKs.
- Integrate the client-side SDK package by following the steps detailed in Integrate the SDK package for iOS, and ensure to use the latest SDK version.
Integration steps
Follow the steps below to begin your integration:
- (Optional) Preload the card binding page
- Create a vaulting sesssion
- Invoke the SDK component
- Obtain the card binding result
Step 1: (Optional) Preload the card binding page Client-side
It is strongly recommended to perform a preloading process when loading the card‑binding page to enhance the rendering speed of the checkout page. This process does not impact your page performance. Refer to the following code example to implement preloading.
iOS
[[AMSVaulting shared] preload];Step 2: Create a vaulting sesssion Server-side
When a buyer selects a payment method provided by Antom, you need to collect key information such as card binding request ID, card binding redirect URL, and card binding result notification URL, call the createVaultingSession API to create a vaulting session, and return the vaulting session to the client.
Creating a payment session includes the following parameters:
Creating a payment session includes the following parameters:
Parameter name | Required | Description |
paymentMethodType | Yes | The payment method to be bound. |
vaultingRequestId | Yes | The unique ID generated by the merchant. Every time you initiate card binding, you must have a new ID. |
vaultingNotificationUrl | Yes | The card binding result notification address. |
redirectUrl | No | The URL to be redirected to after binding. |
is3DSAuthentication | No | Specify whether 3D authentication is required for this card binding request. Set the value to true if 3D authentication is required. For details, refer to 3D Secure 2.Notes:
|
public static void createVaultingSession(){
  AlipayVaultingSessionRequest alipayVaultingSessionRequest = new AlipayVaultingSessionRequest();

  // Replace with your paymentRequestId
  String vaultingRequestId = UUID.randomUUID().toString();
  alipayVaultingSessionRequest.setVaultingRequestId(vaultingRequestId);

  alipayVaultingSessionRequest.setPaymentMethodType("CARD");
  alipayVaultingSessionRequest.setVaultingNotificationUrl("http://www.yourNotifyUrl.com");
  alipayVaultingSessionRequest.setRedirectUrl("http://www.yourRedirectUrl.com");

  // Bind the card
  AlipayVaultingSessionResponse alipayVaultingSessionResponse;
  try{
      alipayVaultingSessionResponse = CLIENT.execute(alipayVaultingSessionRequest);
  }catch (AlipayApiException e){
      String errorMsg = e.getMessage();
      // Handle error condition
  }

}
The following code shows a sample of the request:
{
"paymentMethodType": "CARD",
"redirectUrl": "http://www.yourRedirectUrl.com",
"vaultingNotificationUrl": "http://www.yourNotifyUrl.com",
"vaultingRequestId": "4a17609d-1749-4f53-a2fb-8bdba8d5aad8"
}
The following code shows a sample of the response, which contains the following parameters:
- vaultingSessionData: The vaulting session data to be returned to the client.
- vaultingSessionExpiryTime: The expiration time of the vaulting session.
{
"result": {
  "resultCode": "SUCCESS",
  "resultMessage": "success.",
  "resultStatus": "S"
},
"vaultingSessionData": "qOnxVjFYB/QNieiGGnf3P7XOreGIRi7dSZDMzCzT5DzGLaI5a5paDhEAgmG8IwVuTCHscscPdJg==&&SG&&188&&eyJleHRlbmRJbmZvIjoie1widmVyc2lvbk1hcFwiOntcIndlYlwiOntcIjEuMS4wXCI6e1widGFyZ2V0V2ViVmVyaXNvblwiOlwiMS4xLjBcIn0sXCIxLjIuMFwiOntcInRhcmdldFdlYlZlcmlzb25cIjpcIjEuMi4wXCJ9fSxcImlPU1wiOntcIjEuMS4wXCI6e1widGFyZ2V0V2ViVmVyaXNvblwiOlwiMS4xLjBcIn0sXCIxLjIuMFwiOntcInRhcmdldFdlYlZlcmlzb25cIjpcIjEuMi4wXCJ9fSxcIkFuZHJvaWRcIjp7XCIxLjEuMFwiOntcInRhcmdldFdlYlZlcmlzb25cIjpcIjEuMS4wXCJ9LFwiMS4yLjBcIjp7XCJ0YXJnZXRXZWJWZXJpc29uXCI6XCIxLjIuMFwifX19fSIsInBheW1lbnRTZXNzaW9uQ29uZmlnIjp7InBheW1lbnRNZXRob2RDYXRlZ29yeVR5cGUiOiJDQVJEIiwicHJvZHVjdFNjZW5lIjoiVkFVTFRJTkciLCJwcm9kdWN0U2NlbmVWZXJzaW9uIjoiMS4wIn0sInNraXBSZW5kZXJQYXltZW50TWV0aG9kIjpm******",
"vaultingSessionExpiryTime": "2024-12-31T12:06:05+08:00",
"vaultingSessionId": "********qOnxVjFYB/QNieiGGnf3P7XOreGIRi7fAxqpLf+1appjsXAs5Eq1H"
}
Step 3: Invoke the SDK component Client-side
Use vaultingSessionData to invoke the SDK, and the SDK renders the required card payment element collection page and handles the 3D Secure flow, allowing the buyer to complete a server‑to‑server card binding process.
1. Instantiate the client SDK
Create the SDK instance by using the
AMSVaulting
and specifying the basic parameters. Configuration objects includes the following parameters:Parameter name | Required | Description |
locale | No | It is used to pass in language information. Valid values are listed as follows. You can choose the value to pass based on the region of the payment method. If other values are passed, English is used by default:
|
options | No | Used to configure the redirection after the card binding and specify whether to use the sandbox environment. Valid values are:
|
The following sample code shows how to instantiate the SDK:
Instantiate the SDK
#import <AMSComponent/AMSComponent-Swift.h>

AMSVaultingConfiguration *componentConfig = [AMSVaultingConfiguration new];
componentConfig.locale = @"en_US";
// set sandbox environment, not production environment
NSDictionary *options = @{@"sandbox": @"true",
                        @"notRedirectAfterComplete": @"true"
                        };
componentConfig.options = options;


[[AMSVaulting shared] initConfiguration:componentConfig];
[AMSVaulting shared].paymentDelegate = self;

[[AMSVaulting shared] createComponent:vaultingSessionData];

#pragma AMSPaymentProtocol
- (void)onEventCallback:(NSString *)eventCode eventResult:(AMSEventResult *)eventResult
{
  NSLog(@"eventCode%@ eventResult%@", eventCode, eventResult);
}
2. Create a card binding component
Use the
createComponent
or mountComponent
function in the instance object to create a card binding component. Configuration objects includes the following parameters:Parameter name | Required | Description |
sessionData | Yes | Create a configuration object by using the sessionData parameter: Pass the complete data in the vaultingSessionData parameter obtained in the response through the createVaultingSession API to the sessionData parameter. |
appearance | No | Customized appearance theme configuration, and it contains the following child parameters:
|
There are different ways in which you can make the SDK component display on a page through a pop-up window or embedded on a page, the following are the sample codes:
Pop-up experience
Embedded experience
[[AMSVaulting shared] createComponent:sessionData];
//Unmount the component
[[AMSVaulting shared] onDestroy];
[[AMSVaulting shared] mountComponent:sessionData];
// The user completes input and submits binding
NSString *dataString = @"{"billingAddress":{"zipCode":"310000","region":"CN"}}";
[[AMSVaulting shared] submit: dataString];
//Unmount the component
[[AMSVaulting shared] onDestroy];3. Handle SDK callback event codes
According to the configuration of the notRedirectAfterComplete parameter, handle the subsequent process accordingly:
- If you set notRedirectAfterComplete to false, the buyer will be redirected to the vaultingRedirectUrl that you provided in createVaultingSession API after completing the card binding. You can obtain the card binding result by active query in that URL and show it to the buyer.
- If notRedirectAfterComplete istrue, the card binding result will be given through theonEventCallbackmethod. The card binding result here is only for front-end display, and the final order status is subject to the server side.
Event codes
The following are the possible event codes of the card binding result returned by
onEventCallback
:Event code | Message | Solution |
SDK_ASSET_BINDING_SUCCESSFUL | The vaulting is successful. | It is recommended to redirect the buyer to the card binding result page. |
SDK_ASSET_BINDING_PROCESSING | The vaulting is being processed. | Guide the buyer to retry the card‑binding operation based on the provided information. |
SDK_ASSET_BINDING_FAIL | The vaulting failed. | |
SDK_ASSET_BINDING_CANCEL | The buyer exits the vaulting page. | You can re-invoke the SDK with the vaultingSessionData that is within its validity period. If it has expired, you need to request a new vaultingSessionData. |
SDK_ASSET_BINDING_ERROR | The vaulting status is abnormal. | You can wait for the card binding result notification, or guide the buyer to bind the card again. |
The following sample code shows how to process the
onEventCallback
: #import <AMSComponent/AMSComponent-Swift.h>
#pragma AMSPaymentProtocol
- (void)onEventCallback:(NSString *)eventCode eventResult:(AMSEventResult *)eventResult
{
if ([eventCode isEqualToString:@"SDK_ASSET_BINDING_SUCCESSFUL"]) {
// Card binding successful, need to unmount SDK. It is recommended to redirect to the card binding result page.
} else if ([eventCode isEqualToString:@"SDK_ASSET_BINDING_FAIL"]) {
// Card binding failed. It is recommended to guide the buyer to re-bind the card based on the vaultingResultCode error code prompt information.
} else if ([eventCode isEqualToString:@"SDK_ASSET_BINDING_ERROR"]) {
// Card binding exception. It is recommended to wait for the card binding result notification or re-guide the buyer to bind the card.
} else if ([eventCode isEqualToString:@"SDK_ASSET_BINDING_CANCEL"]) {
// Guide the buyer to try card binding again.
} else {
// Other custom events or errors of concern
}
NSLog(@"eventCode%@ eventResult%@", eventCode, eventResult);
}The following are sample codes for card binding results corresponding to frontend event codes:
The card binding is successful
{
"code": "SDK_ASSET_BINDING_SUCCESSFUL",  // Front-end event code
"result": {
  "resultStatus": "S",
  "resultCode": "SUCCESS",
  "resultMessage": "Success"
}
}
The card binding failed
{
"code": "SDK_ASSET_BINDING_FAIL",  // Front-end event code
"result": {
  "resultStatus": "S",
  "resultCode": "SUCCESS",
  "resultMessage": "Success"
},
"vaultingStatus":"FAIL",
"vaultingResultCode":"PROCESS_FAIL",
"vaultingResultMessage":"A general business failure occurred."
}
4. Unmount the component
Call the
onDestroy()
method to unmount the created component. You need to unmount the component in the following situations:- When the timeout time set by your client is reached.
- When the buyer exits the card binding page.
- When you receive the card binding result callback.
Note: Only one component can be created at a time. If you need to use different vaultingSessionData or recreate the component, you must first execute the unmount method.
[[AMSVaulting shared] onDestroy];Step 4: Obtain the card binding result Server-side
You can obtain the card binding result by one of the following methods:
- Receive the asynchronous notification
- Inquire about the result
Receive the asynchronous notification
Inquire about the result
Receive the asynchronous notification
Antom will send you the card binding result notifications via the notifyVaulting API. Follow the steps below for configuration:
1. Configure the webhook URL to receive asynchronous notifications
- If each of your card binding operations has a unique notification URL, it is recommended to set the webhook URL in each request. You can pass the asynchronous notification receiving URL for the specific order through vaultingNotificationUrl in the createVaultingSession API.
The following code shows a sample of the asynchronous notification request:
{
"paymentMethodDetail": {
  "card": {
    "brand": "MASTERCARD",
    "cardToken": "ALIPAY34RlcCU3ZtZ***********************sVYl8x244tyWCloE4MwfmN48sP1+rSPQ==",
    "maskedCardNo": "************1310",
    "networkTransactionId": "112000********575887"
  },
  "paymentMethodType": "CARD"
},
"vaultingRequestId": "VAULT_2025*******348834_AUTO",
"result": {
  "resultCode": "SUCCESS",
  "resultMessage": "success",
  "resultStatus": "S"
}
}
The following table shows the possible values of result.resultStatus in the notification request of authorization result. Please handle the result according to the guidance provided:
result.resultStatus | Message | Further actions |
S | Indicates that the card binding is successful. | It is recommended to store the following parameters for subsequent payments:
|
F | Indicates that the card binding failed. | Please check result.resultCode to identify the specific failure reason. |
2. Verify the asynchronous notification
When you receive an asynchronous notification from Antom, you are required to return the response in the Sample code format, but you do not need to countersign the response.
You need to verify the signature of the authorization payment notification sent by Antom:
import javax.servlet.http.HttpServletRequest;

import org.springframework.http.ResponseEntity;
import org.springframework.web.bind.annotation.PostMapping;
import org.springframework.web.bind.annotation.RequestBody;
import org.springframework.web.bind.annotation.RestController;

import com.alipay.global.api.model.Result;
import com.alipay.global.api.model.ResultStatusType;
import com.alipay.global.api.response.AlipayResponse;
import com.alipay.global.api.tools.WebhookTool;

@RestController
public class PaymentNotifyHandleBySDK {

  /**
   * alipay public key, used to verify signature
   */
  private static final String SERVER_PUBLIC_KEY = "";

  /**
   * payment result notify processor
   * using <a href="https://spring.io">Spring Framework</a>
   *
   * @param request    HttpServletRequest
   * @param notifyBody notify body
   * @return
   */
  @PostMapping("/payNotify")
  public Object payNotifyHandler(HttpServletRequest request, @RequestBody String notifyBody) {

      // retrieve the required parameters from http request
      String requestUri = request.getRequestURI();
      String requestMethod = request.getMethod();

      // retrieve the required parameters from request header
      String requestTime = request.getHeader("request-time");
      String clientId = request.getHeader("client-id");
      String signature = request.getHeader("signature");

      Result result;
      AlipayResponse response = new AlipayResponse();

      try {
          // verify the signature of notification
          boolean verifyResult = WebhookTool.checkSignature(requestUri, requestMethod, clientId, requestTime, signature, notifyBody, SERVER_PUBLIC_KEY);
          if (!verifyResult) {
              throw new RuntimeException("Invalid notify signature");
          }

          // deserialize the notification body

          // update the order status based on the notification result

          // respond to the server that the notification has been received
          result = new Result("SUCCESS", "success", ResultStatusType.S);

      } catch (Exception e) {
          String errorMsg = e.getMessage();
          // Handle error condition
          result = new Result("ERROR", errorMsg, ResultStatusType.F);
      }
      response.setResult(result);
      return ResponseEntity.ok().body(response);
  }

}
Whether the card binding is successful or not, each notification request must be responded to in the format specified below. Otherwise, Antom will resend the asynchronous notification.
{
"result": {
  "resultCode": "SUCCESS",
  "resultStatus": "S",
  "resultMessage": "success"
}
}
Common questions
Q: Will an asynchronous notification be sent immediately after a successful card binding?
A: The asynchronous notification for the card binding result is sent within seconds, typically 3 to 5 seconds after the card binding succeeds.
Q: Will an asynchronous notification be sent if the card binding fails?
A: Yes, it will be sent.
Q: Will the asynchronous notification be re-sent?
A: Yes, the asynchronous notification will be re-sent automatically within 24 hours for the following cases:
- If you didn't receive the asynchronous notification due to network reasons.
- If you receive an asynchronous notification from Antom, but you did not respond to the notification in the Sample code format.
The notification can be resent up to 8 times or until a correct response is received to terminate delivery. The sending intervals are as follows: 0 minutes, 2 minutes, 10 minutes, 10 minutes, 1 hour, 2 hours, 6 hours, and 15 hours.
Q: Do I need to verify the signature upon receiving a card binding result notification?
A: Yes. Signature verification is necessary to ensure that the request was sent to you by Antom. When performing verification, the assembled message must strictly adhere to the following format:
<http-method> <http-uri> <client-id>.<request-time>.<request-body>
. For the <request-body>
part, you must use its original, unprocessed string value.
Q: How long is the validity period of the returned cardToken?
A: The cardToken itself is permanently valid. If the card expires, it will become invalid at the same time. If the card expires, when you call the payment request again, Antom will return the
INVALID_EXPIRATION_DATE
error code. It is recommended that you guide the buyer to re-bind the updated card information.Inquire about the result
In addition to obtaining card binding results through asynchronous notifications, you can also query to get the results. You can inquire about the card binding result by calling the inquireVaulting API using vaultingRequestId from the card binding request.
public static void inquireVaulting(){
  AlipayVaultingQueryRequest alipayVaultingQueryRequest = new AlipayVaultingQueryRequest();

  //Replace with your vaultingRequestId
  alipayVaultingQueryRequest.setVaultingRequestId("c7f3ee64-c472-4d12-b8de-3157804ed55f");

  AlipayVaultingQueryResponse alipayVaultingQueryResponse;
  try{
      alipayVaultingQueryResponse = CLIENT.execute(alipayVaultingQueryRequest);
  }catch (AlipayApiException e){
      String errorMsg = e.getMessage();
      // Handle error condition
  }
}
The following sample code shows a request message:
{
"vaultingRequestId": "VAULT_20250508183612361_AUTO"
}The following sample code shows a response message:
{
"paymentMethodDetail": {
  "card": {
    "brand": "MASTERCARD",
    "cardToken": "ALIPAYEfG2DFbGx2Eh****************************XA7nyWCloE4MwfmN48sP1+rSPQ==",
    "maskedCardNo": "************1310",
    "networkTransactionId": "112000********575887"
  },
  "paymentMethodType": "CARD"
},
"result": {
  "resultCode": "SUCCESS",
  "resultMessage": "success.",
  "resultStatus": "S"
},
"vaultingRequestId": "VAULT_2025********361_AUTO",
"vaultingStatus": "SUCCESS"
}
The table below shows the possible values of result.resultStatus in the response. Please handle the result according to the guidance provided:
result.resultStatus | Message | Further actions |
S | Indicates that the API is called successfully. | You can obtain the card binding result from the vaultingStatus field in the API response.
|
F | Indicates that the API call failed. | For more information about the failure reason, refer to result.resultCode. |
U | Indicates that the API call failed for unknown reasons. | Use the same vaultingRequestId to try again. |