
Dispute
You can complete the following tasks under Payments:
- Handle disputes
- Set chargeback alerts
- Manage risk & dispute
Handle disputes
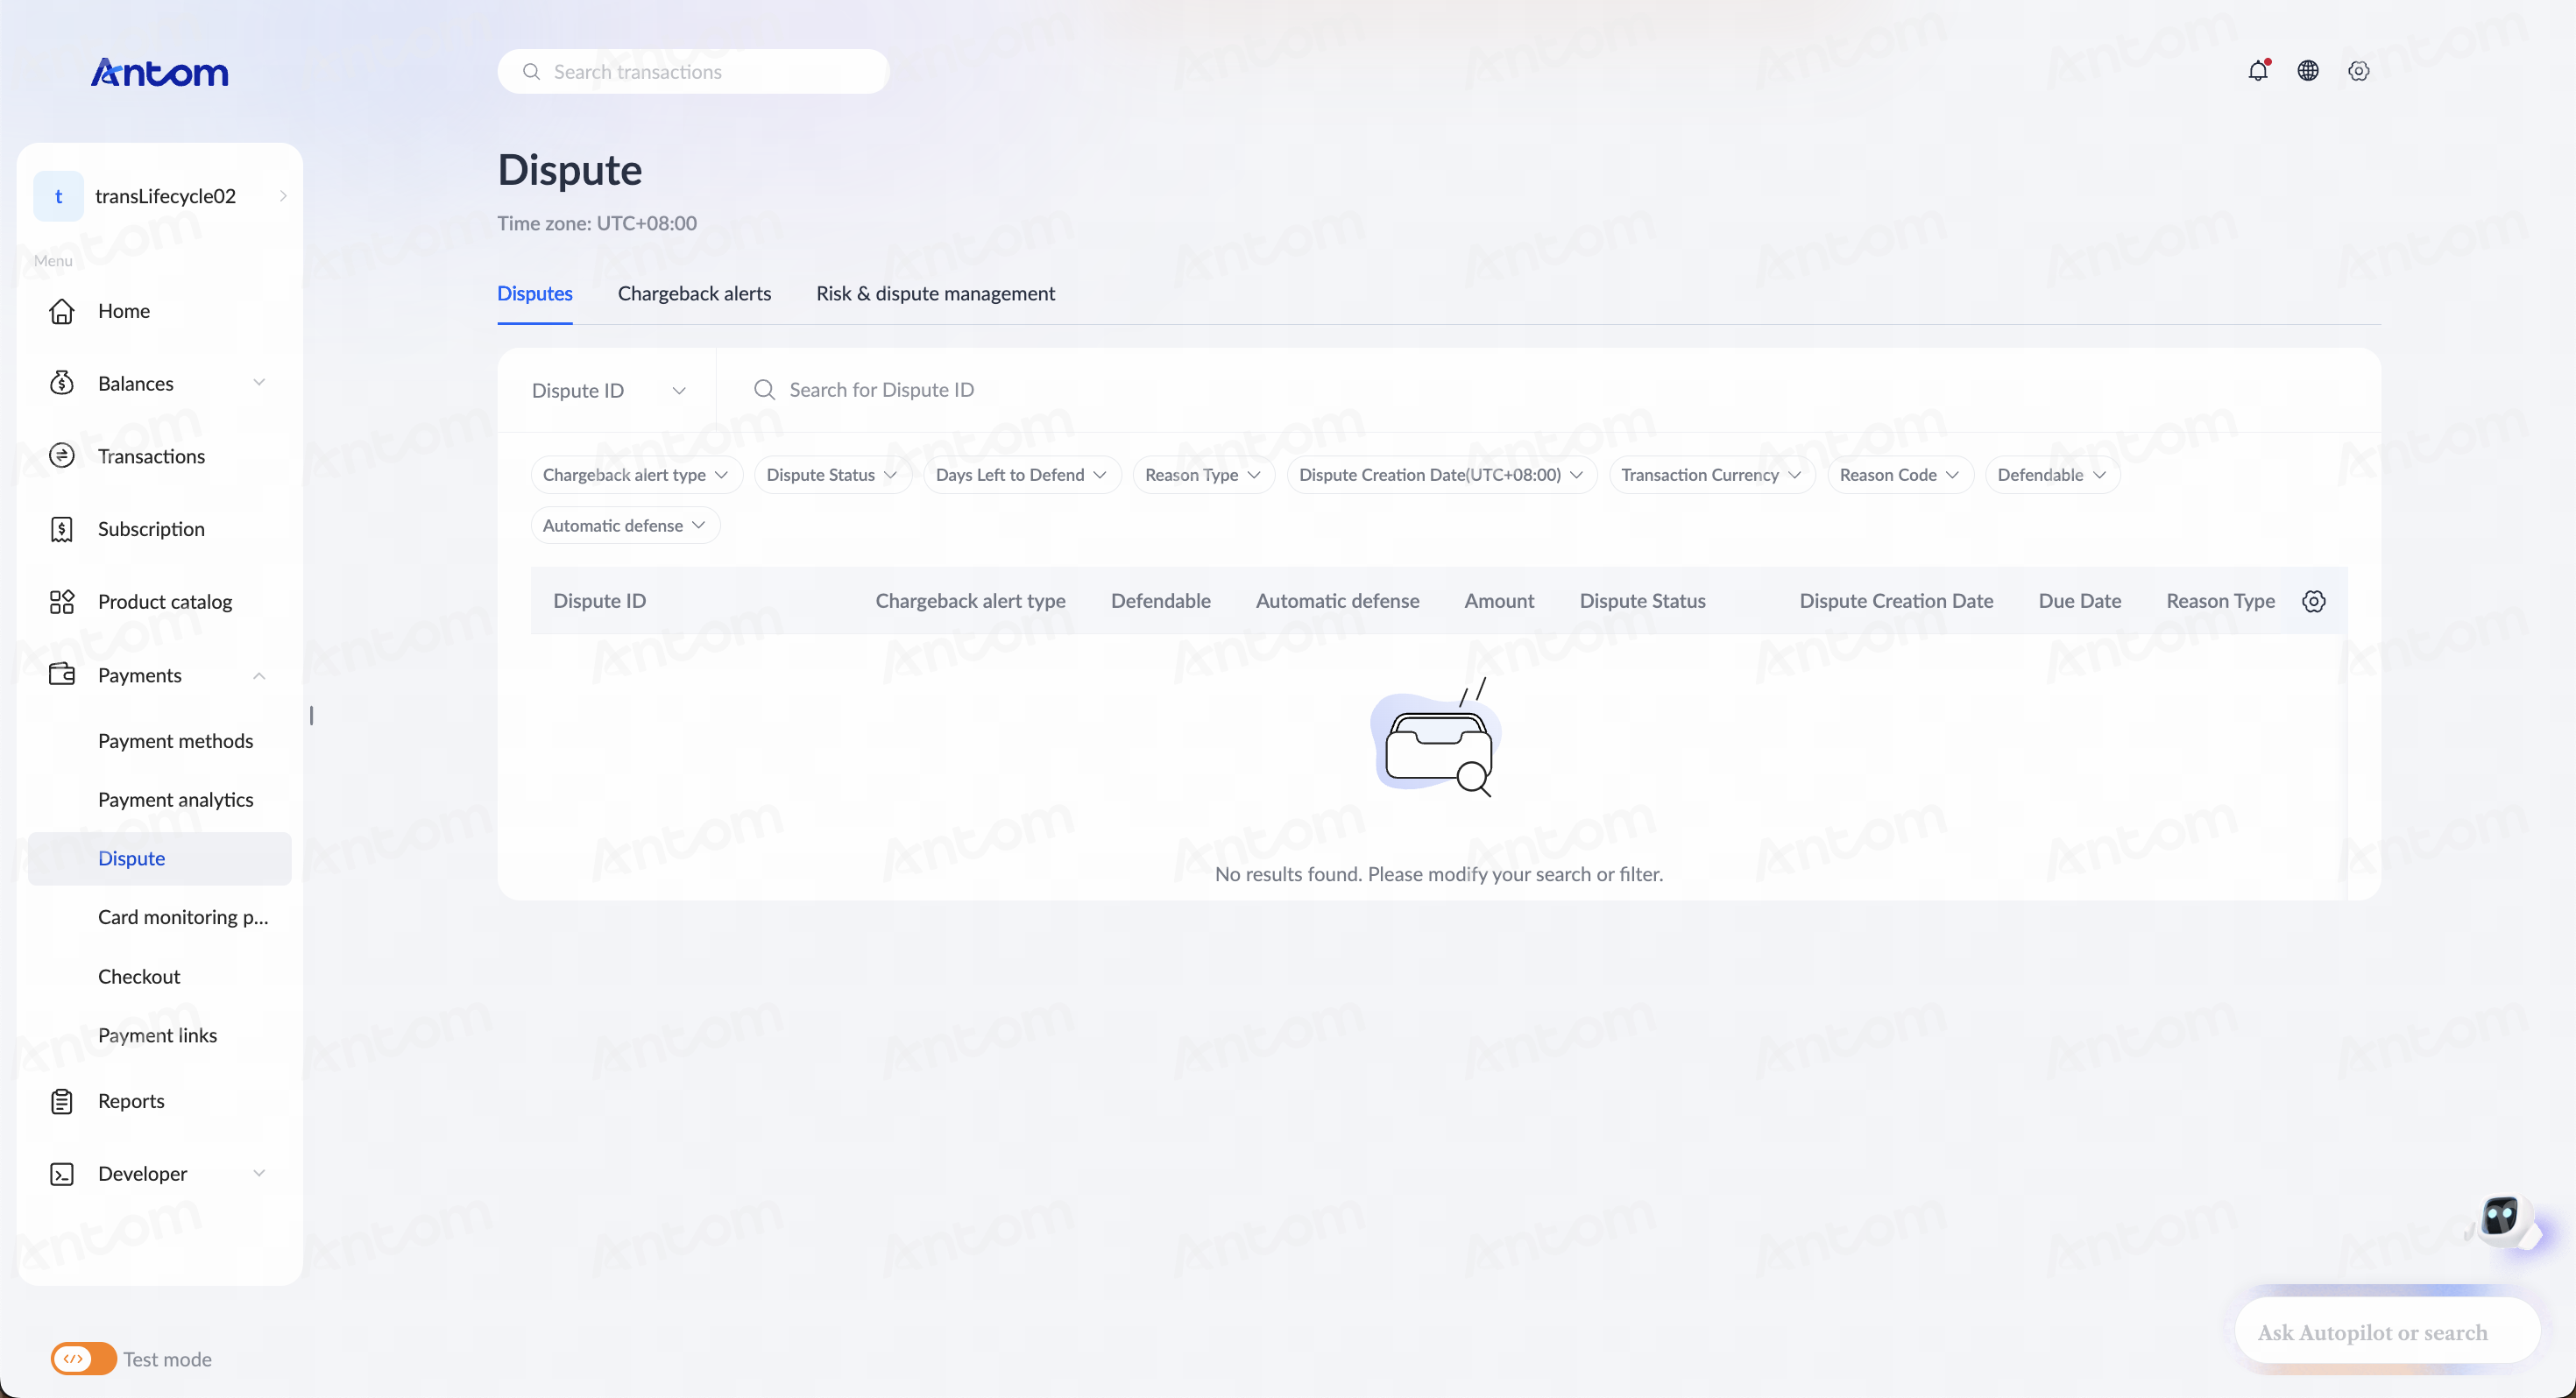
In addition to calling dispute APIs, you can also receive and efficiently handle dispute cases in real time on Antom Dashboard through Payments > Dispute. On the Dispute page, you can perform the following actions:
- Search for the desired dispute case using the respective ID.
- Export the dispute details to an Excel (.xlsx) file.
- On the dispute details page, view the details of a dispute, accept or defend a chargeback.
Search for a dispute
On the Dispute page, you can filter by Dispute ID, Transaction ID, or Merchant Payment Request ID, and search for related disputes using the respective ID. To further filter the list of disputes, you can use filter settings such as Chargeback alert type, Dispute Status, and others.
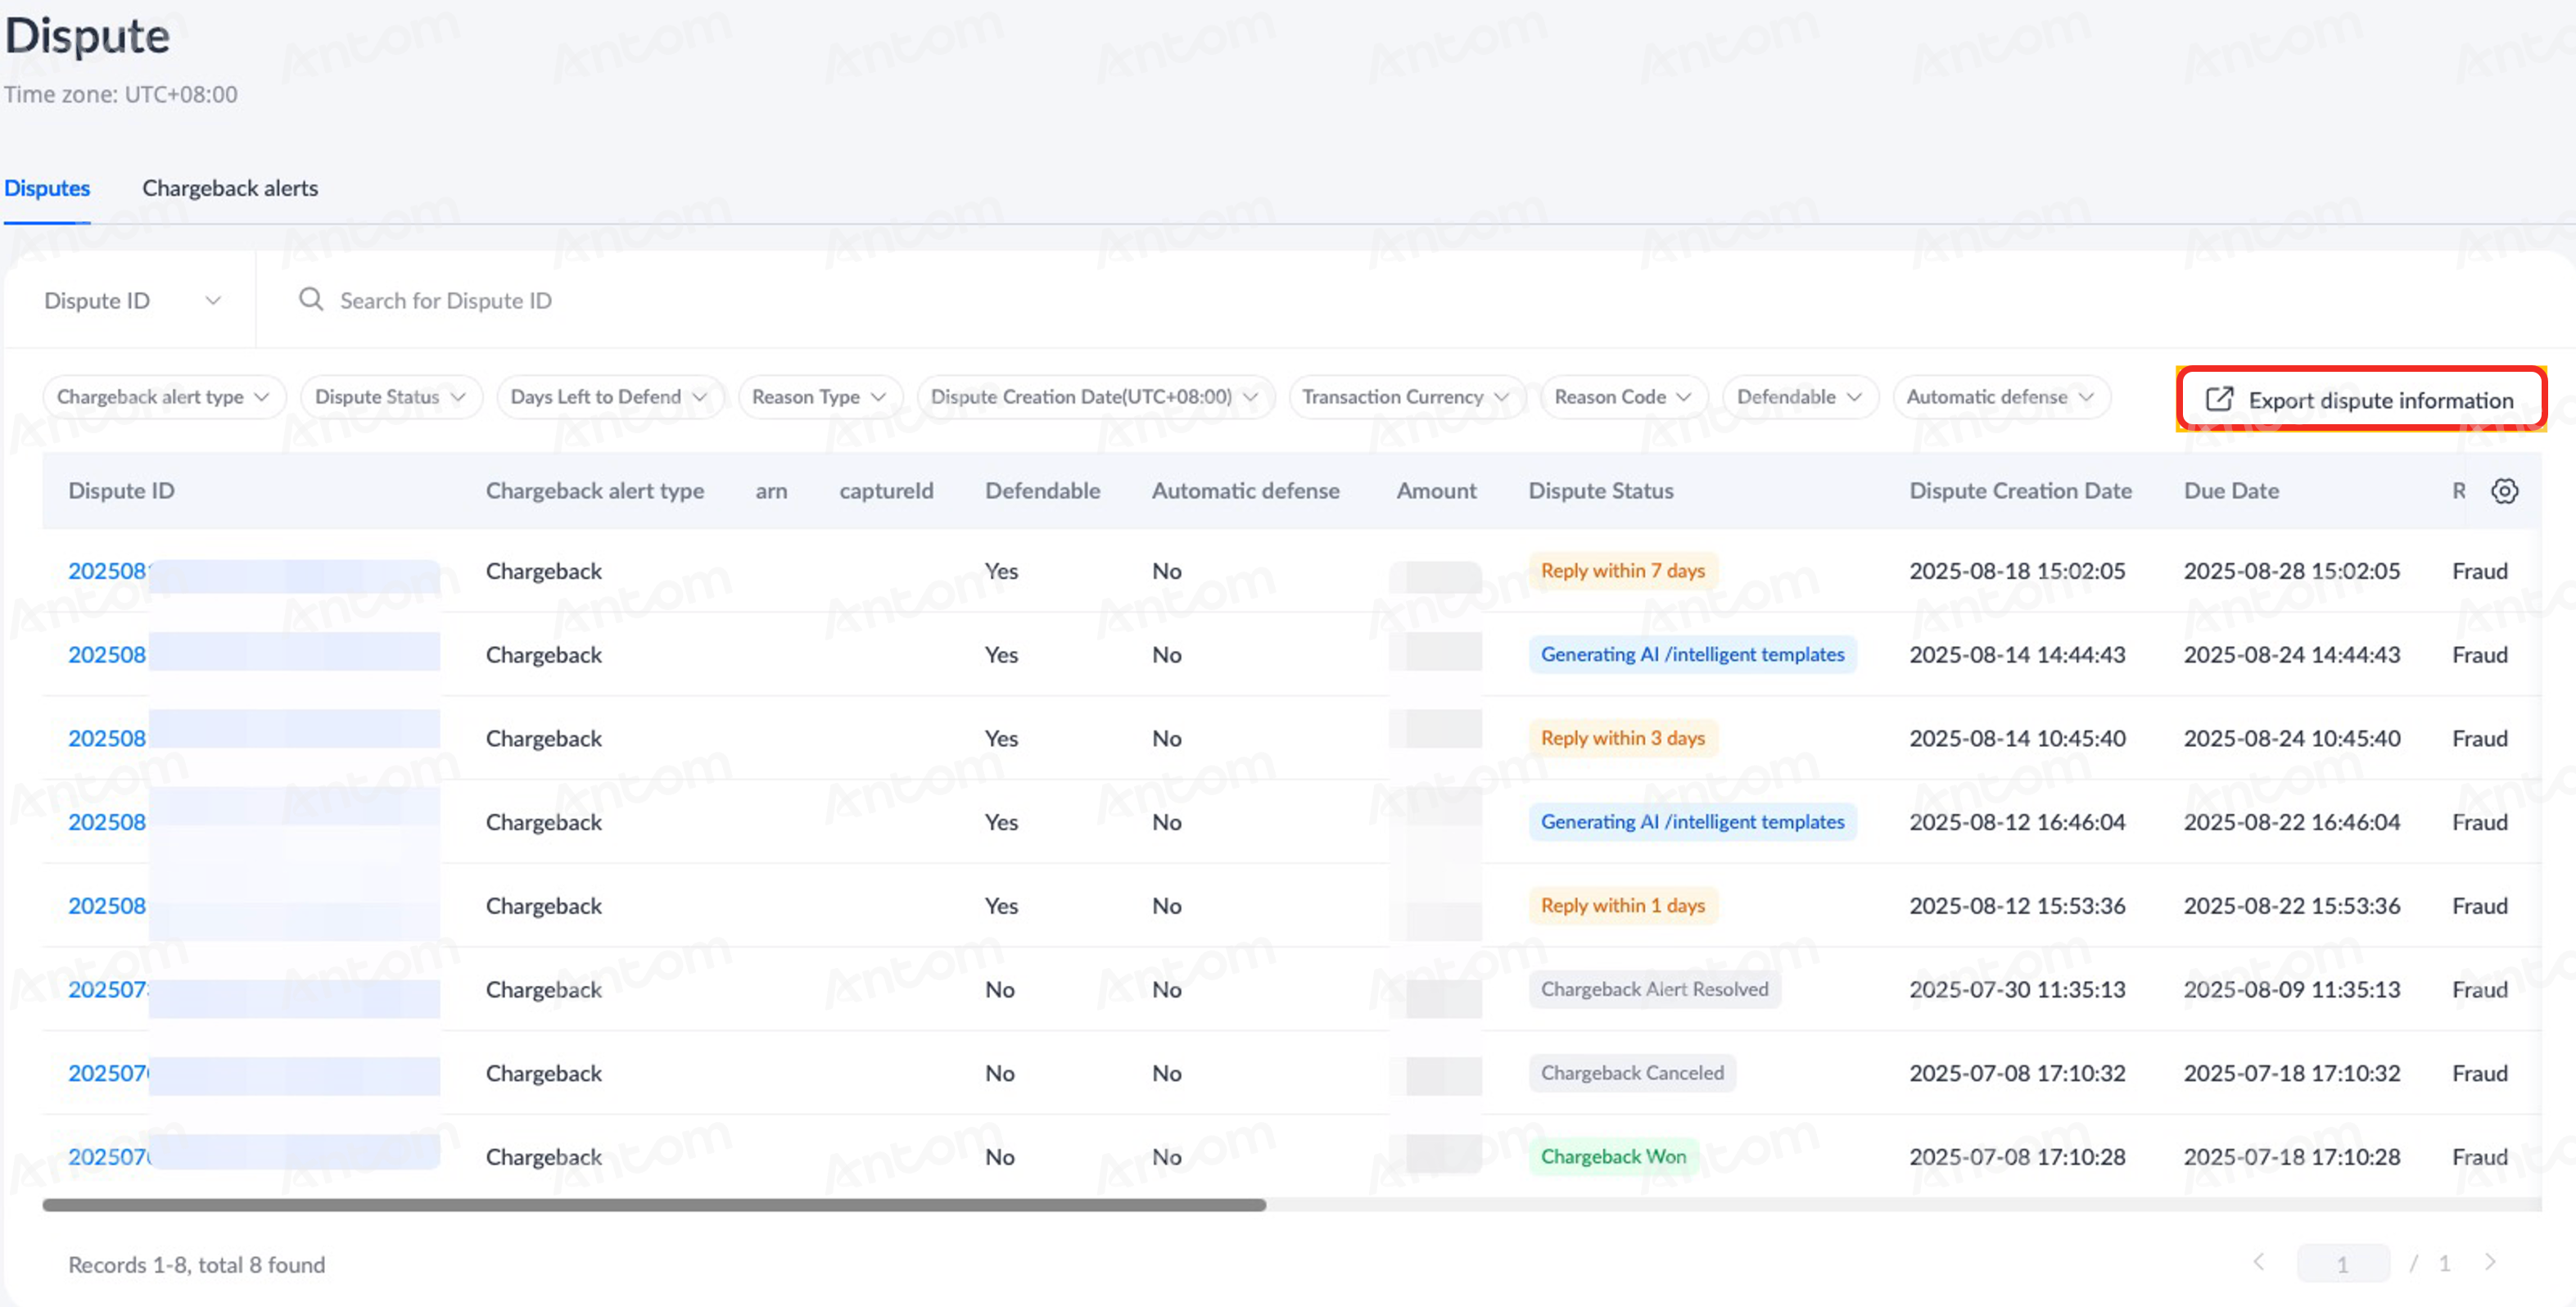
Export dispute details
On the Dispute page, click Export dispute information to export the information of disputes available in the dispute list to an Excel (.xlsx) file.
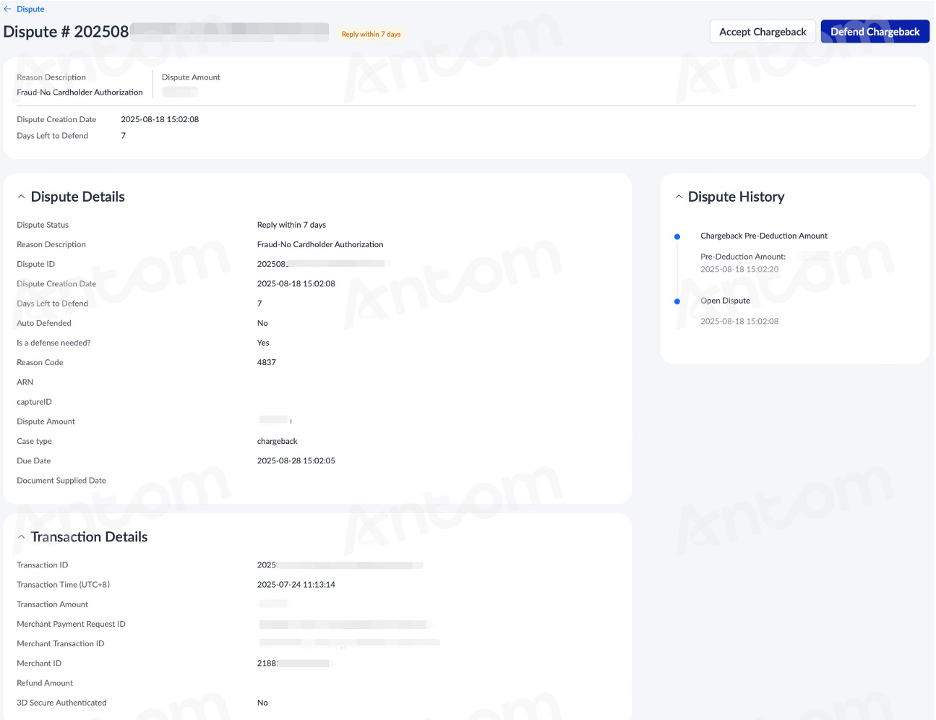
Dispute details page
On the Dispute page, under the list of disputes, click the dispute ID of the desired dispute case to view the dispute details page. On the dispute details page, you can view dispute information such as dispute status, dispute details, transaction details, bank card information, and dispute history.
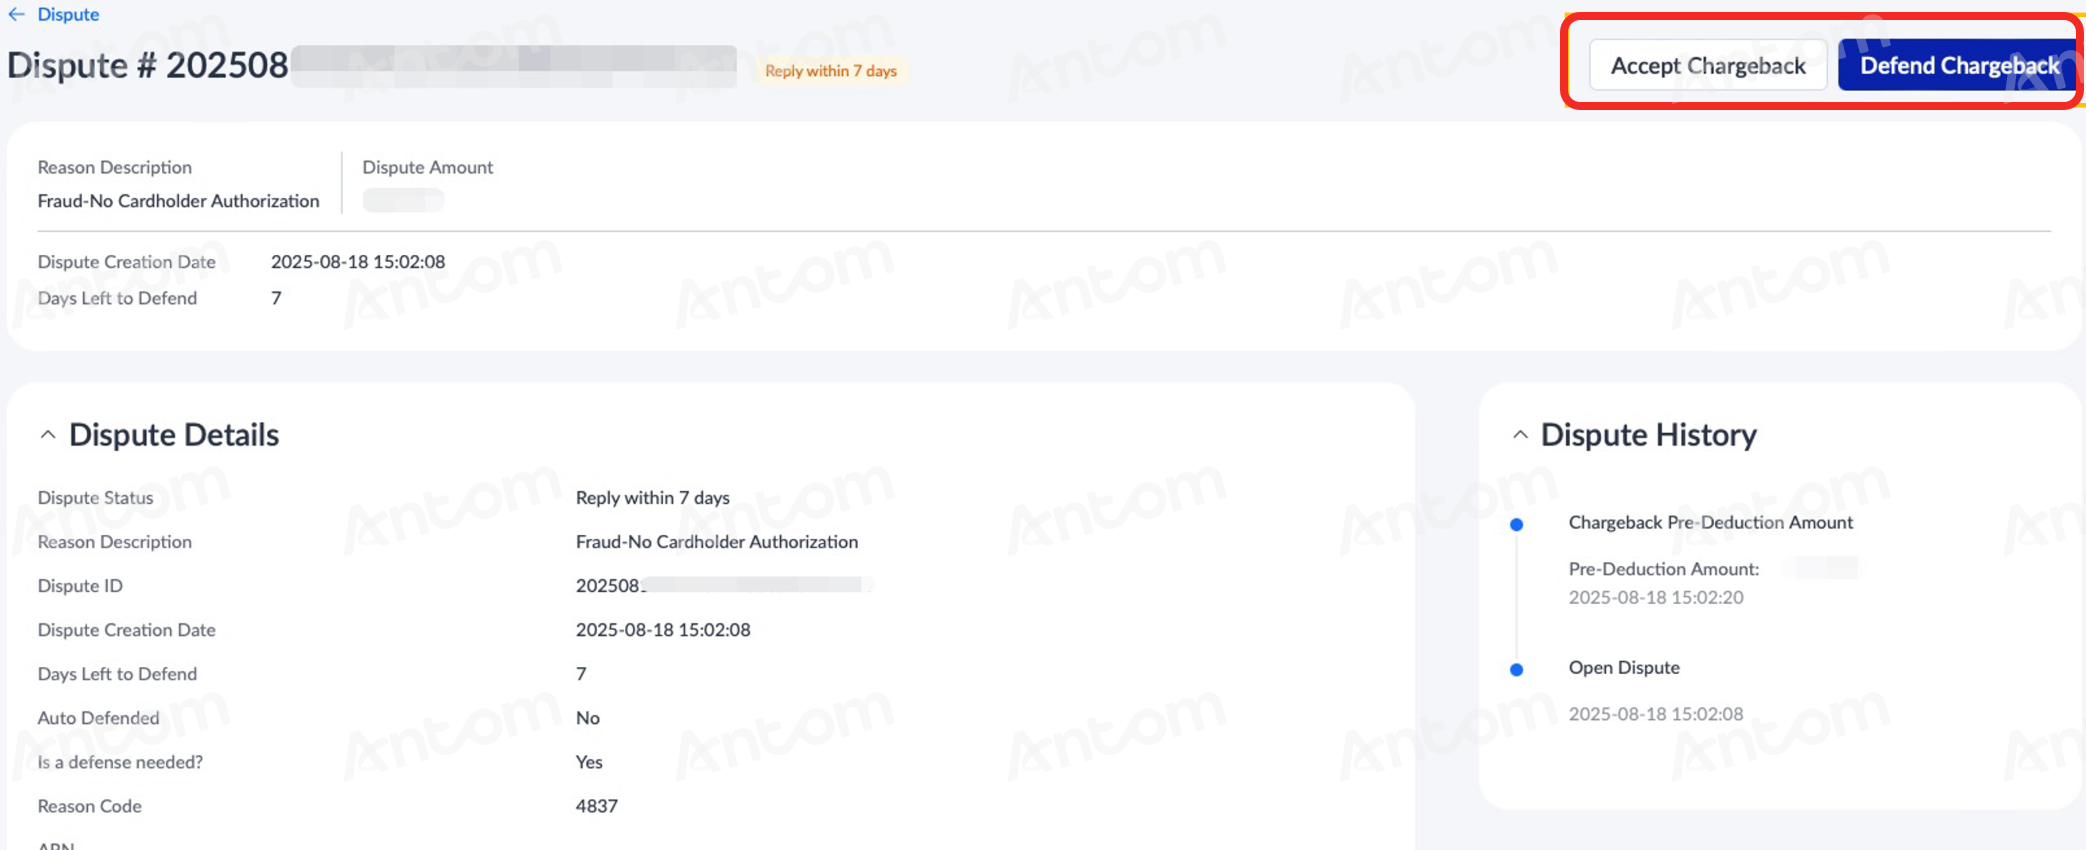
On the dispute details page, you may handle a dispute case in either of the following ways:
- Accept a chargeback: You can choose to accept the chargeback to resolve the dispute.
- Defend a chargeback: You can choose either the manual chargeback defense or the Antom Copilot chargeback defense.
Accept a chargeback
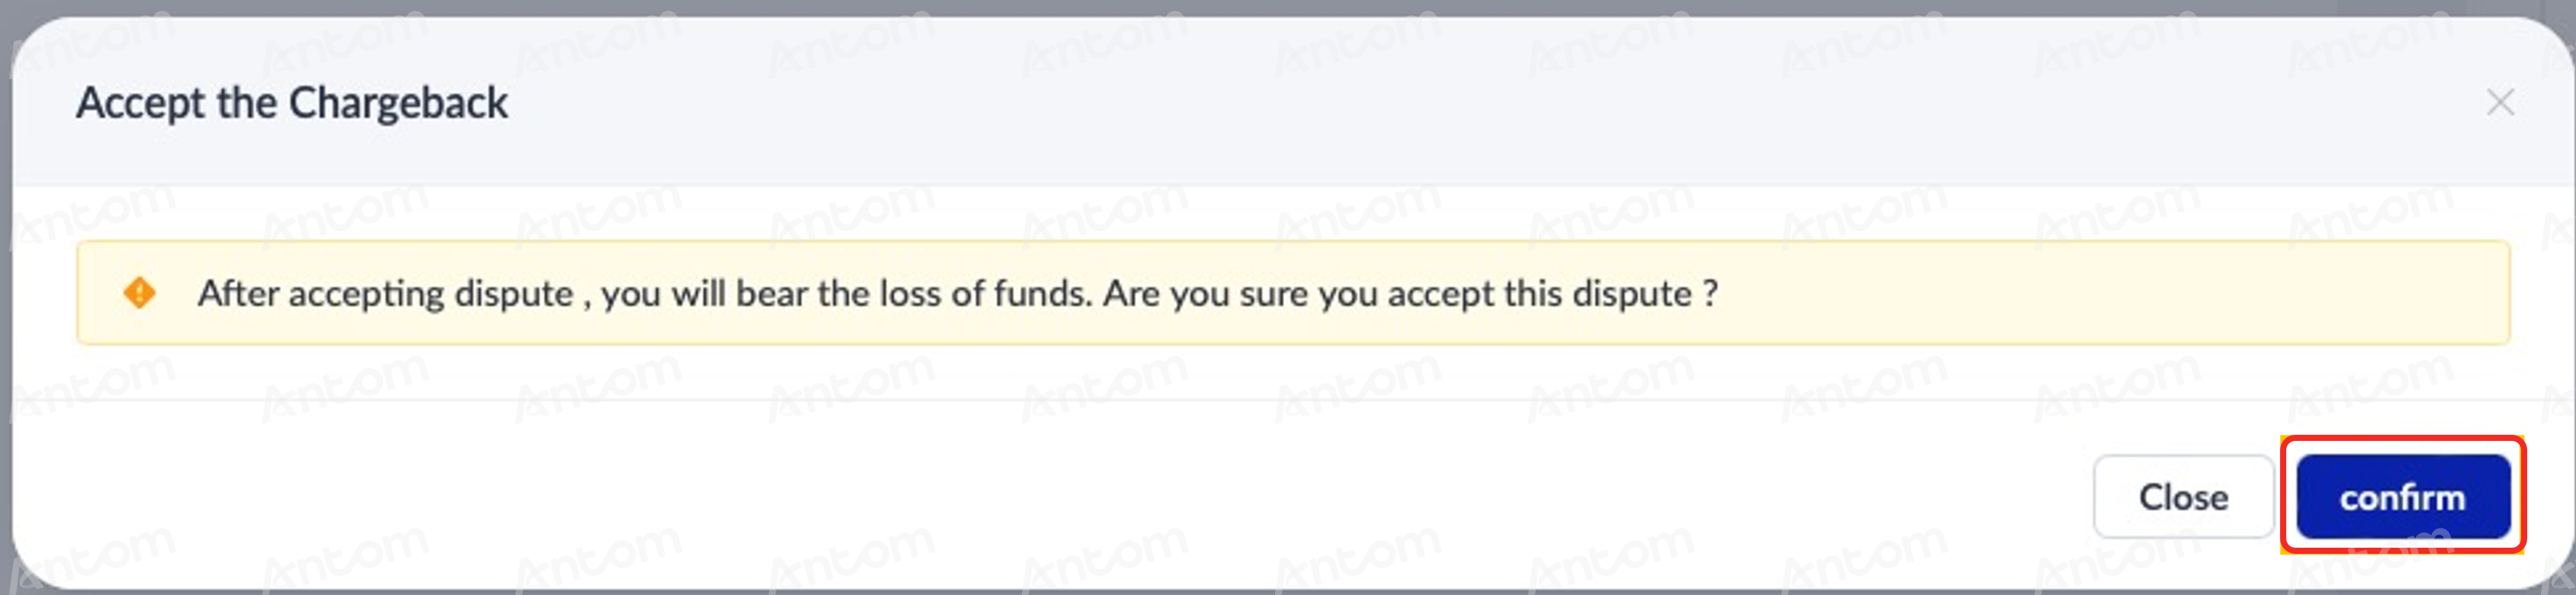
If you wish to accept the chargeback, click Accept Chargeback on the dispute details page, and click Confirm on the Accept the Chargeback pop-up window to complete the process.
|
|
Defend a chargeback
If you wish to defend the chargeback, you can handle the dispute using one of the following methods:
- Manual chargeback defense
- Antom Copilot chargeback AI assistant
Manual chargeback defense
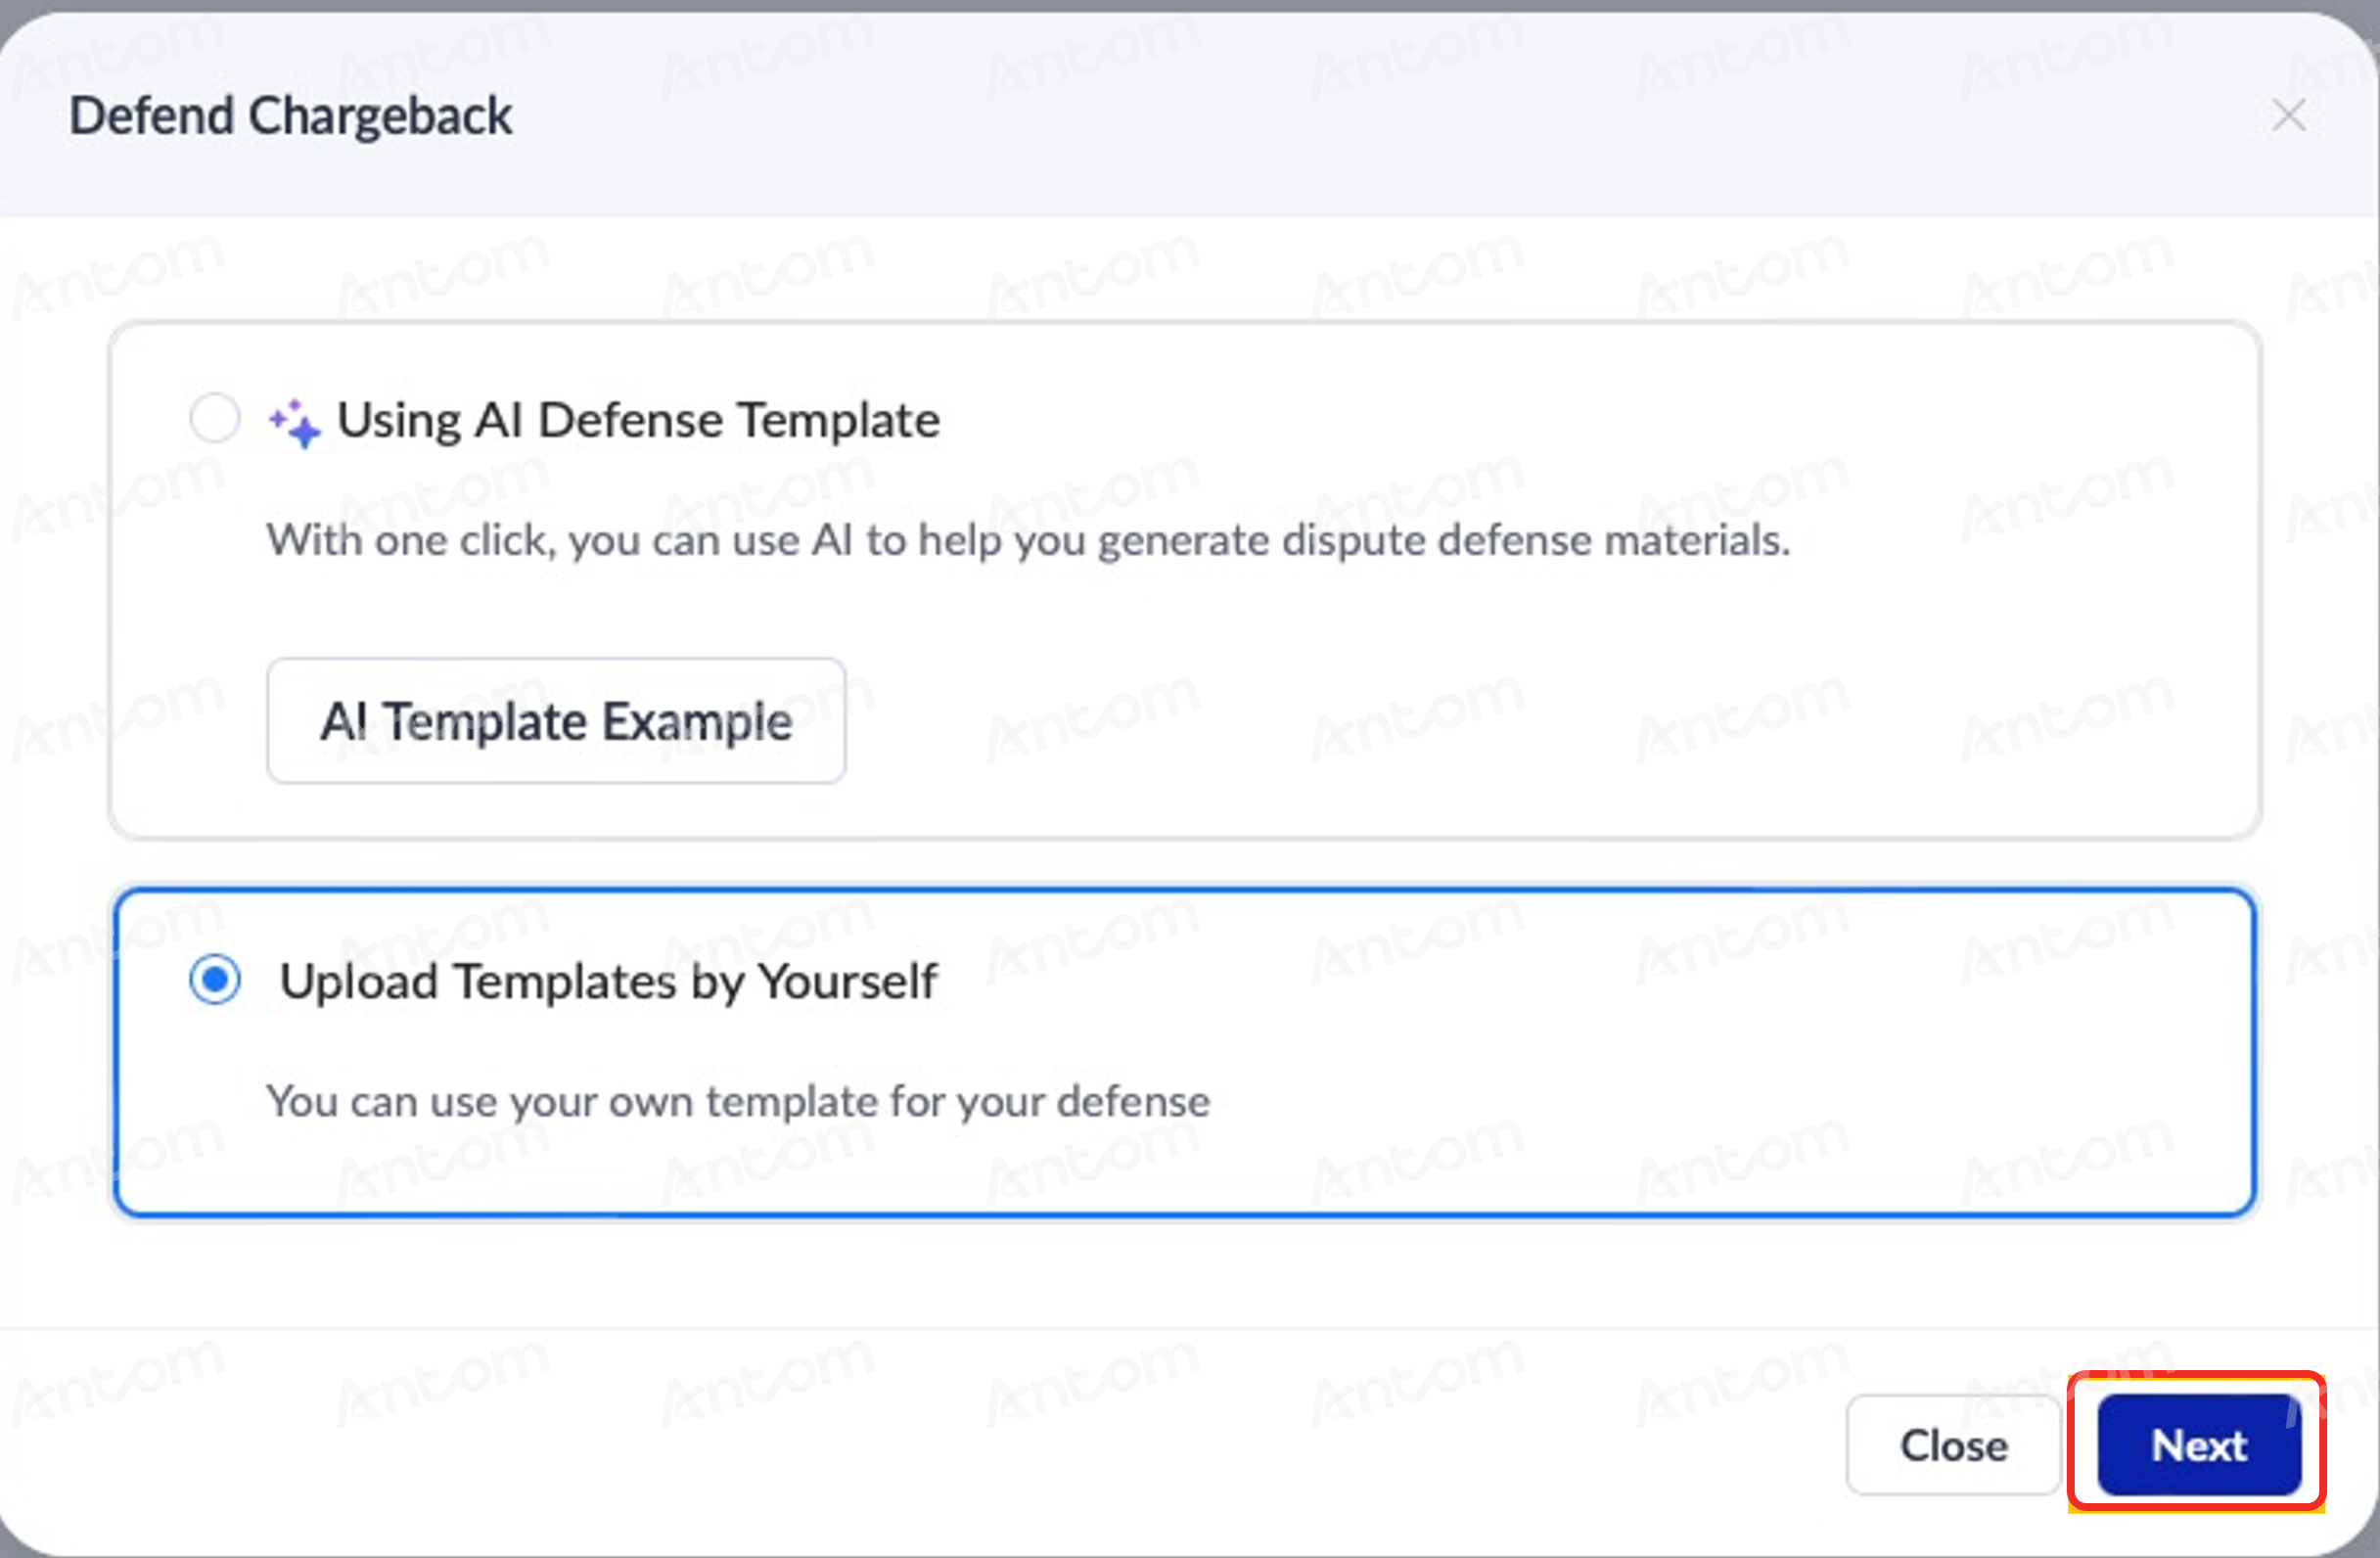
If you want to defend a chargeback manually, click Defend Chargeback on the dispute details page. On the Defend Chargeback pop-up window, use one of the following methods to submit the defense materials:
- Using AI Defense Template: Use the AI defense template to help you generate the dispute defense materials and submit it with one click for fraud chargeback case.
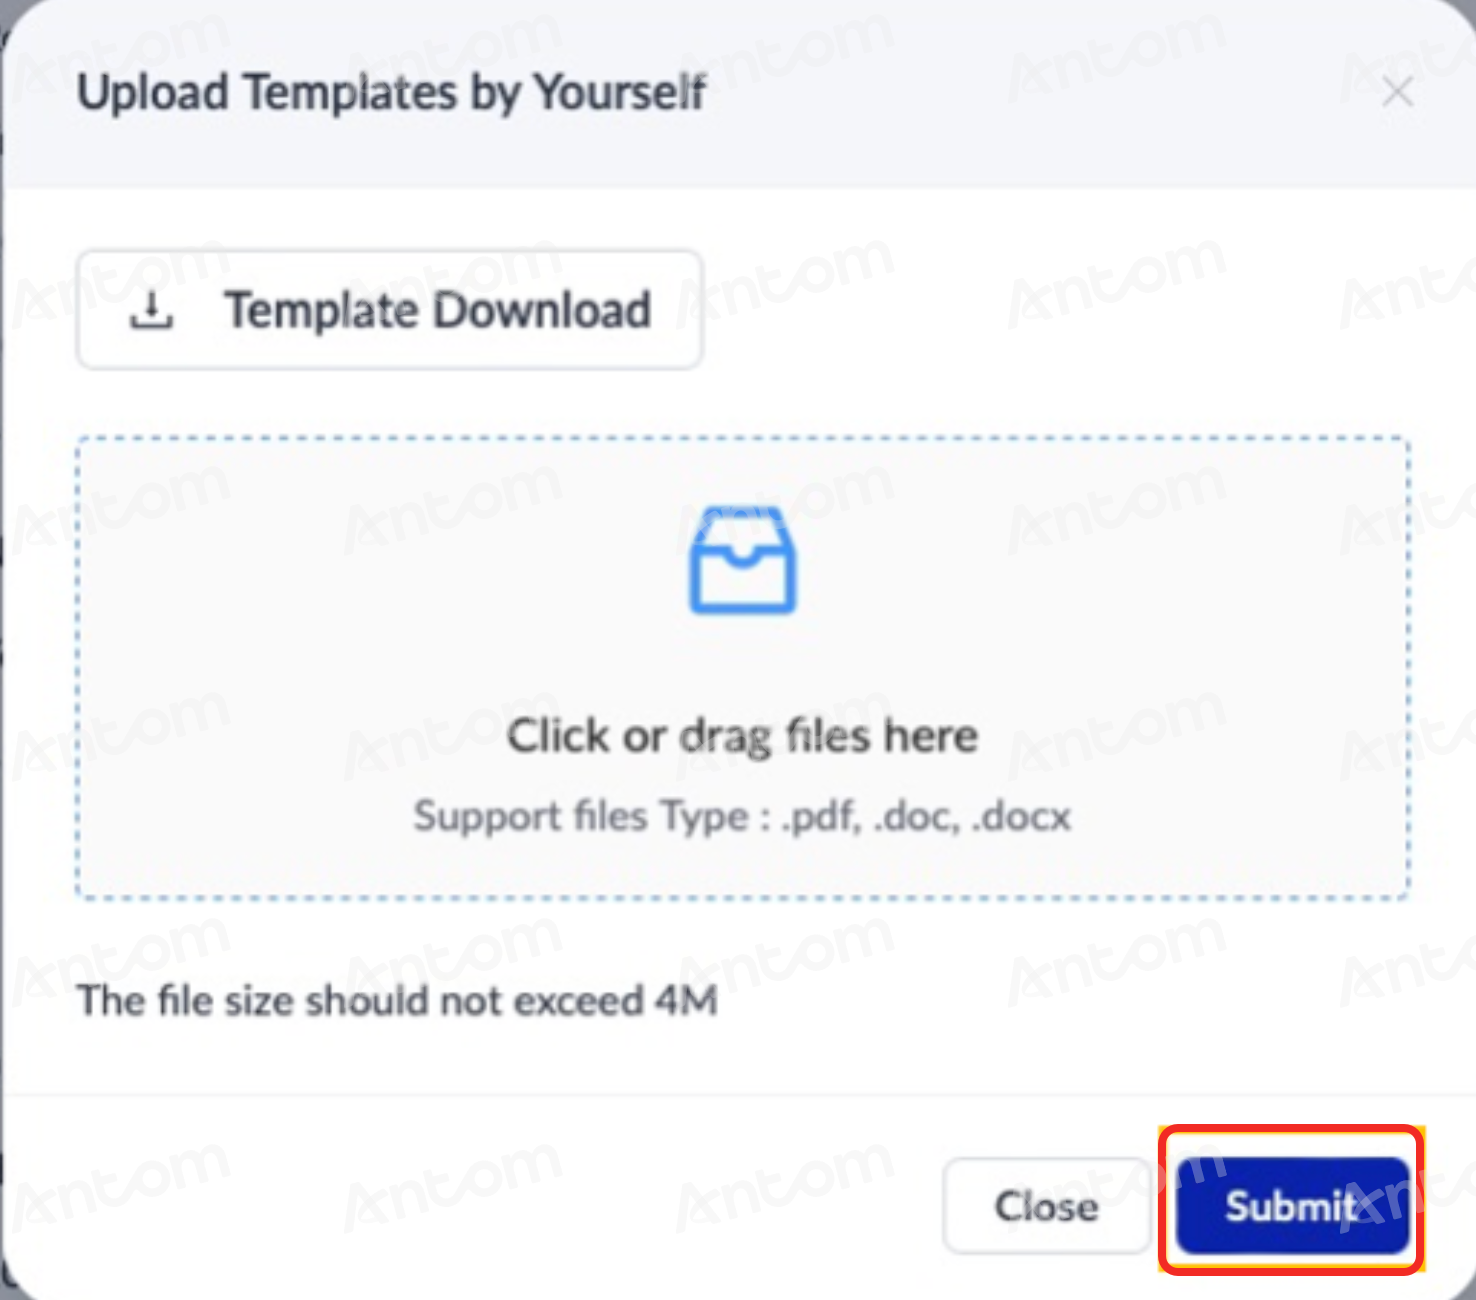
- Upload Templated by Yourself: Upload your own template for your defense, fill in the relevant information, and submit the defense materials. After selecting your preferred option, click Next to proceed. Click Template Download to get the template file. After filling in the defense material, upload the file. Click Submit to complete the process.
|
|
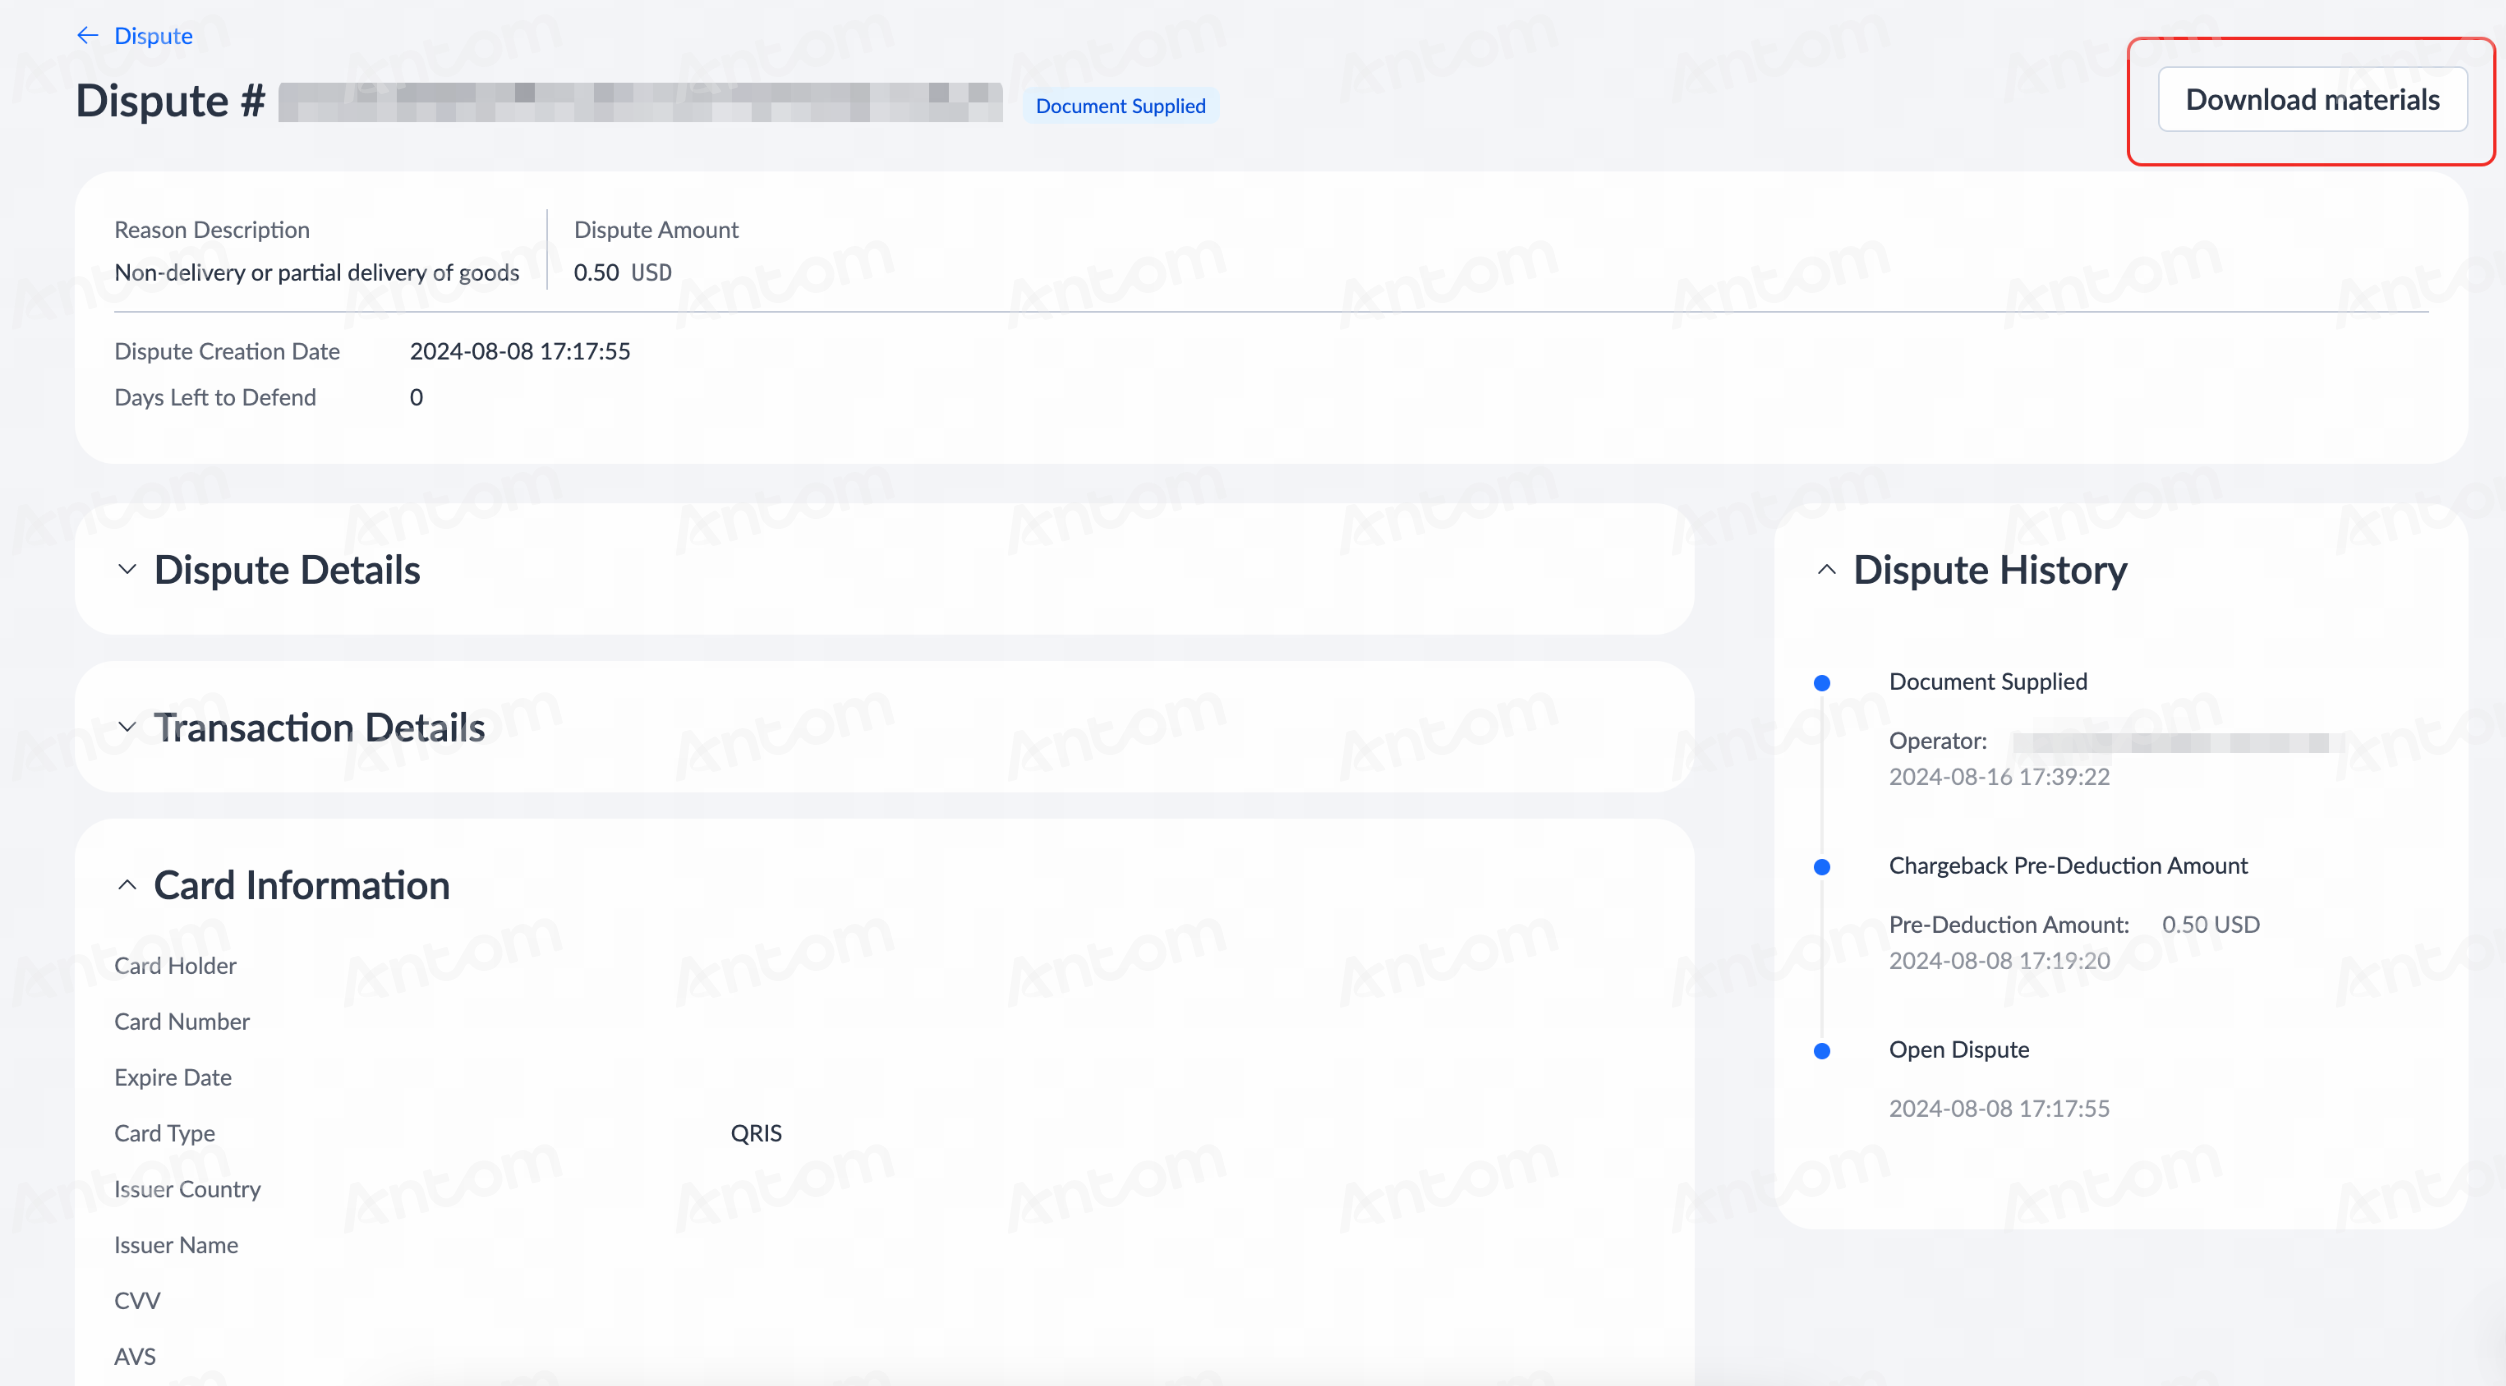
To ensure timely updates on the case progress, it is recommended that you log in to Antom Dashboard regularly to check the status of disputes and handle new disputes promptly. The dispute status will be updated promptly according to various situations, such as whether you have submitted materials, whether the case has expired, the case results, and more. Additionally, you can click Download materials to get the PDF file to check materials you have submitted at any time.
Antom Copilot chargeback defense
Antom Copilot chargeback AI assistant is primarily operated through Antom Dashboard, the specific process is as follows:
- When a dispute case involving goods or processing errors is ready for dispute, the
 icon will appear on the Dispute page. Click the icon to start the Antom Copilot.

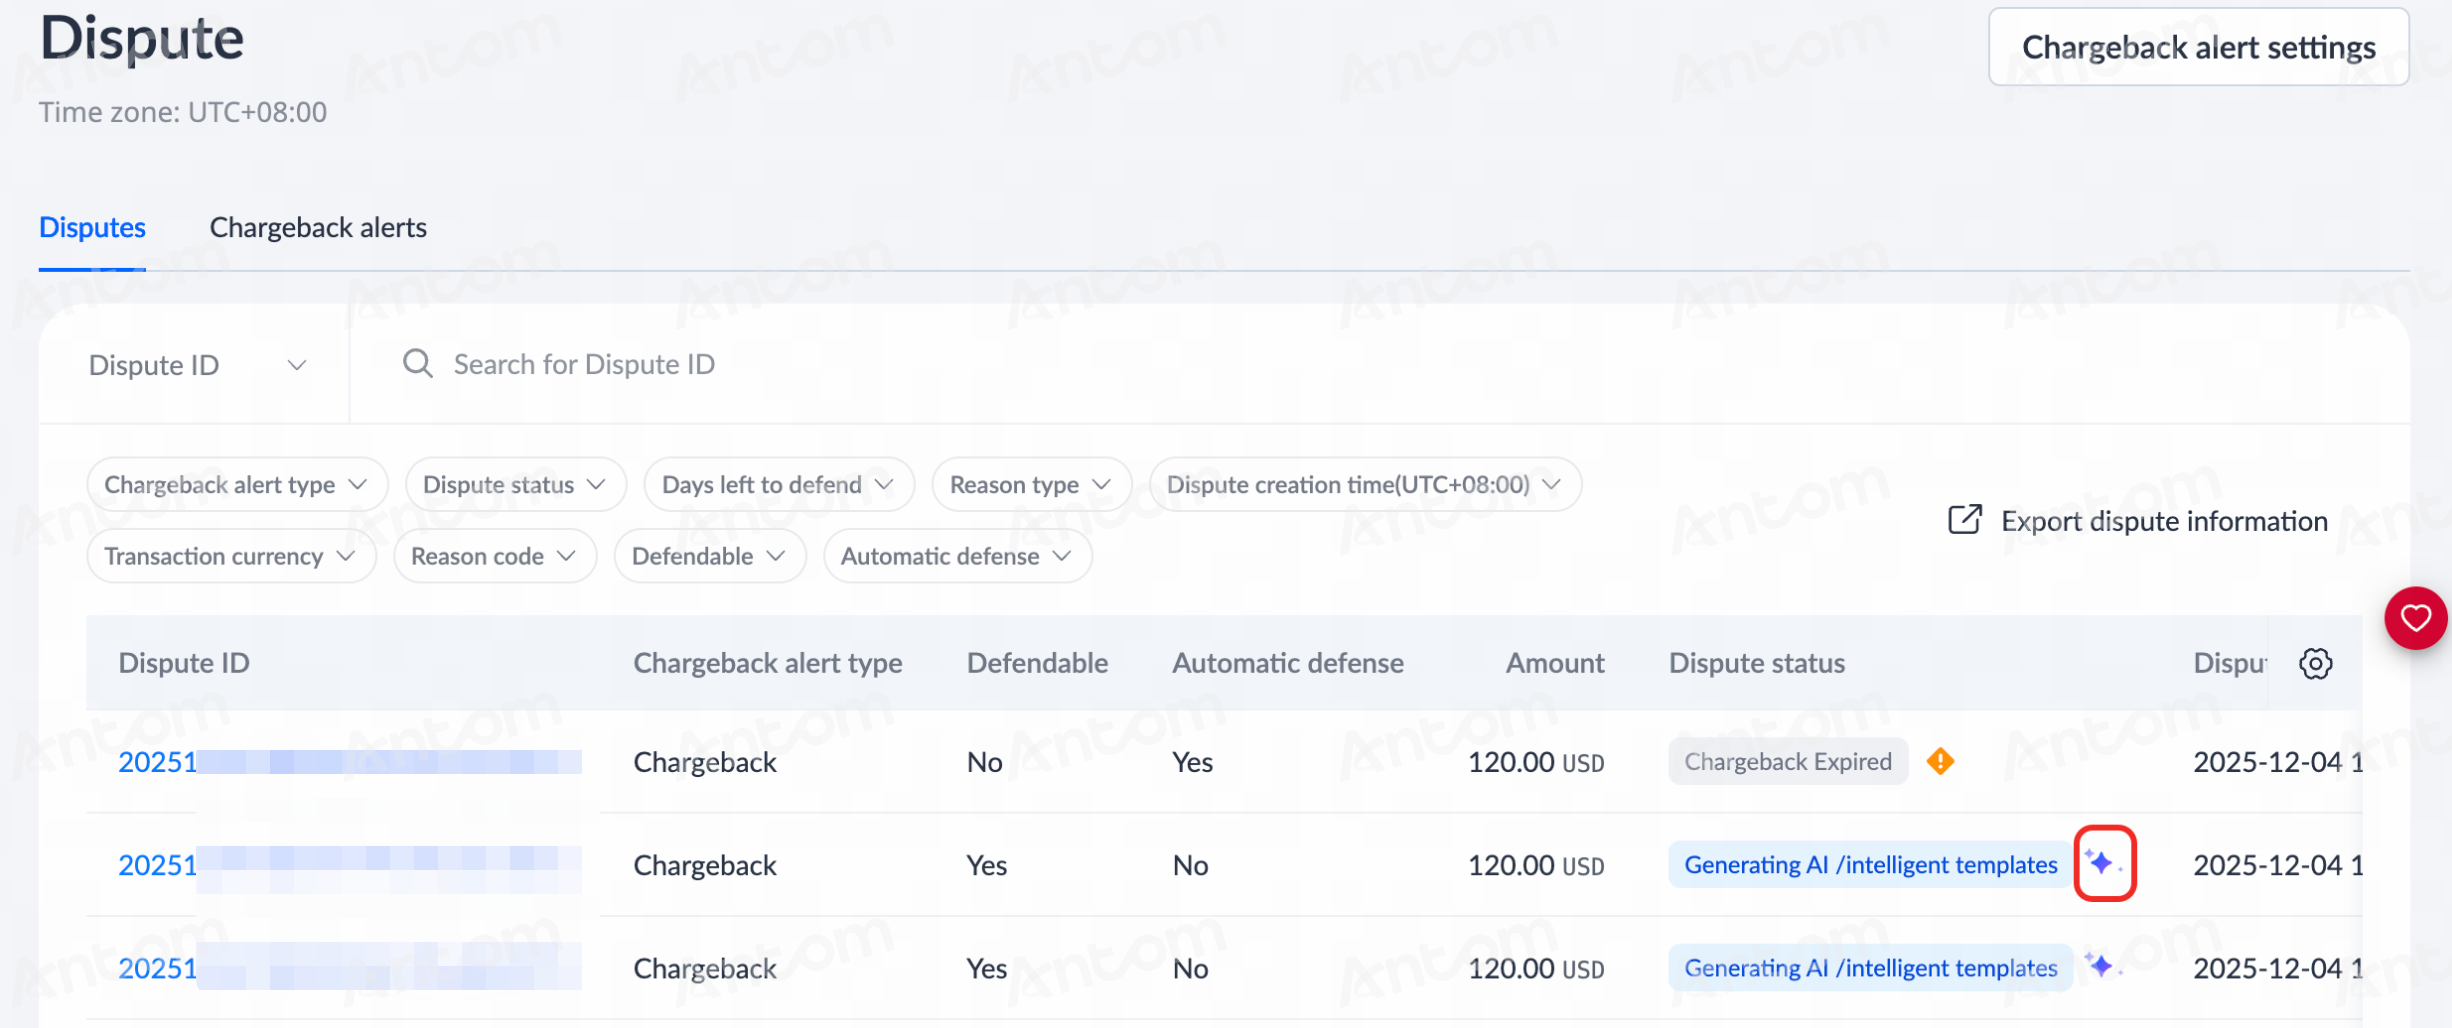
- Antom Copilot will analyze the case and automatically prepare the corresponding dispute materials. You can proceed by one of the following methods:
- Click Download the defense materials to download the defense template and save a copy. Complete or supplement the information as needed.
- Click Supply Evidences and the Upload and generate dispute defense materials pop-up window will appear. Upload additional supporting documents following the instructions. Once completed, click Generate defense materials to allow the Antom Copilot to assist in generating and finalizing the defense package.
|
|
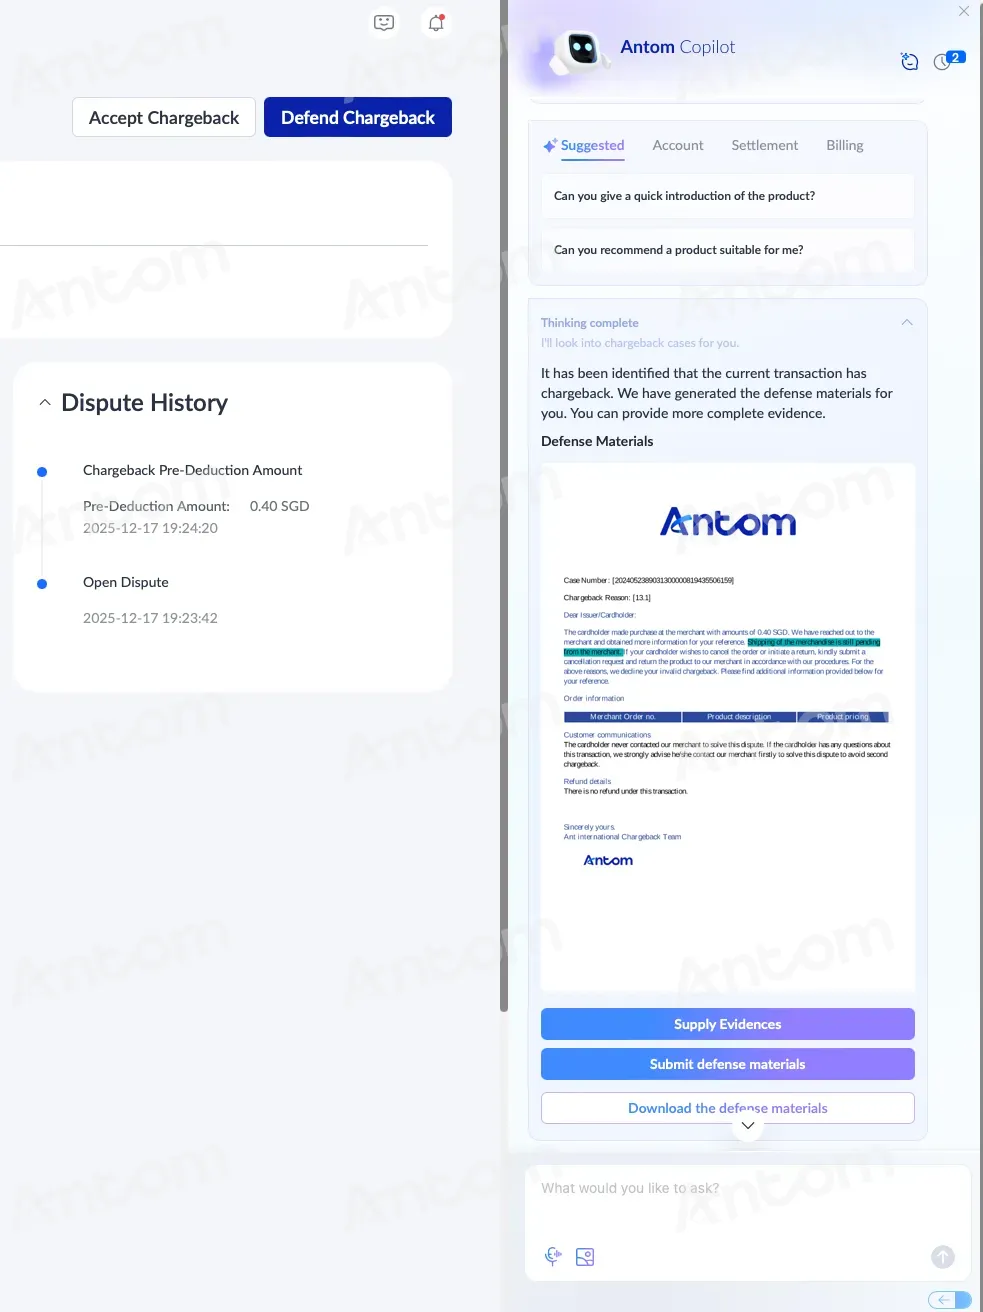
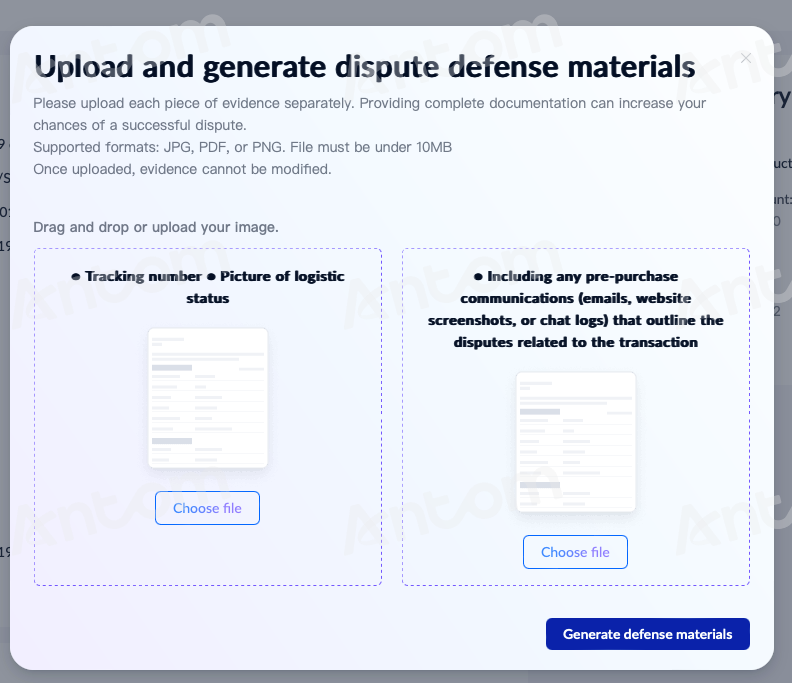
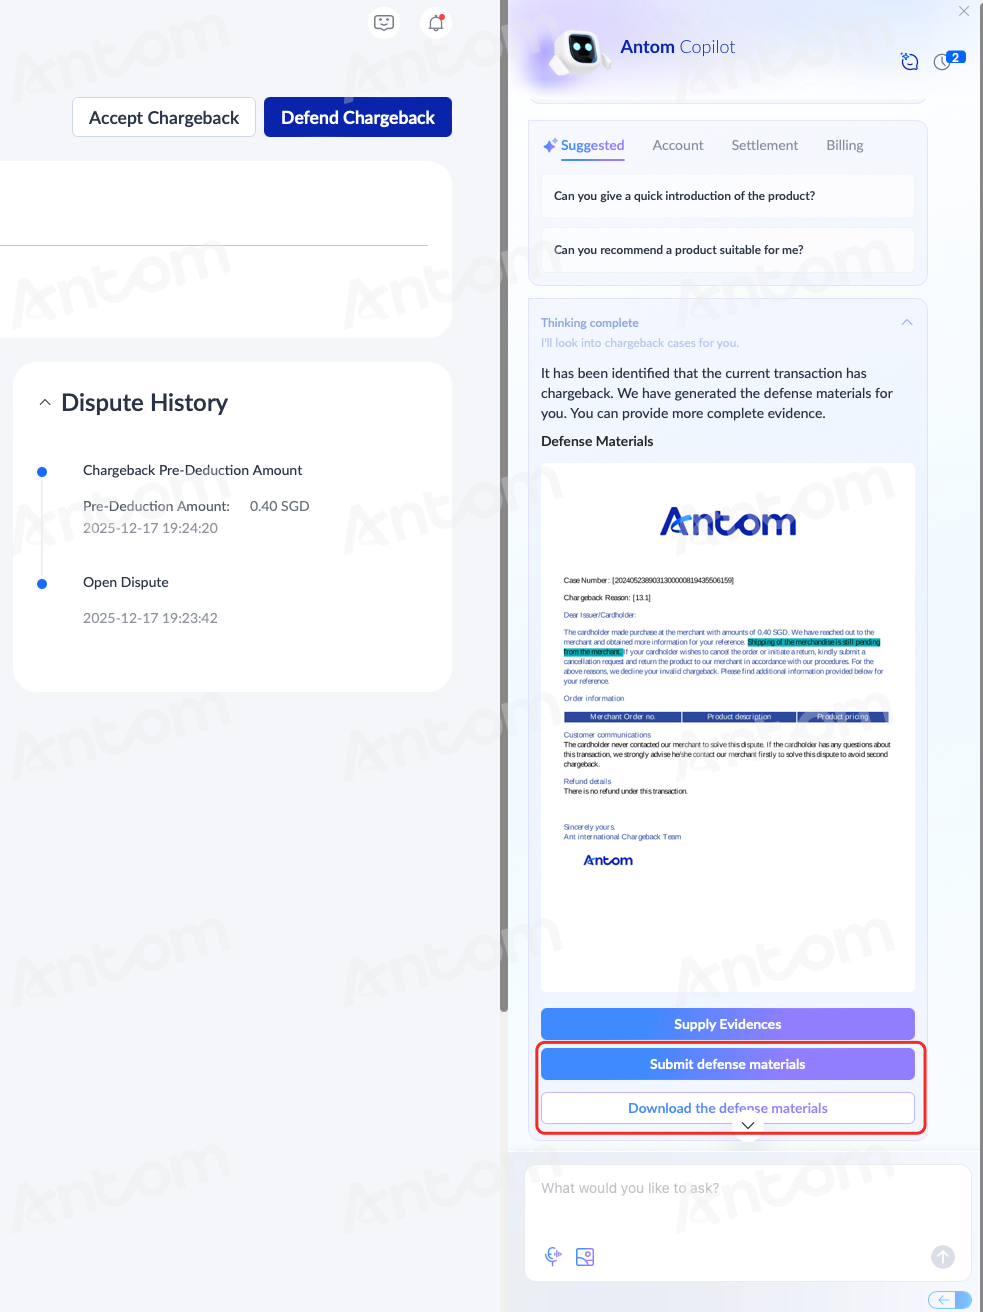
- After reviewing and confirming that everything is in order, click Submit defense materials to complete the submission. You can click Download the defense materials again to download and save a copy for your records or for further action if needed.
Set chargeback alerts
Antom Dashboard offers a Chargeback alert settings feature. You can configure the following settings:
RDR settings
Setting chargeback alerts can help initiate and set thresholds for Rapid Dispute Resolution (RDR). RDR automatically verifies and processes eligible refunds based on pre-configured merchant rules (such as refund thresholds) for chargeback cases, ultimately resolving them. Cases resolved by RDR are excluded from the card scheme monitoring program, helping to optimize operational costs and protect your brand reputation. For more information about the RDR, please refer to Rapid dispute resolution.
Take the following steps to configure RDR settings:
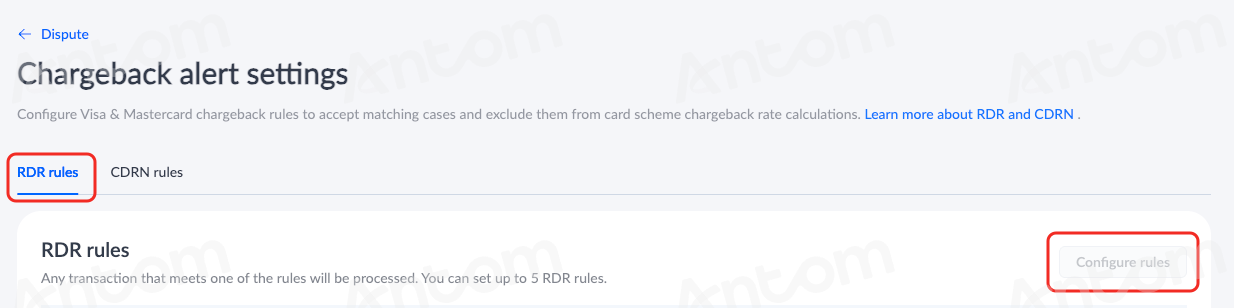
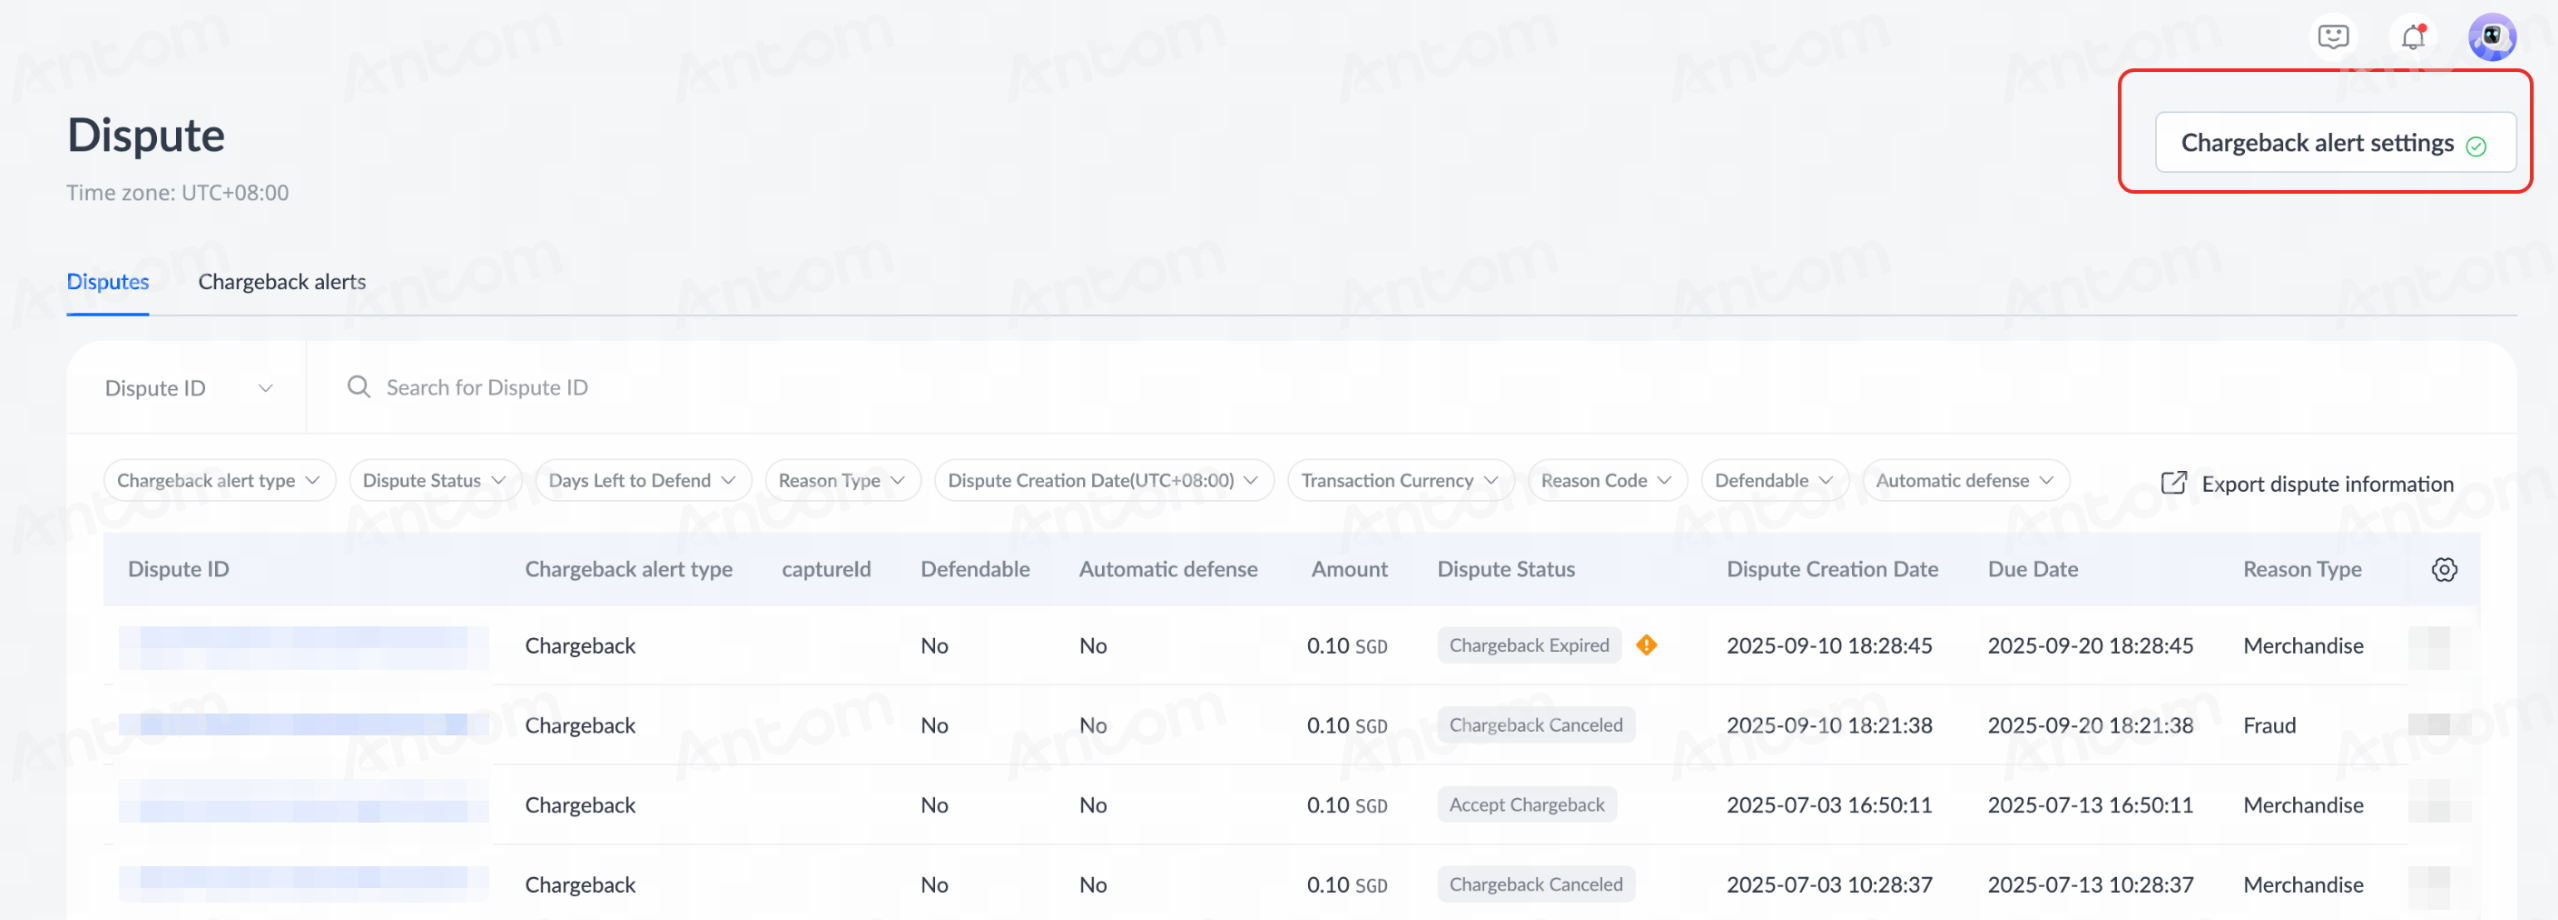
- On the Dispute page, click Chargeback alert settings in the top right to configure RDR rules.

- On the Chargebcak alert settings page, click RDR rules > Configure rules to configure the rules and threshold ranges.
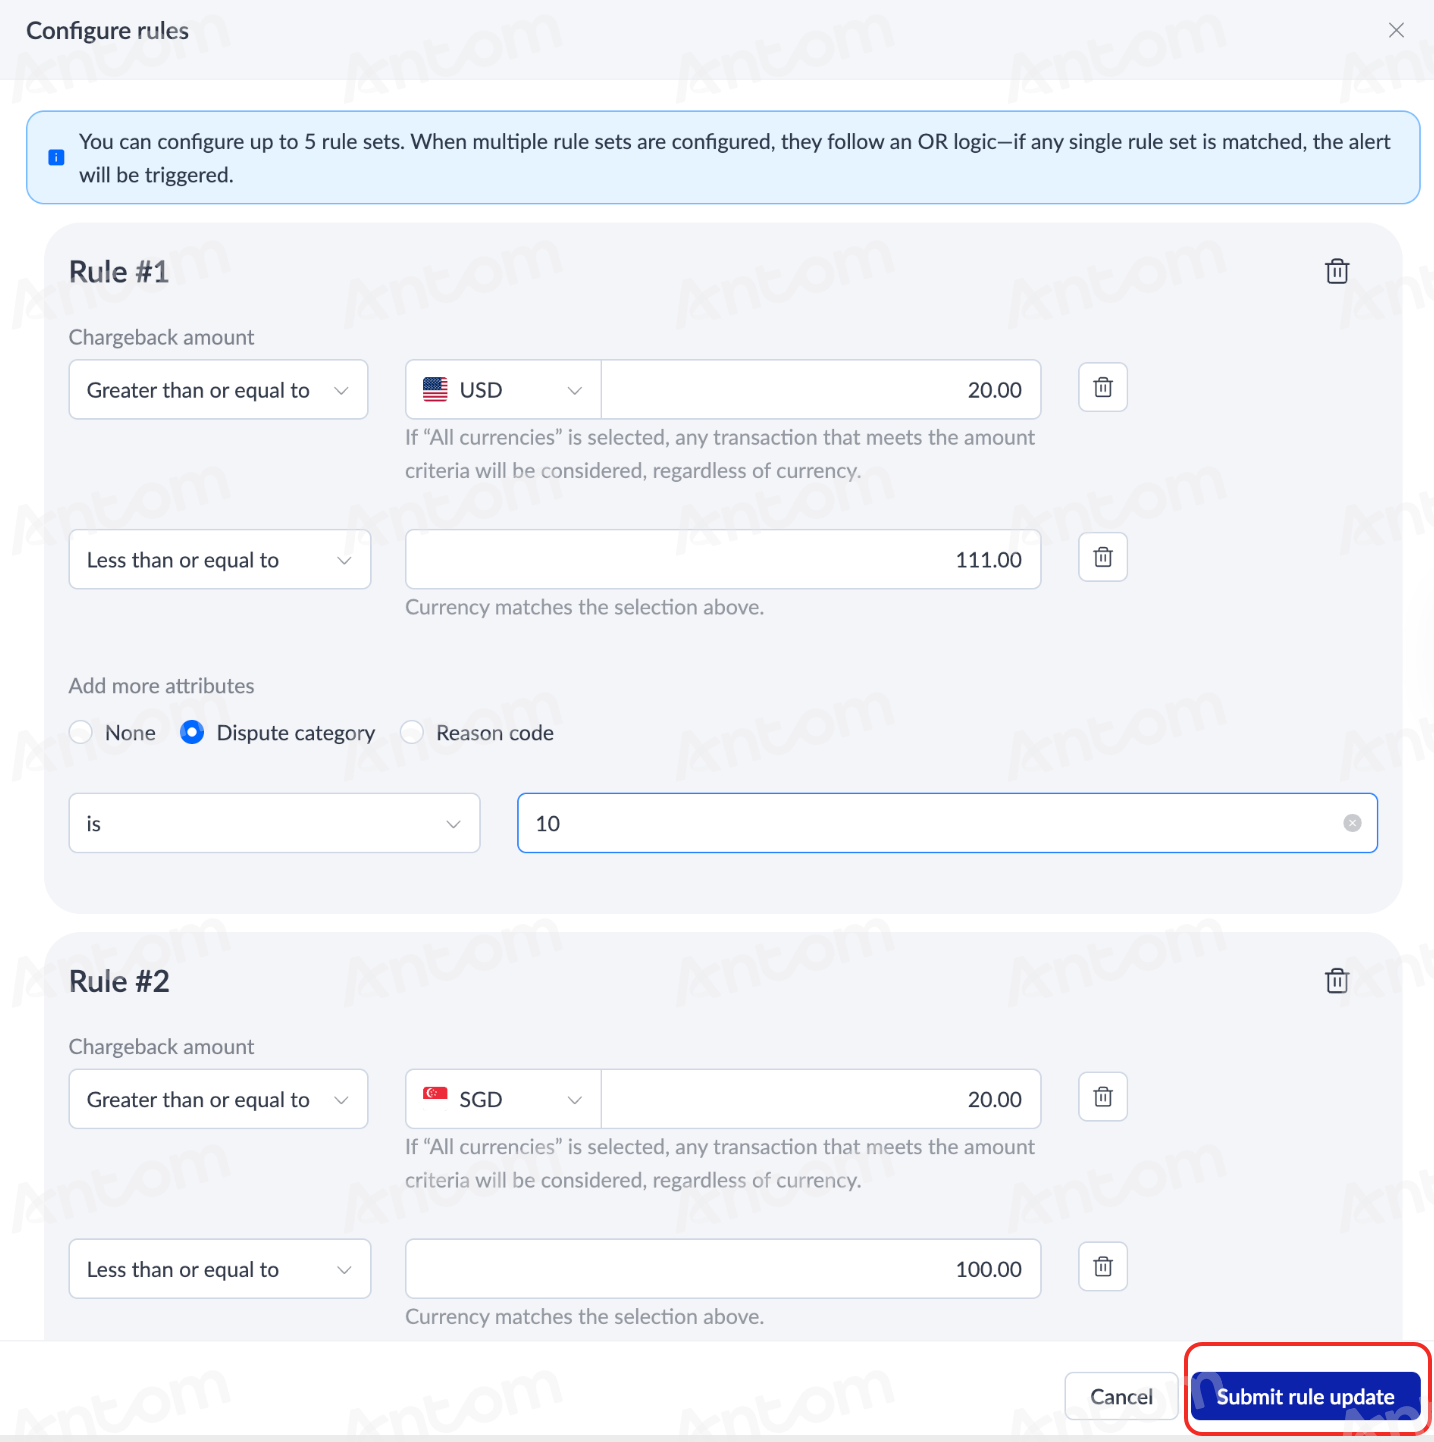
- On the Configure rules page, rules can be customized by different currencies, chargeback amounts, and other attributes. Up to five rule sets are supported. Once configured, click Submit rule update to complete the setup. Then a pop-up window will appear for confirmation. Click Confirm to proceed.
|
|
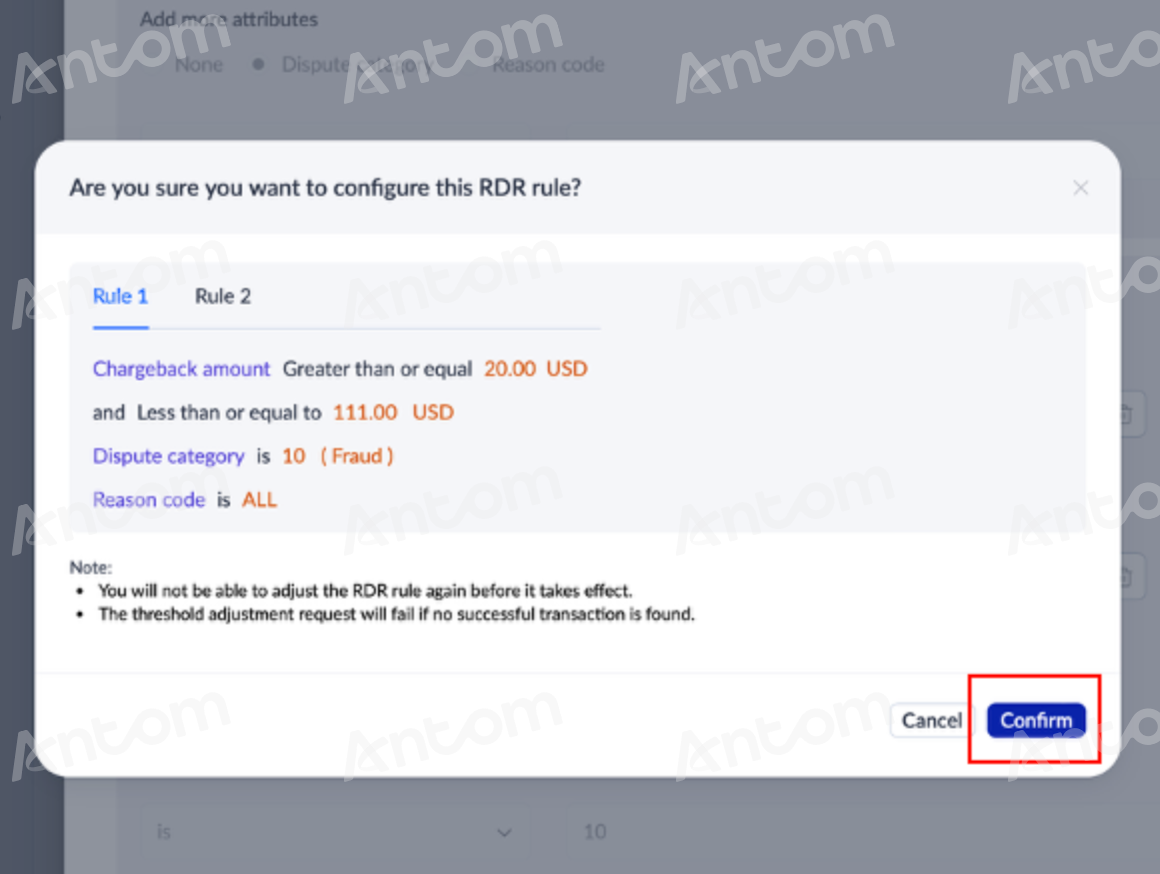
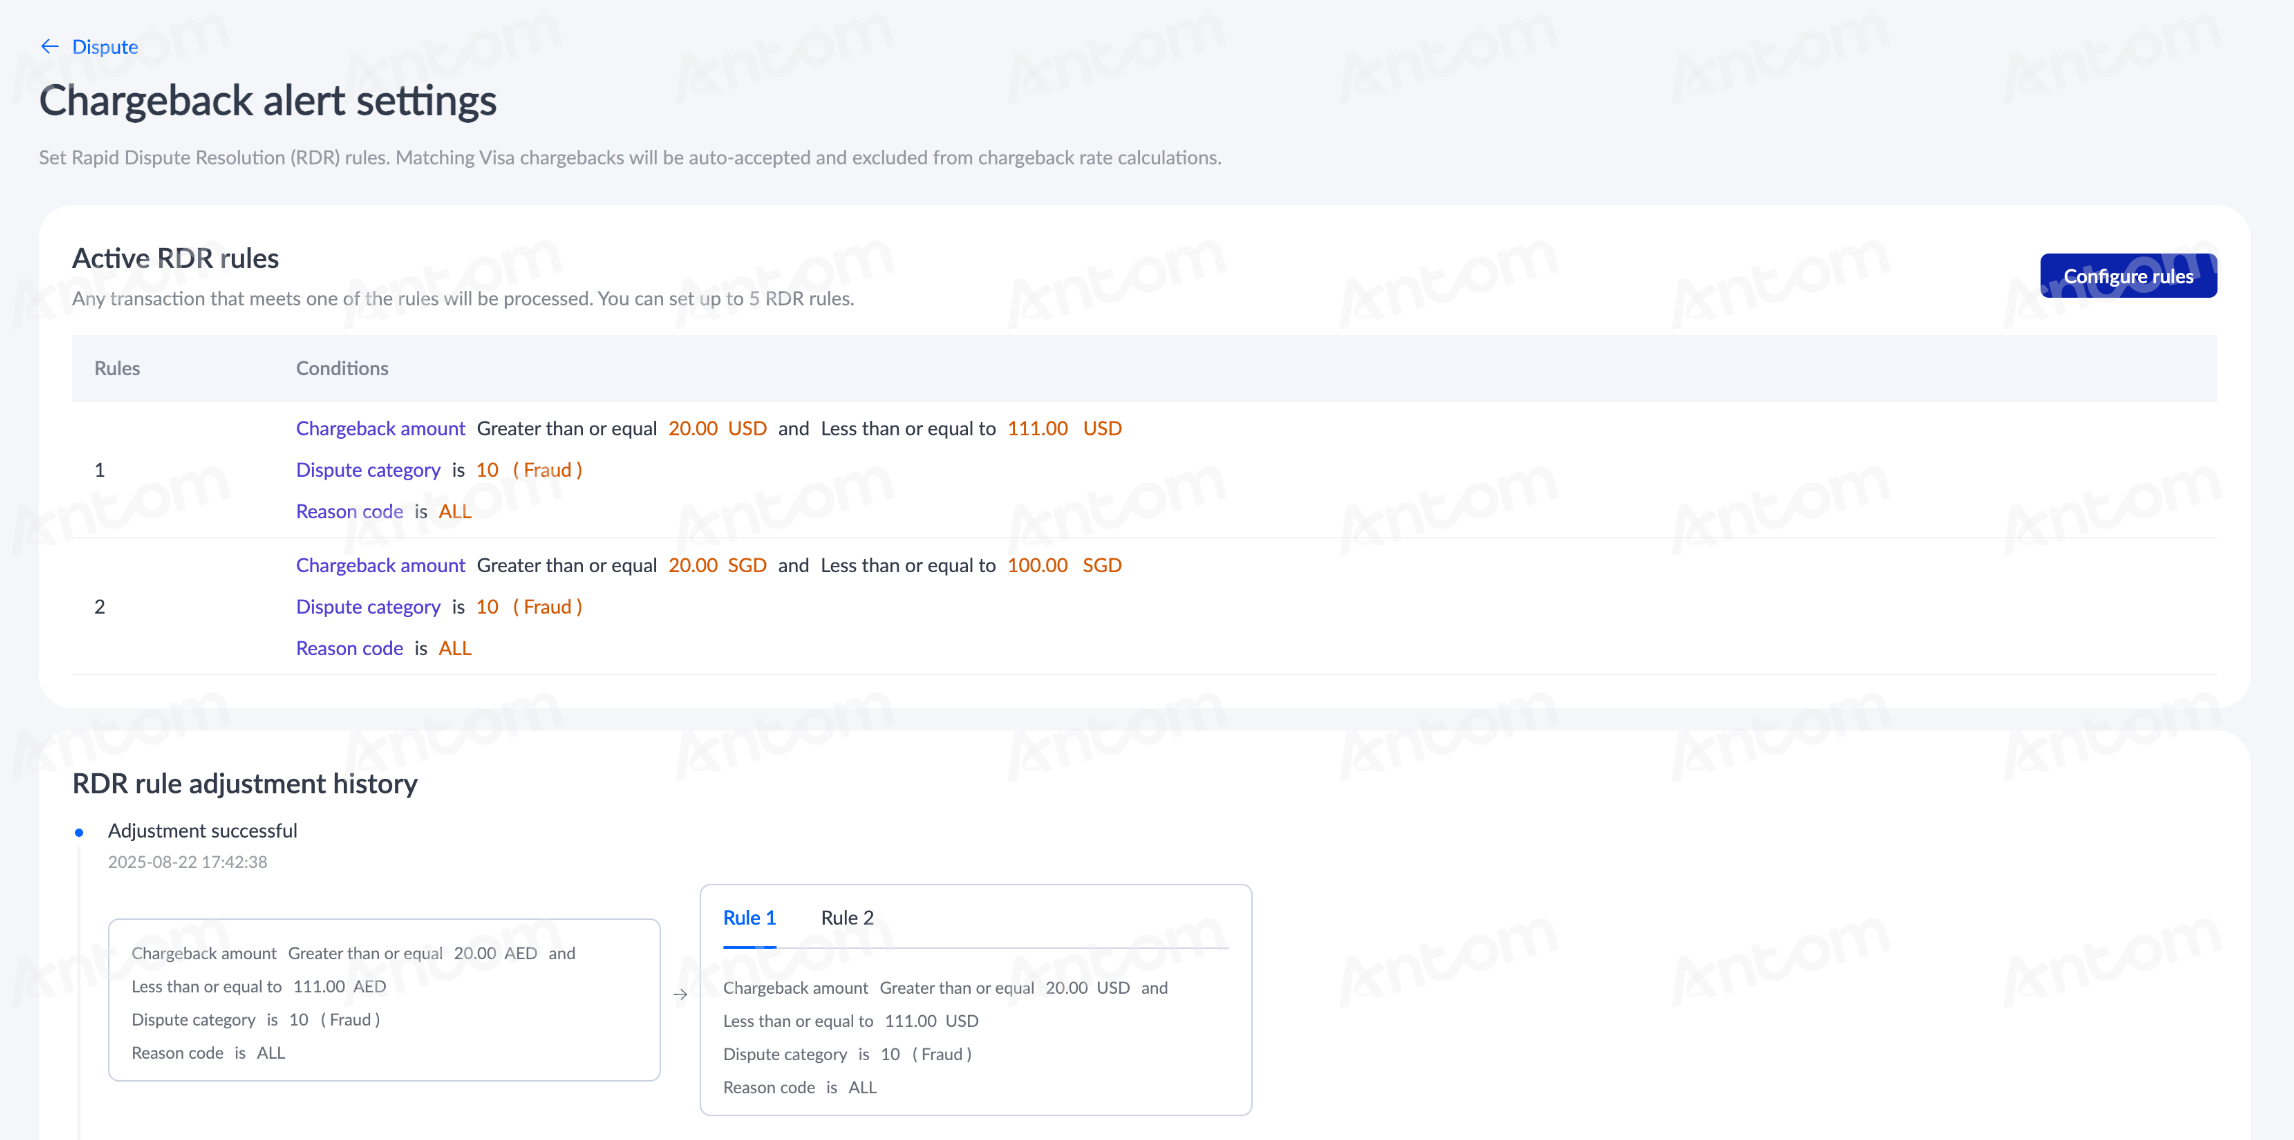
- After the configuration request is submitted, the system displays a prompt that the request is in progress. You can view the approval progress and adjustment history of the RDR rules on the Chargeback alert settings page.
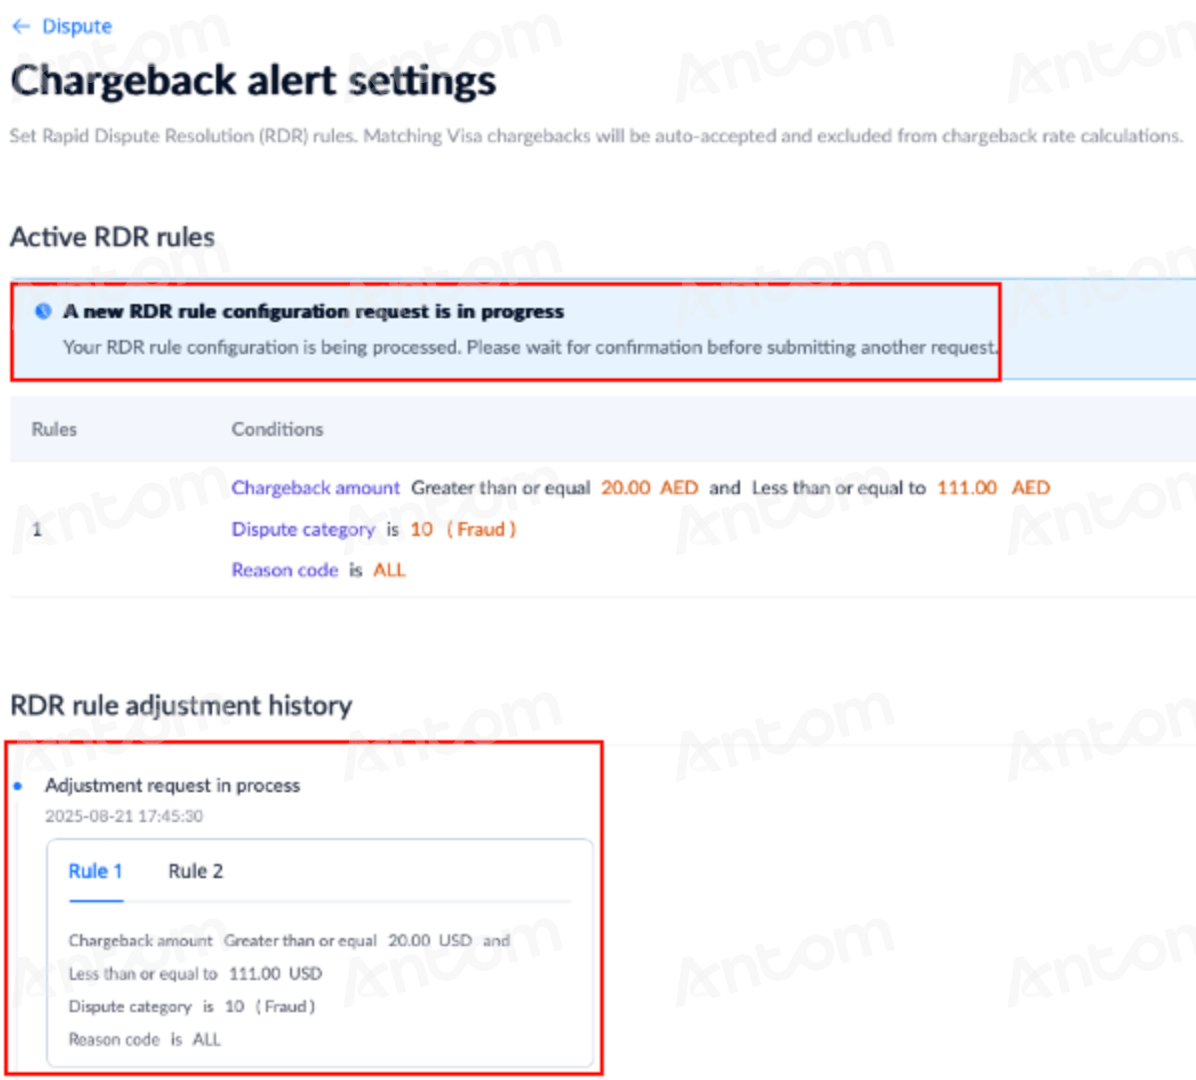
- After the request is approved, the Chargeback alert settings logo on the dispute page turns green to indicate that the configuration is complete. Click Chargeback alert settings to enter the details page to view the adjusted RDR rules and adjustment history.
|
|
CDRN settings
Setting chargeback alerts can also help configure the function of Cardholder Dispute Resolution Network (CDRN). CDRN provides merchants with an efficient early dispute resolution mechanism to significantly reduce chargebacks and safeguard account security and stability, and help avoid compliance risks with card brands. For more details about the CDRN, please refer to Cardholder dispute resolution network.
Take the following steps to configure CDRN settings:
- On the Dispute page, click Chargeback alert settings in the upper-right corner to configure CDRN rules.

- On the Chargeback alert settings page, click CDRN rules. You can view your CDRN feature status and click Mode settings to proceed with the configuration.
|
|


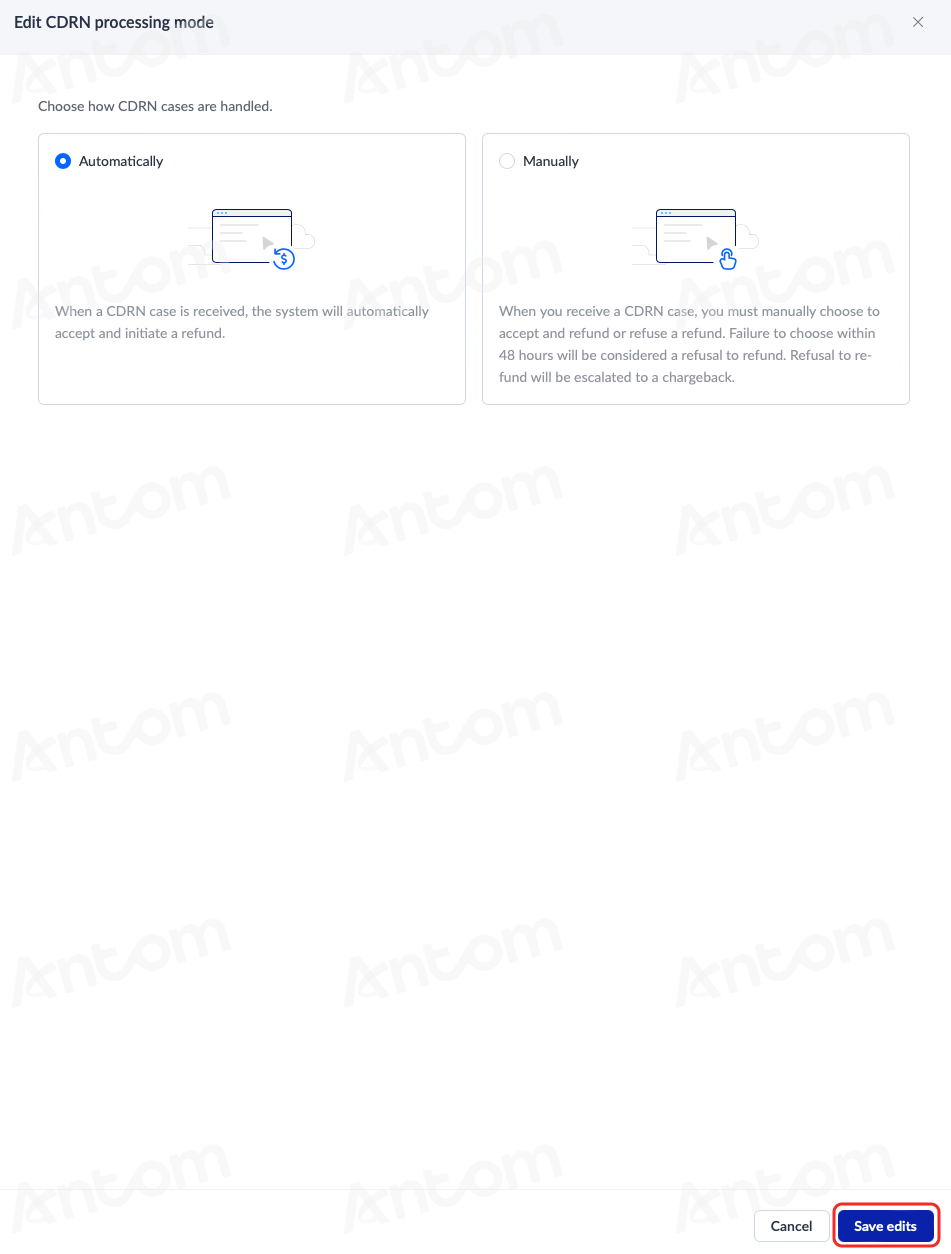
- After clicking Mode settings to enter the Edit CDRN processing mode page, you can choose either Automatically or Manually as needed. Click Save edits in the bottom-right corner to complete the setup.
Ethoca settings
Ethoca provides you with an efficient pre-dispute resolution mechanism, delivering alert notifications before consumers formally submit chargebacks — empowering you to proactively intervene and resolve disputes. For more information about Ethoca, refer to Ethoca Alerts.
Take the following steps to configure Ethoca settings:
- On the Dispute page, click Chargeback alert settings in the top right to configure Ethoca rules.
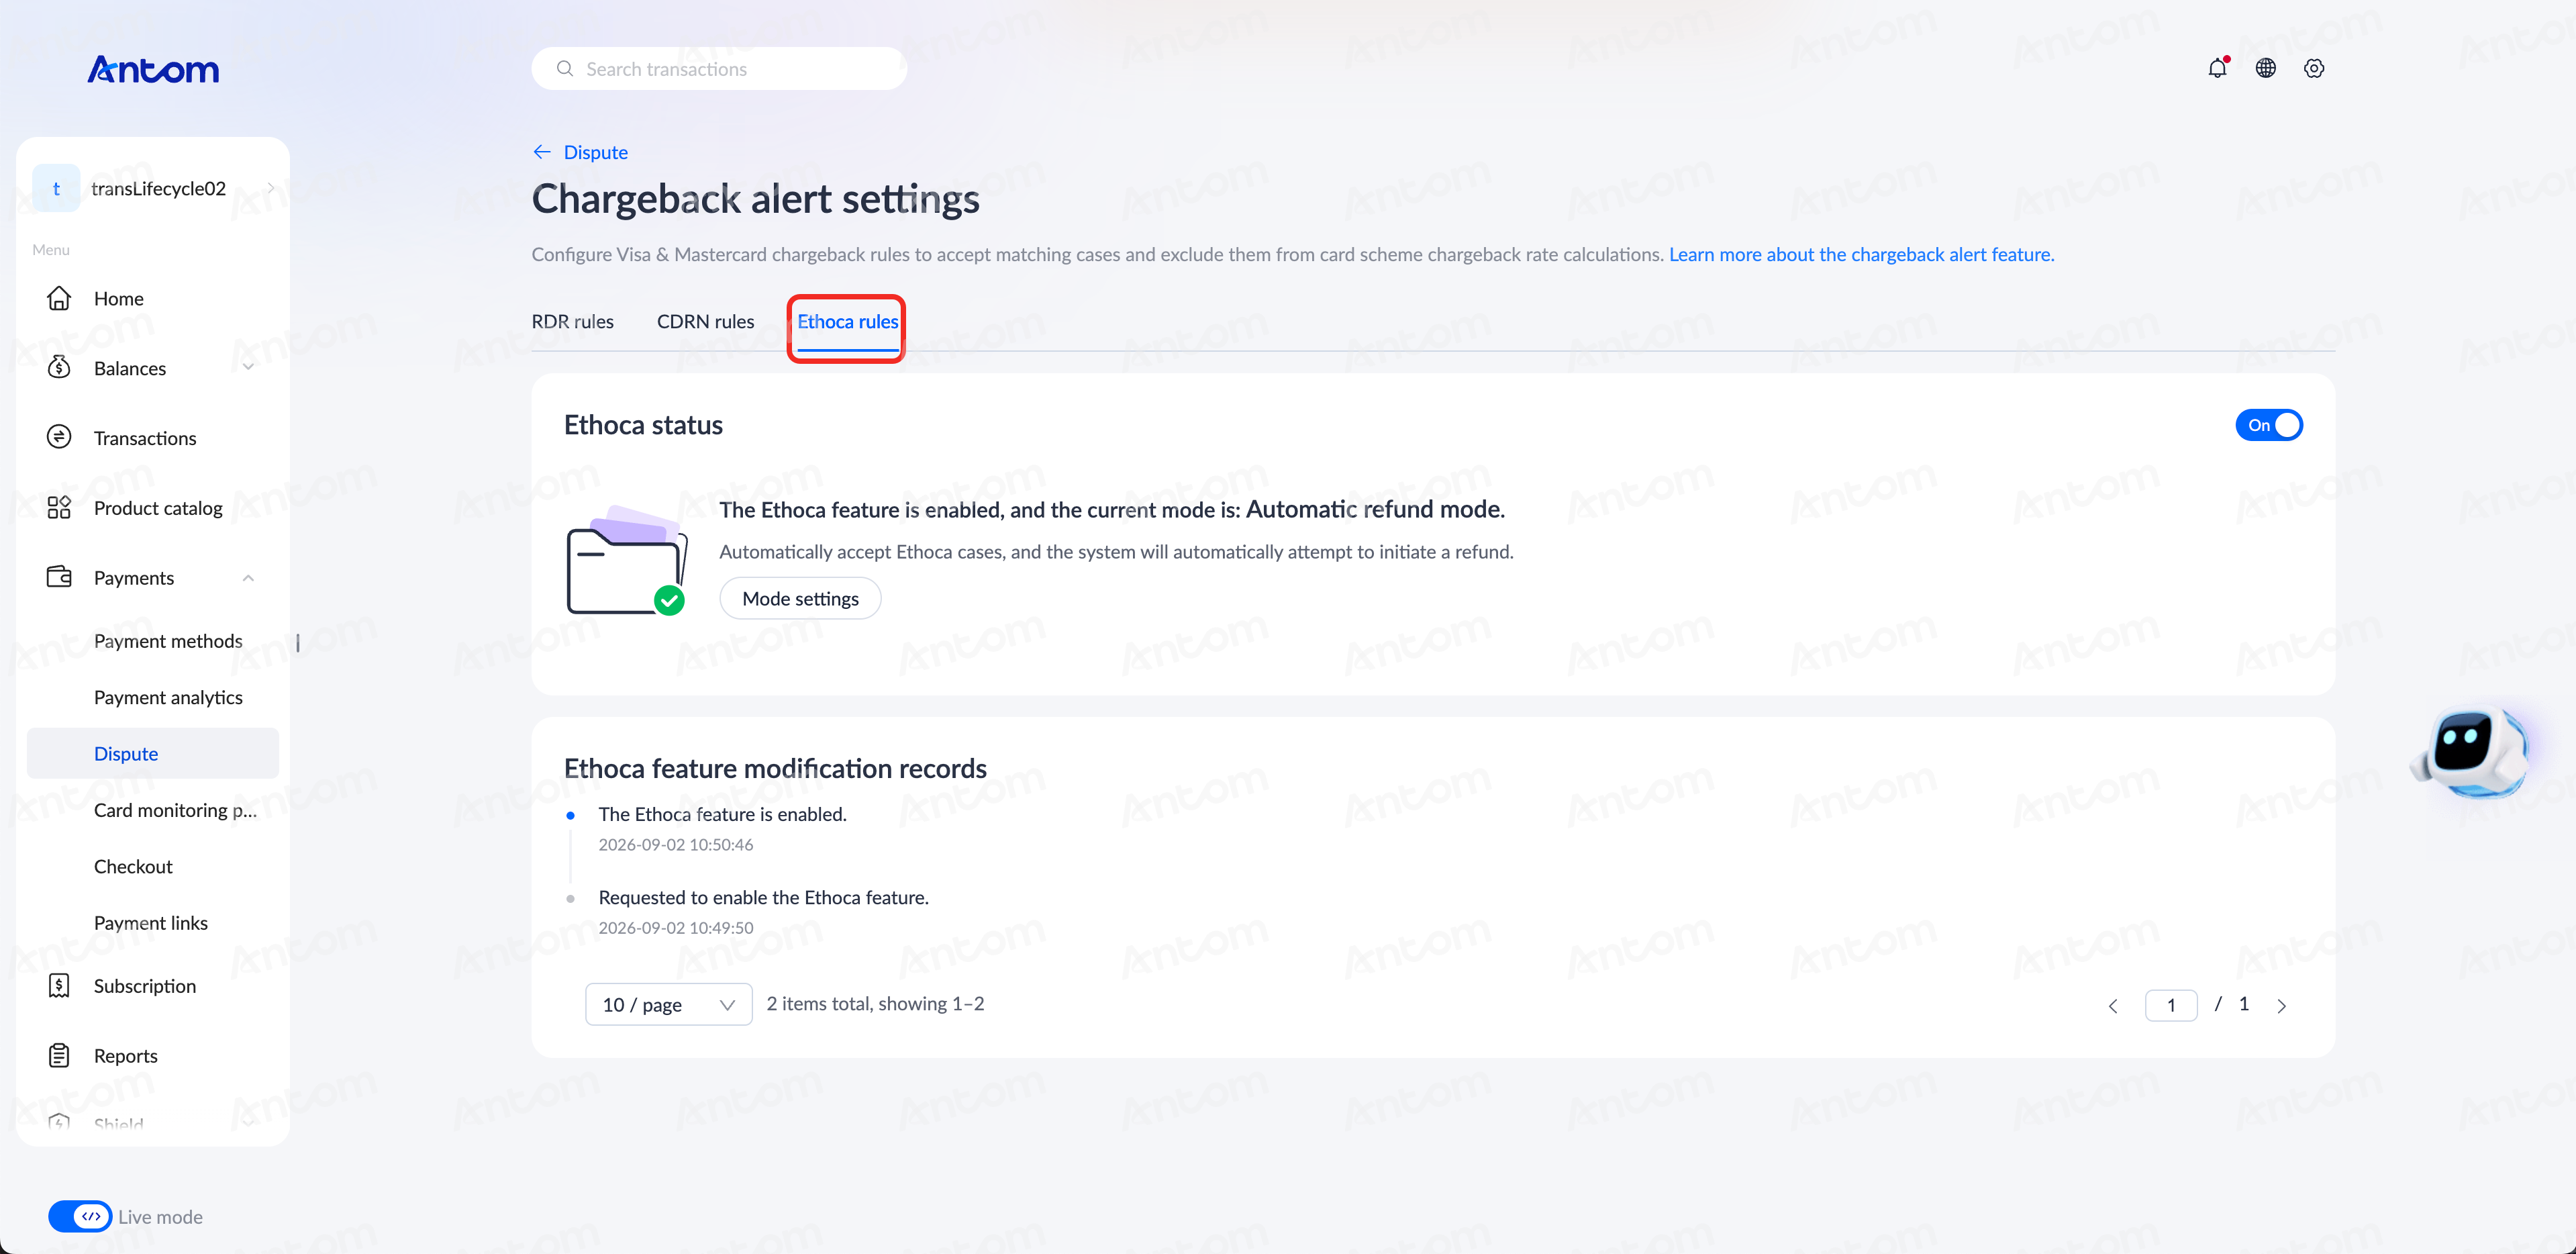
- On the Chargeback alert settings page, for first-time users, click Ethoca rules > Activate to activate the Ethoca feature, and select whether to handle cases in Automatically or Manually refund mode.

Note: Click Mode settings to configure the refund mode when needed.
- After submitting the configuration request, the system prompts that the request is in progress. You can view the approval progress and adjustment history of the Ethoca rules under Ethoca feature modification records on the Chargeback alert settings page.
Manage risk & dispute
View data in Card and Non-card modes
On the Risk & dispute management page, you can use filters to view data in card and non-card modes. You can switch Card and Non-card mode according to your needs. This change will affect the entire page.

Filter risk and dispute records
You can use filters such as Transaction creation time, Merchant account ID, Product code, and Payment method types to filter transactions. Click More filters to customize the options for the filter area.
Different modes support different customization options. Only the card mode supports Issuer country/region and Card brand filters. After filtering, click Reset all to clear previous filtering records.

View data details
The data displayed in card and non-card modes are different. The details are as follows:
Summary
The Card mode includes Disputes and Authorizations. In Non-card mode, only Authorizations is displayed. Click the switch button in the upper right corner to switch to the Amount and Count sections to view the corresponding data as needed.
|
|


NOCs & NOFs overview
This part is displayed in Card mode only, including two-part charts of rate and count. The data indicators are NOCs, NOFs, Fraud NOCs and Non-fraud NOCs. You can do the following in this area:
- Filter: Click the drop-down box in the upper right corner of the icon to change the data options displayed in the chart area. You can customize this area as needed.

- Data display: The chart area displays 4 parts of data indicators by default. Click the crosshair icon next to the color block to close other color blocks, click the crosshair icon again to cancel.

- Positioning: Hover the cursor over the time of the chart to view the specific data of the day. When the cursor slides to a specific time, the charts for other times will be grayed out.

Blocked and refused transactions
This chart is displayed in both Card and Non-card modes, including the Rate and Count charts, with the data indicators Refused by issuer and Blocked by risk. You can do the following in this area:
- Data display: The chart area displays 2 parts of data indicators by default. Click the crosshair icon next to the color block to close other color blocks, click the crosshair icon again to cancel.

- Positioning: Hover the cursor over the time of the chart to view the specific data of the day. When the cursor slides to a specific time, the charts for other times will be grayed out.

Risk performance
This chart is displayed in both Card and Non-card modes. Click the switch button in the upper right corner to switch to the Amount, Count and Ratio sections to view the corresponding data as needed. You can do the following in this area:
- Filter: This area supports two filtering functions:
- Click the drop-down box at the top left of the list to choose to display data for different options, which are the same as those in the filter area at the top of the page.
- In the data list, click the filter icon in the right column to apply this option as a global filter.

- Sorting: Click the sort icon on the list header to sort the list data in forward or reverse order.

Download data
On the Risk & dispute management page, you can download files under the current filter conditions.
Click the Download icon and choose to download one or two files as needed in the Download dashboard pop-up window. You can select the required condition type in the drop-down box, and the downloaded file will be the data under this filter condition.
Note: If you only download the Risk & dispute management file, you will not be able to filter.

After selecting the number of files and filtering conditions, click download file to complete.

Use common settings
On the Risk & dispute management page, you can do the following:
- Set the currency: Click Preferences in the upper right corner of the page. In the Preferences pop-up window, you can set the currency type for this page. After the setting is completed, the currency will be applied to all amount areas under the Data insight module.

- Share dashboard data: Click the Share icon at the top right of the page, and a link containing the current configuration conditions will appear in the Share dashboard pop-up window. Click Copy link to share your dashboard data.

- View definitions: Click the Learn more icon in the upper right corner of the page to view the definitions of terms contained in the current page.
|
|


You can also click the tip icon on each card in the Summary area, or the tip icon at the header of the Risk Performance list to view the corresponding explanation.
|
|

